The Galaxy Note 2 is the latest entry in the new category of device called “phablet” started by Samsung with the Galaxy Note. The super specs of this tech beast make it one of the most craved for devices in the world. This amazing hybrid gadget with a 5.55″ big display requires a big hand to hold it, a big pocket to afford it and, of course, a big heart to root it. If you are one of the proud owners of the Galaxy Note 2 and want to make the most out of your little assistant by further extending its power and performance, you would naturally have a desire to root it. While rooting is a plaything for some informed and adventurous folks, most people hesitate to do it due to the fear of losing manufacturer’s warranty or bricking their brand new device.
I am a veteran with the Samsung Galaxy Series of smartphones and can still remember how I shivered to my bones at the thought of rooting my first Android phone, the Galaxy S. But when I overcame my fear, I grew brave enough to root my SGS 2 and S3 on the very first day I bought them. I do not want to overrule the fact that the rooting procedure is risky. Yes, it is! but only when you fail to follow the method devised by the developers. If you carefully follow the rules/steps, you won’t encounter any problem.
Also Read:
Install Android 4.1.2 Jelly Bean Firmware on Samsung Galaxy Note 2 GT-N7100
Root Samsung Galaxy Note 2 GT-N7100 on Android 4.1.2 Jelly Bean Firmware
One might ask, “Why should I root my Note 2 when I am happy with it in its current unrooted state?” Well, if you are happy, keep sticking to it and go your way. But if you want to become happier and enjoy unofficial mods, themes, ROMs, apps, updates, performance tweaking and better battery performance, you can achieve all this by rooting your Galaxy Note 2. Thanks to XDA member Chenglu for his hard work on the ClockworkMod Recovery for the Note 2 without which rooting this device would not have been this easy.
In the present tutorial, I will tell you the easiest, most trusted and safest method to root your Galaxy Note 2 and install the ClockworkMod Recovery on it. Please, be noted that the method given here applies only to the Windows computer.
Preparations before Rooting:
You will need to do a few things before setting out to root your Note 2. Please, do not miss a single thing if you want to land safely.
- Your device must have more than 60% of battery power left. If not, plug in the charger.
- While your device is still charges, make sure that the Samsung USB driver is installed on your PC. If not, download it from here and install it. When it is installed, restart your PC.
- Now download the rooting package for your Galaxy Note 2 and save it the desktop of your computer.
- Though the rooting method described here does not affect the data stored on your device, it is just advisable that you create a manual backup of you contacts, messages, settings and other files to the external SD Card or computer. Backup your contacts, call-logs, messages, APNs, bookmarks, calendar, apps & games using these nice free apps.
- Open Settings on your device and enable USB Debugging: Settings>Developer Options> USB Debugging.
- You will also need the USB cable that came with your device.
Rooting Steps:
Your device should now be charged amply now and can proceed to do the steps needed to root your device.
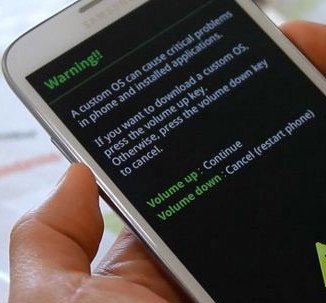
- Turn off your Galaxy Note 2 and enter the Download Mode on it. To do so, press and hold the Volume Down and Home (center) buttons together and then long press the Power key. This will take you to the a screen like shown below. Press the Volume Up key to proceed.

- Extract the GalaxyNote2Root.zip file and run the Odin3 v1.85.exe file. It will prompt a pop up window.
- Now connect you device to the computer via the USB cable.
- Wait for some time till the device drivers are installed and the Odin detects your device. When it does, you will see the ID:COM port yellow box with a different number value and the “Added !!” text in the Message box below. The change of number indicates that the device is connected properly.

- Do not dare play with any other thing on the Odin3 and click on the PDA button, browse to the cwm6-root-note2.tar file and select it.
- You are now just a click away from rooting your Note 2. Click on the Start button and wait till the Odin3 does its job.
- Just the Odin program finishes the CWM Recovery installation, you will see the ID:COM box turn green with PASS message.
- Your device will reboot automatically and it will be rooted with CWM Recovery and SuperUser app installed on it.
- If you want to make sure whether your devices is rooted properly or not, download the RootChecker app from the market and run it.
Got a rooted Galaxy Note 2 (GT 7100) with CWM installed and looking for a good custom ROM? We have shortlisted some of the best ROMs for your device. Just click the link below:
Best Custom ROMs for Samsung Galaxy Note 2 GT N7100
If you have any questions, doubts or problem regarding the rooting procedure, feel free to drop a comment.


does it work on 4.2.2 kitkat update with knox bootloader…although i haven’t installed the knox application..but still worried plz help.
Wow, I’ve rooted a few devices before, including the original note 1(which was a pain to root after ics install), this was by far the easiest one! thank you very much.
Nice to hear that you like the tutorial. Keep visiting and join us at Facebook or Twitter or Google+
does this work for the Verizon version aswell?
Hi Mac, if you try flashing any custom Recovery on your Verizon Note 2, your device might brick because the device has an Unlocked bootloader. I am afraid you will have to wait till we have a workaround for rooting.
Thanks this was my first rooting and everything went well.
Nice, enjoy!