Here’s how you can use Android device as PC for ADB and Fastboot. Learn how you can execute ADB and Fastboot command on Android phones and tablet devices.
ADB and Fastboot have become essential tools for every developer and advanced Android user nowadays. And without them, it’s impossible to perform any sort of development on your phone. One of the main advantages of using ADB or fastboot in you can install system updates, custom ROMs, boot images, custom kernel, and applications as well.
There are certain devices out there that don’t support the traditional custom recovery flashing methods instead you have to use ADB and Fastboot to flash the files. But let’s say that your PC isn’t working or maybe you are traveling and the PC available doesn’t have ADB/Fastboot installed. It would be a real dilemma.
This guide here will show you how to install ADB and Fastboot on any Android smartphone or tablet, so can perform all the activities you would on your PC.
You may think that we can use ADB and fastboot binary files for Linux on our Android devices. No. We can’t use them because those files are not compiled for ARM. Thanks to Google, ADB has been compiled for ARM. This file is already included in some new devices. (Search “adb” in /system/bin or /system/xbin folder.
Preparations and Downloads
Before you can use your Android phone or tablet device as a PC for running and executing ADB and Fastboot commands, you will require a few things
- A rooted Android phone or tablet.
- OTG cable – Make sure that your device supports OTG. (If not then search how to enable it on your device).
- A root browser or explorer app ( e.g:- Root Explorer, ES file explorer).
- Download the Terminal Emulator app from the Play Store.
- Download ADB and Fastboot for Android: ADB-SDK-Platform-Tools.zip
Don’t Miss: List of ADB and Fastboot Commands for Android
Use Android Device as PC for ADB and Fastboot
Step 1: Extract the downloaded Platform-Tools.zip file and, copy the contents of the folder to /system/bin folder using a root explorer.
Step 2: Install Terminal Emulator app on your device, launch the app and type the following commands in sequence:
su
mount -o remount,rw /system
chmod 755 /system/bin/fastboot
chmod 755 /system/bin/adb
Step 3: Restart your phone after it’s done and your device will now have ADB and Fastboot installed.
Step 4: Once your device restarts, open up the terminal again and type
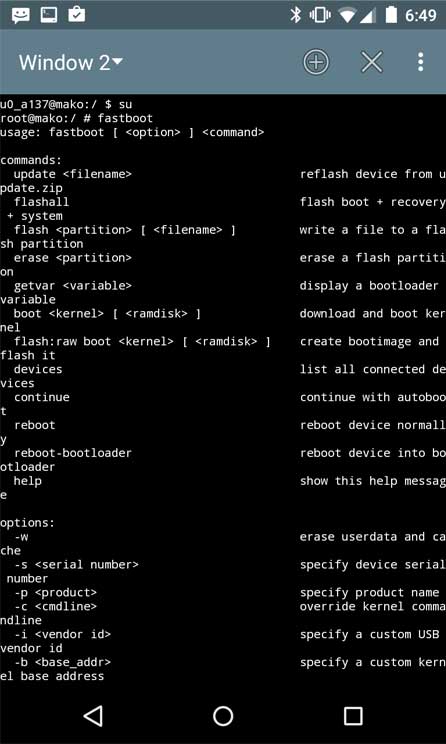
fastboot
Step 5: If you get a reply like this:

It means that Fastboot is working.
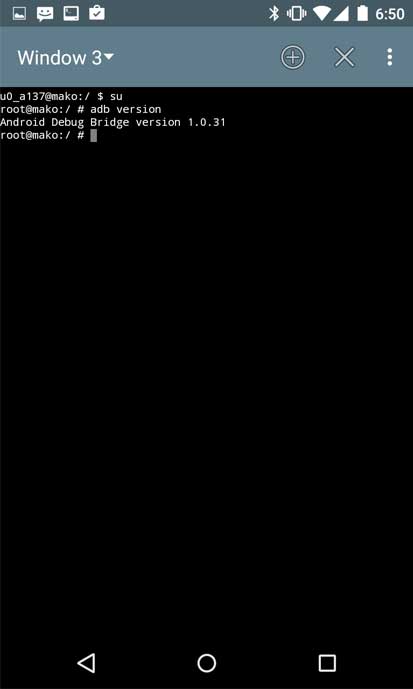
Step 6: Next to check ADB, just type “ADB version” and if you get a reply like this:

It means ADB is also working. And that’s it! You can now connect another device using the OTG cable and try out different ADB and fastboot commands.
For any more queries, feel free to ask us in the comments section below.


cannot locate symbol bio_f_base64
pff, THERE IS NO DOWNLOAD
it gives links to windows/mac/linux ONLY, plus a link back to THIS VERY TUTORIAL in case I want to get one for android…
there is no builtin adb on this phone and nobody bothers to give any binaries, and I bet they’d be for wrong architecture too…
Hi Mr. J, sorry for the inconvenience! I agree that the steps were not clear enough so I just updated them. Please, read again and let me know.
For some reasons I can’t download adb and fastboot from those Dev-Host links… Could it be possible to update them? Thanks
Hi,we have updated the file link. You can download it now.
Just tried to install fastboot and adb on my android nexus 4 but it won’t recognise it no matter what way I do it???/plz help
cannot link executable:cannot locate symbol “BIO_f_base64” referenced by “adb”
the most important part they left out is its a binary file, you need to go back to the system bin folder using your root explorer and rename it to fastboot, delete the .exe they put at the end. its just there to deter idiots from downloading it and trying to use it improperly.