The ability to use your Android device as a Wi-Fi hotspot can be a very useful feature. This feature of the Android devices has more to offer than just portability. With just a few clicks one can share his data connection with his friends, family or anyone else. This feature can be very useful while traveling, gaming, music sharing, streaming and what not. The cool stuff about this is that it can also be password protected with some advanced security methods such as WPA2 PSK. If you had encountered across this post then you must be facing a problem in setting up your portable Wi-Fi hotspot. Here’s how to use your Android device as WiFi hotspot router.
So without any delay, Let’s get started!!
Turning on Portable Wi-Fi Hotspot on Android
- Look for Settings in the app drawer and click to open it.
- Then, navigate to Settings> More> Tethering & portable hotspot.
- There you will see an option Portable Wi-Fi hotspot.
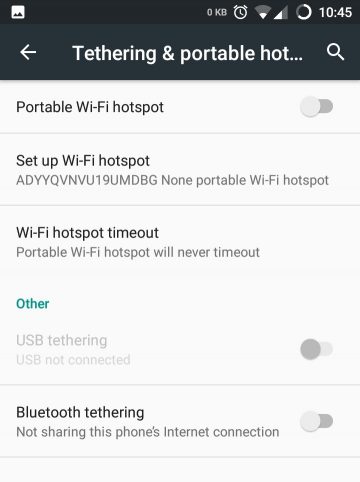
- Click the option to turn it on (This will activate the hotspot with the default settings).
Your portable Wi-Fi hotspot is activated. Now, it isn’t over yet. The hotspot has been activated with default settings which in general case means that it isn’t password protected. This might be a problem because people other than yourself and your friends will be able to connect to your portable hotspot without any authentication. This may result is slower internet speeds and high data charges. Don’t worry there is a solution for this. To avoid the above-mentioned problem we will have to set up some security measures to prevent the thieves from hacking into your safe.
Setting Up Wi-Fi Hotspot
- Follow the steps 1 to 3 from turning on the portable Wi-Fi hotspot (Don’t turn it on yet).
- Then, click on Set up Wi-Fi hotspot.
- There you will find it divided into three rows (Network name, Security, Select AP Bandwith).
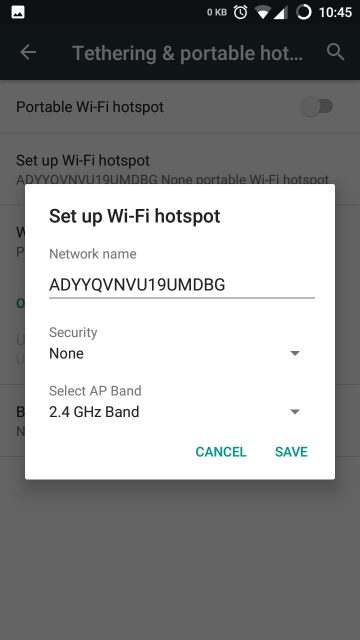
- You can use the network name to change your Wi-Fi hotspot name into any name you desire (Just click on it and the keyboard will pop up).
- Then, there is security. Click on security and select the WPA2 PSK method.
- This will generate another row with a blank field named as Password.
- Click on it and set your desired password (You can change it anytime you want, even if you forget).
- Make sure the password is greater than 8 letters or else the save option won’t be highlighted.
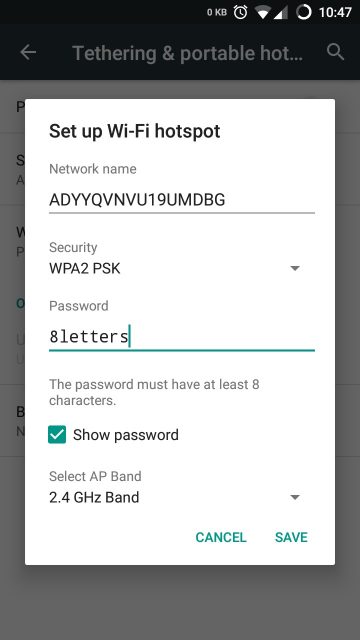
- Finally, there is Select AP bandwidth option. This will be having two options only if your device supports 5 GHz Band else it will be 2.4 GHz.
- Nevertheless, if your device has the 5 GHz Band option then just select it. This would result in better range and connectivity to your hotspot.
- In the end, make sure you click the option save or else all the settings will be erased and you will have to do the whole thing again.
Nowadays all the devices come with portable hotspot features. But previously some devices don’t come with it while some carriers made the feature hidden. For those devices, you can download Hotspot Control a great app from Chainfire to enable that hidden feature. However, it will only work if your device was made to support the hotspot feature. Without any further delay, let’s get right into it.
Enabling WiFi Tethering If Hidden or Blocked
- Make sure you have downloaded Hotspot Control (Works without root).
- Open the app and look for Enable Access Point.
- Clicking on it will activate portable Wi-Fi hotspot for your device. (Again with the default settings)
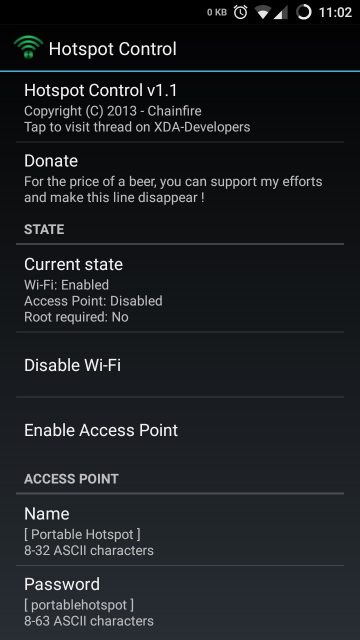
- You can change the default settings by using the name and password box below the Access Point.
- Just simply click on it and type in your preferred Name and Password.
- Make sure you click the save option.
That’s it, folks! If you have any queries related to this post, feel free to type in the comments section below.

Join The Discussion: