Oneplus has recently released its fourth smartphone, the Oneplus 3. Oneplus continues its policy of providing the high-end specced devices’ at a not so high price. OnePlus 3 also comes with the top of the line specifications with a price tag of only $399. This time around Oneplus has also upgraded from the plastic Sandstone back to the full metal body providing more premium feel to the device.
OnePlus 3 is powered by the Snapdragon 820 processor clocked at 2.15Ghz and a whopping 6Gb of RAM. The 5.5-inch Optic AMOLED display still is a 1080p panel but it does help in improving battery life as compared to the 1440p display panel or a 4k display. The camera has been upgraded to 16MP with PDAF, OIS providing better images and videos at up to 4k resolution. All this is packed into a slim all-metal unibody.
On the software front, Oneplus 3 runs the latest version of OxygenOS running on Android Marshmallow 6.0.1. The software experience has been improved as compared to the previous versions of OxygenOS on 1+2. Also, the user experience remains close to stock Android with minimal customization option. So if you are a person who likes to tweak and customize his/her smartphone to your liking then you must root your 1+3. Given below is a step by step guide to Unlock the bootloader on your device, Installing TWRP custom recovery on your device and finally for rooting your 1+3.
Things You Will Need
- TWRP | Link
Download this file on your PC. We will be flashing this custom recovery using Fastboot.
- SuperSU | Link
Download this zip file and transfer it to your phone’s storage.
- ADB and Fastboot | How to Setup ADB and Fastboot on Windows within Seconds
Download and setup Minimal ADB and Fastboot on your PC using above guide.
Backup
Before proceeding with this guide you must backup all of your data to a secure location. Backup all the application, photos, music, and all other important data you might have on your device. You may transfer the data to your PC or use an application that will backup everything to your external storage or to the cloud. Use the link given below to backup your applications and data.
[googleplay url=”https://play.google.com/store/apps/details?id=com.koushikdutta.backup”/]Steps To Follow
Part 1 – Unlocking Bootloader
Step 1. Open Settings app on your phone and go to About phone. Now tap Build number 7 times, this will unlock the Developer options on your device.
Step 2. Head back to the main Settings menu and go to Developer Options and switch the ‘Allow OEM Unlock‘ option. Also, enable the option for Android debugging.
Step 3. Now make sure you have setup the ADB and Fastboot drivers on your PC using the guide linked above. Then open the Minimal ADB and Fastboot on your PC.
Step 4. Now turn the phone off and then boot it into fastboot mode by holding Volume Up + Power buttons for few seconds. The phone will display “fastboot” text indicating that it has successfully booted into fastboot mode. Now connect your device to your PC using a USB cable.
Step 5. Now type the following command in the command window
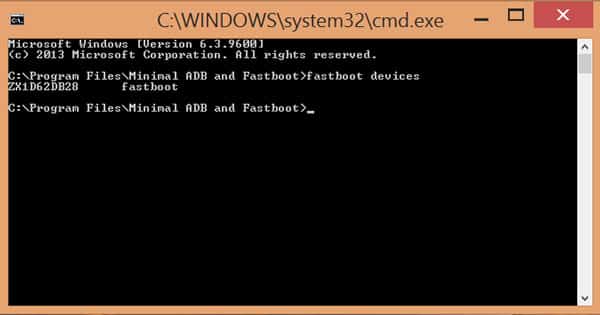
fastboot devices
 This command will list the connected devices (as shown above). If your phone’s serial number shows up you are good to go and you should proceed to next step. If the phone is NOT listed then you must check that your device is properly connected to your PC and you have installed USB drivers. To continue you must fix USB drivers so that your phone is listed under fastboot devices.
Step 6. Now type the following command to unlock your device’s bootloader. Remember that this step will wipe everything off from your device. So take a backup before proceeding with this step.
fastboot oem unlock
Step 7. Now type the following command to Reboot your device
fastboot reboot
Part 2 – Installing TWRP Custom Recovery
Step 1. Download the TWRP ‘recovery.img’ file on your PC from the link given above.
Step 2. Now turn off the phone and then boot it into fastboot mode by holding Volume Up + Power buttons for few seconds. Your phone will display “fastboot” text indicating that it has successfully booted into fastboot mode. Now connect your device to your PC using a USB cable.
Step 3. Open the Minimal ADB and Fastboot on your PC and type the following command to flash the recovery
fastboot flash recovery
Then drag and drop the TWRP img file to the command window, this will add the complete path of the TWRP img file in your command window. Hit Enter to run the command.
Step 4. Once the flash has completed, Don’t use the “fastboot reboot” command instead unplug your device then manually boot it into recovery by pressing Power + Volume Down button.
Step 5. You may make a backup of your device using the Backup option of TWRP. Select Backup and then check mark all the option and swipe to start the backup process. This step is nit necessary but is recommended.
Step 6. Now select Reboot and then select System. This will boot your phone into System.
Once you have a Nandroid backup of your stock system you may proceed to root your device.
Part 3 – Rooting
Step 1. Download the SuperSU zip file from the link given above and transfer the zip file to your device’s storage.
Step 2. Now boot your device into Recovery. Then select Install and browse for the SuperSU zip file that you copied to your device.
Step 3. Swipe to confirm the installation. Then once the installation is complete Reboot your device to the system.
Congrats! you have successfully rooted your Oneplus 3. Enjoy the root access on your device by tweaking and customizing it to your liking to enhance your day to day experience with your device.
Need help? Leave us your queries in the comment section below. We will try our best to resolve your issues as soon as possible.


Join The Discussion: