The Moto X Play is a device powerful enough to help you make through your day no matter what you throw at it. From simple tasks like browsing Facebook to heavy games on more complex tasks, Moto X Play can do all of that, but it’s not exactly a powerhouse of a phone. With a Snapdragon 615 at its core, there’s only so much you can get. If you’re someone who likes getting all the power one can get, bypassing factory restrictions, you might want to root your device. Not to mention that also opens the gates for system level customizations making the deal even sweeter.
Rooting is a big step if this is your first time, so make sure you know all you should. Like, you’ll be losing your warranty, might brick your device, the usual stuff you’ll find everywhere. If you’ve thought this through, we can help you root your Moto X Play. But before we can do that, you will need to unlock the bootloader of your device. This is the very first step towards voiding your warranty. Motorola, like many other OEMs, officially supports bootloader unlocking for those who want to. Even before that, we need to make sure you meet some required conditions.
Prerequisites
- You’ll need Motorola USB Drivers installed on your PC.
- ADB and fastboot drivers must also be installed. If you’re not a developer, it is best to go with Minimal ADB and Fastboot which is much smaller in size.
- Make sure your phone is charge up to at least 50% or more.
- Unlocking the bootloader can potentially wipe the slate clean on your phone so make sure you back up everything, including the files stored on the internal storage.
- The method described here is for Moto X Play running official Android 6.0.1 firmware. Do not try this on any other device or software version, unless you intentionally want to brick it.
Downloads
- TWRP recovery image for Moto X Play
- SuperSU (transfer to your phone)
Don’t miss: Update Moto X Play to Android 7.1.1 Nougat
How to unlock Moto X Play bootloader
- Power off your Moto X Play and then press and hold the Power and Volume Down buttons simultaneously for a few seconds.
- This will boot your phone into the fastboot mode.
- Now connect your phone to the PC with a USB cable.
- Open a command window in the ADB and Fastboot installation folder. To do this, browse to the installation folder (C:\Program Files (x86)\Minimal ADB and Fastboot) and then type cmd in the address bar, hit Enter.
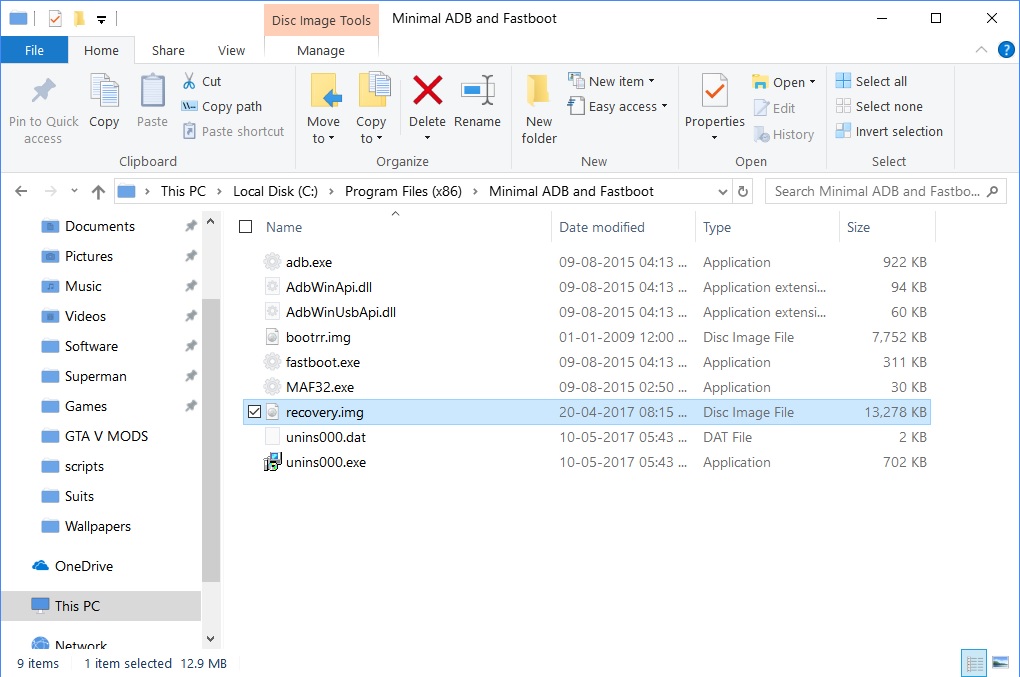
- In the command window, enter the command given below to make sure your device is connected properly.
fastboot devices
- If your device is connected, you will see the device ID listed.
List of devices attached

XXXXXXXX         device
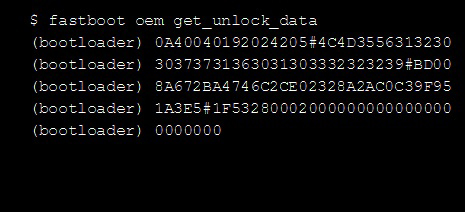
- Now enter the command below to get your device’s OEM unlock data, which will be needed for you to get an unlock key from Motorola.
fastboot oem get_unlock_data
- You’ll be returned a string in the format shown below.
- Visit the official Motorola bootloader unlock page, scroll towards the bottom and click the Next button.
- On the next page, you’ll have to enter your Motorola ID, or you can choose to sign-in with Google.
- Scroll to the 6th point and you’ll notice a text field under it.
- Copy the entire string from your command window to this text field and edit out the “(bootloader)” and spaces so as to make it a single continuous string. It should look something like this:
0A40040192024205#4C4D355631323030373731363031303332323239#BD008A672BA4746C2CE02328A2AC0C39F951A3E5#1F532800020000000000000000000000
- Now click on the button that says Can my device be unlocked?
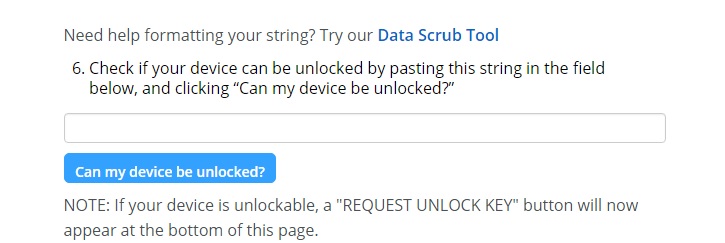
- If your device is unlockable, a Request Unlock Key button will appear at the bottom of the page.
- Click the button and the unlock key will be mailed to you on your registered email. If you used your Google ID to sign-in, it will be mailed to the corresponding Gmail account.
- Copy the unlock key from your email and enter the following command to finally unlock your device’s bootloader. Replace UNLOCK_KEY with the unlock key your received in the email from Motorola.
fastboot oem UNLOCK_KEY
- You should see an unlocked message on your phone and it would then reboot automatically.
How to install TWRP on Moto X Play and root it
- Download the TWRP image file from the download section above, rename it to recovery.img for ease of installation and move it into your adb installation folder.
- Reboot your phone into fastboot mode again using the Power and Volume Down buttons and connect it to your PC with a USB cable.
- Enter the given command to flash the recovery image onto your device.
fastboot flash recovery recovery.img - The flashing hardly takes a couple of seconds.
- Once completed, use the volume keys on your phone to navigate to and select Recovery. Volume Down key moves the selector while Volume Up key will select the current option.
- Your phone should now boot into TWRP recovery. Swipe to allow modifications if asked.
- Select Backup and select all the available partitions, then swipe to create a backup. This is an optional step but it is what will save your device in case things go south.
- When the Backup is complete, go to the main menu and select Advanced > Terminal.
- In the terminal, enter the following command
echo SYSTEMLESS=true>>/data/.supersu
- Now go back to the TWRP main menu, select Install and then select the SuperSU zip you’ve previously transferred to your external SD card.
- Swipe to flash the zip and then tap Reboot System when the flashing process is complete.
You may also like: How to Wirelessly Access Android Devices from Desktop
Your device should now reboot and you’ll find the SuperSU app in your app drawer. Because this is essentially your first boot since unlocking your bootloader, it might take a while so be patient.


error: cannot load ‘recovery.img’
:'(