The Moto G5 and Moto G5 Plus are the recently launched devices from Motorola in the mid-range segment. Both the devices come with some great specifications that are worth the bucks spending on them. The devices come with Android 7.0 Nougat out-of-the-box with minimum customizations and a locked bootloader. So, you need to unlock the bootloader on Moto G5 and G5 Plus before installing a custom recovery like TWRP on your device. Once the TWRP is installed, you can root Moto G5/G5 Plus easily.
Unlocking the bootloader is an essential part to root your device. But be aware that unlocking the bootloader will wipe your entire device and might void the warranty. But the advantages of rooting your device will eventually outweigh these little demerits.
An official TWRP is not yet available for the devices, so we are using the unofficial TWRP 3.1.0.0 ported by Santhosh M from XDA developers. The root method in this tutorial was shared by XDA member Johny Cipeli, and it confirmed working by many Moto G5/G5 Plus users. In order to root Moto G5/G5 Plus, we will use the Magisk systemless method as SuperSU hasn’t installed on the device while Phh SuperSU broke the system.
In this tutorial, we will share the working and safe way to root your Moto G5/G5 Plus. So, follow the below tutorial to unlock the bootloader, install TWRP and root Moto G5 and G5 Plus smartphones.
Recommended for you: 70 OK Google Commands for Google Assistant and Google Now
Prerequisites
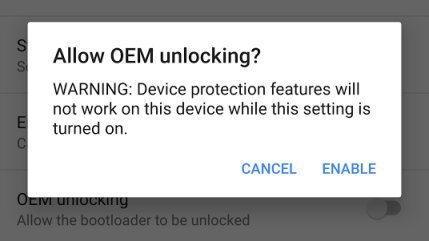
- Go to Settings » About phone » Build number and tap it 7 times to enable Developer options on your device. Then go back to Settings »Developer options and enable USB Debugging and OEM unlocking.

- Download the Minimal ADB and Fasboot Setup and install it on your computer.
- Install Motorola USB drivers on your PC.
- Backup important files on your device to a safe place as unlocking the bootloader will format your entire device.
- Make sure you have enough charge on your device before starting the process.
Downloads
Don’t miss: Install All Sony Exclusive Apps from Play Store on Your Android Phone
How to Unlock Bootloader on Moto G5 and G5 Plus
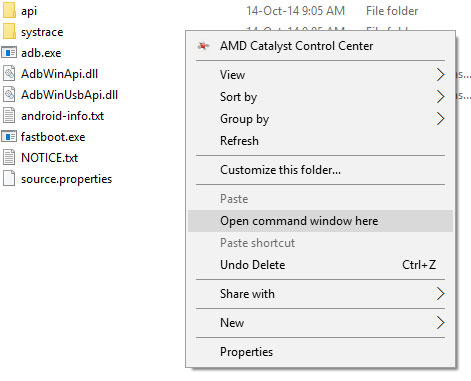
- Navigate to the folder where you’ve extracted the ADB and Fastboot files and open a command prompt by pressing Shift + Right click on any empty space inside the folder and select Open command window here from the context menu.

- Connect your device to the PC and use the below command to enter into the fastboot mode.
adb reboot bootloader
- As you’re in fastboot mode, you need to check whether your device is able to communicate with PC properly or not. So, use the below command to check the connection:
fastboot devices
If everything is good, you should see a serial number in the command prompt. If it’s blank, re-install the USB drivers and Fastboot drivers on your PC.
- Type or copy/paste the following command in the cmd window:
fastboot oem get_unlock_data
You’ll get a return string in the command window. Copy it (Right click the mouse, select Mark option and then highlight the string by Shift+dragging the mouse, and then press Ctrl+C to copy).

- Paste the copied string in the Notepad and remove the spaces if any.
- Now open the Motorola website. Sign in with your Google account or Motorola ID.
- Now paste the copied string into the text field and then click “Can my device be unlocked?” button.

- You’ll see a “REQUEST UNLOCK KEY” button at the bottom of the page. Check the “I Agree” option and hit the button.
- You’ll receive a mail to the registered Email ID with the unlock key.
- Now issue the following command in the cmd (replace “UNIQUE_KEY” text with the 20-character unlock key:
fastboot oem unlock UNIQUE_KEY
- This will unlock the bootloader on your device and format your device in the process.
- Once it’s completed, reboot your device and you’re done.
That’s it. You’ve successfully unlocked the bootloader on Moto G5/G5 Plus smartphone.
Must read: How to Erase Android Phone Data Remotely Without Internet
Install TWRP Recovery on Moto G5 & G5 Plus
- During the bootloader unlock process, your device will be formatted. So, you have to enable the USB debugging, OEM unlocking options from the developer options on your device again.
- Once you’re done with the prerequisites, connect your device to PC using a USB cable.
- Now, reboot your device to bootloader mode using the command “adb reboot bootloader” just like you did earlier.
- Download the TWRP image for your device from the downloads section and rename the downloaded ZIP file to recovery.img for our convenience.
- In the command prompt, navigate to the path where the recovery file is located. Now, execute the below command to flash the TWRP recovery on your Moto G5/G5 Plus.
fastboot flash recovery recovery.img - Don’t reboot the device at this point as it may brick your device. Instead, use the below command to boot into TWRP recovery directly.
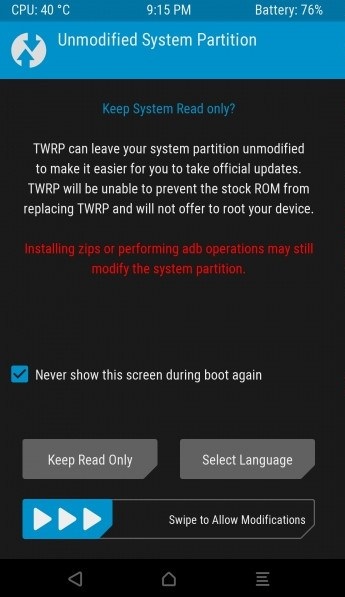
fastboot boot recovery.img - You’ll now be in the TWRP recovery. In the decrypt/data screen, press cancel, then “Swipe to Allow Modifications” if prompted. Also, check the “Never Show this screen during boot again” checkbox so that it won’t appear again.

- Once you’re in the TWRP main menu, go to Wipe options and then “Swipe to Factory Reset.” This will format your device once again.
- Now get back to TWRP main menu and go to Reboot options. In here, select Recovery to restart the TWRP recovery.
- If asked to install SuperSU, select Do not Install.
- After restarting to TWRP, you’ll be prompted to “Swipe to Allow Modifications” again. Do it.
As of now, TWRP installation is complete. Proceed with the root process immediately without rebooting the phone. Follow the below process to root your Moto G5/G5 Plus.
You may like: All You Need to Know About Smartphone Battery: The Facts, The Myths
How to Root Moto G5 & G5 Plus
The XDA developer has successfully rooted the Moto G5/G5 Plus using the Magisk v11.6 Zip. You can try the latest Magisk v12.0 Zip as well but make sure to take a backup first. The safest method is to install Magisk v11.6 on your device and then update it from the app.
- Plug your phone into PC and copy the “no-verity-opt-encrypt-5.1.zip” and “Magisk-v11.6.zip” to the Internal storage of your device using MTP.
- Now flash the “no-verity-opt-encrypt-5.1.zip” from the Install menu and reboot your device from Reboot » System.
Note: If you reboot without flashing the no-verity file, you’ll probably brick your device. - Once your phone is booted into the Android OS, reboot it back to recovery mode again.
- Flash the Magisk Zip now and reboot the device.
- After the device restarts, open the Magisk app from the app drawer. The Magisk app will ask for an update, so update it to the latest version.
The latest Magisk manager comes with a default root method called the MagiskSU which is an open source root option. So, don’t install the SuperSU or Phh’s SuperSU as it’s reported breaking the system on Moto G5/G5 Plus.
That’s it. You’ve successfully unlocked the bootloader, installed TWRP and rooted Moto G5/G5 Plus. You can install your favorite custom ROMs now.


Join The Discussion: