In times when restrictions on rooting an Android smartphone are increasing, it is quite refreshing to see at least one OEM staying developer friendly. Even as Google itself is making rooting less appealing, thanks to SafetNet, OnePlus continues to ship devices with an unlocked bootloader. In addition, you don’t lose your OnePlus warranty when you root your phone. In comparison then, OnePlus does seem like the more developer friendly option. But rooting and flashing are tricky processes. Even the most experienced developers have faced countless boot loops, device bricks and the occasional heartbreaks that accompany them. If you bought the OnePlus 5, you at least do not have to panic when that happens because you can easily unbrick OnePlus 5.
To be honest, most devices can be brought back to life in most bricking cases. But an official unbricking tool just makes life a lot easier for people who brick their devices more often. There’s also a peace of mind when you don’t have to worry about the authenticity of the software. The OnePlus 5 unbricking tool that we will use here was posted on the Chinese OnePlus forums. It apparently was received by them through a staff member at OnePlus.
The tool is quite similar to the unbricking tool for the OnePlus 3/3T except that it downloads and flashes only HydrogenOS. For those who do not know, HydrogenOS is the Chinese ROM developed by OnePlus for its devices in China. International OnePlus devices run on the OxygenOS ROM. The unbricking tool wipes your device and installs HydrogenOS on it. But don’t worry, you can still flash OxygenOS on top of it later.
Note
- Make sure you have the necessary USB drivers and ADB drivers installed on your computer.
- Ensure that your bricked device has sufficient charge.
Downloads
Also see: Remove Bloatware on OnePlus 5 Running Oxygen OS
How to unbrick a OnePlus 5
- Considering your device is bricked, it should probably already be powered off. Power it off if it isn’t. Then connect it to your PC via a USB cable while holding the Volume Up button.
- Hit the Windows key on your PC and type in Device Manager to search for it and open it.
- Under Unknown devices, find QHUSB_BULK, right click on it and select Upgrade driver software.
- Your device should now be listed as Qualcomm 9008.

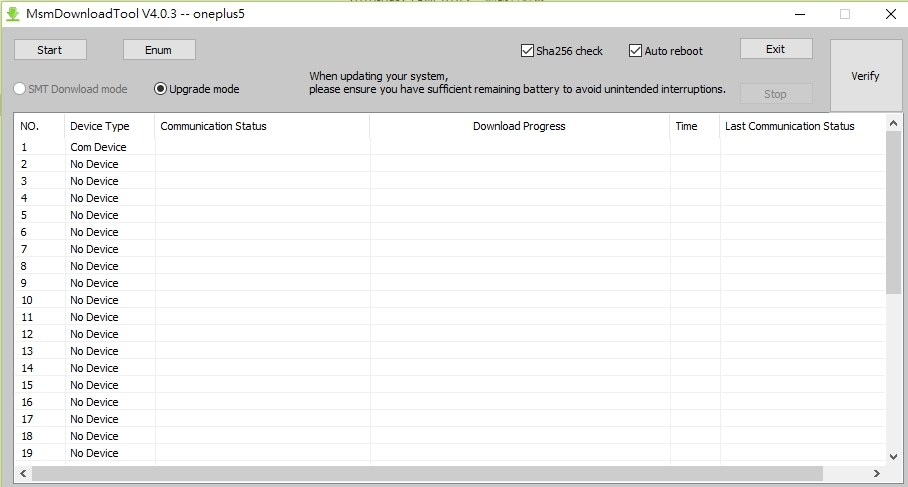
- Now launch the Unbrick tool with elevated privileges. To do this, right click on it and select Run as administrator.
- Click the Start button in the top left corner to begin flashing HydrogenOS to your device.

- Wait until you see green text flashing, signaling the completion of the process.
Your device has now successfully been restored. But you will probably prefer having OxygenOS installed on it instead of HydrogenOS.
Flash OxygenOS over HydrogenOS
Once your device is up and running, you can easily install a custom recovery on it and flash OxygenOS like you would flash any other custom ROM. In case you don’t know how to get a custom recovery installed on your OnePlus 5, you can refer to our guide. The process is the same for any OnePlus 5 regardless of the flavor of OS it’s running on. You may not want to root the device just yet since you’ll be installing a new ROM anyway. So when you’re done installing TWRP recovery, come back over to this guide and proceed with the steps below.
You may also like: How to Install Dolby Atmos Sound Port on OnePlus 5
If you do intend to root your device after installing Oxygen OS, download the Magisk zip and Magisk Manager APK from the above-mentioned guide.
- Download and transfer the OxygenOS ROM zip to your OnePlus 5. If you downloaded the Magisk flashable zip and Magisk Manager, transfer them to your device too.
- Power off your phone, then press and hold the Power and Volume Down buttons together to boot it into recovery mode. If you followed the guide mentioned above, you should have TWRP custom recovery on your OnePlus 5.
- Go to Wipe > Advanced Wipe and select the system, data, cache and dalvik cache partitions. Swipe to wipe them.
- Select Install and navigate to the OxygenOS ROM zip file.
- Select the file and swipe to confirm the flash.
- Similarly, flash the Magisk zip as well if you wish to root your device.
- Tap the Reboot system button when done.
Now, wait for your device to boot up because it may take a while the first time. When it does power on, go ahead and install Magisk Manager if you flashed Magisk and your device should also be successfully rooted.


Thanks
So it worked? I got a different comment reporting some issue earlier.
THANK YOU!