There were times when you were going on a vacation, you had a pack a Camera for capturing all the great landscapes, a mp3 player for listening some music on the road and maybe some books or magazines to read while on a train/flight. But now things are completely different, you just need to carry your smartphone that’s it. Just pack some clothes, take your smartphone and head to your destination, your smartphone will take care of everything else.
Taking photos with your phones has become extremely popular these days. Take any tourist destination, you would find many tourists taking selfies with their smartphones everywhere.
Unless you are a photographer by profession or you are passionate about photography, you wouldn’t want to buy a camera these days. Smartphone’s cameras have become capable of taking good to great quality pictures. In most of the situations, you would find smartphone’s camera is good enough for you.
Before starting with the tips for taking better photos with your Android device there certain things you should know. No matter how many tricks and tips you apply while taking a photo, at least, it all depends on the sensor your smartphone is using and the image processing behind it. As Android ecosystem consists of a vast range of devices, ranging from $50 to $800, if your photos are not coming out good your device must not be capable of taking better photos due to a poor sensor or poor image processing.
Tips for Taking Better Photos with Your Android Device
1. Avoid Using Flash When You Can
Though flashlight is present in your smartphones to help you take better photos in dark, they may ruin a shot for more often than helping you improve the lighting. Avoid flash when your subject is near to the camera, or you are clicking images of some reflective surfaces. If you can get a good image with natural light, there is no point of using a flashlight.
2. Do Not use Digital Zoom
Zoom is the only department where smartphone photography suffers. Though smartphones are equipped with digital zoom, there are very few smartphones with optical zoom. Digital zoom produces images of lower quality than a camera with optical zoom would produce.
Digital zooming uses some image processing to enlarge the image and crop it. Instead of using digital zoom, click a zoomed out shot and then crop the image to fit your subject. This would definitely produce a better result than zooming while clicking your image.
3. The Rule of Thirds
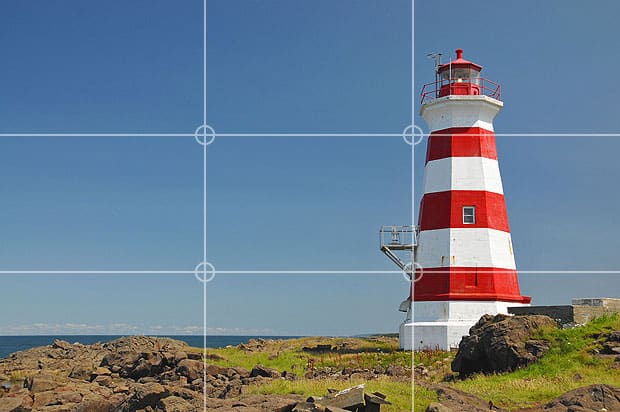
The rule of thirds applies to any kind of photography whether it is done using a smartphone’s camera or using a DSLR. According to this rule, you need to keep your subject at one-third of the frame( as shown in the above pic). This technique will produce better-looking shots than the ones clicked with your subject at the center of the frame.
Try turning grids on in your camera application to apply this rule to perfection. Grids will also help you hold your smartphone at correct angles, i.e. your smartphone should not be tilted at weird angles, try taking shots by aligning your subject to the grids lines. (You can see in the above picture, water is parallel to the horizontal grid line and lighthouse is also perfectly aligned)
4. Use Manual Mode
Some smartphones already have a manual mode in their stock camera application, but for some, you will need to install one from the Play Store. Manual mode gives you a bunch of options that you will otherwise find on a stand-alone camera only. You can control things like White balance, ISO settings, Shutter speed, etc. using manual mode.
Manual mode lets you adjust various settings of the camera so that you can get a perfect shot in every lighting condition. Initially, settings might confuse you, but as you use it more you would know what settings would produce better results under particular lighting conditions.
You can control things like White balance, ISO settings, Shutter speed, etc. using manual mode. Manual mode lets you adjust various settings of the camera so that you can get a perfect shot in every lighting condition. Initially, settings might confuse you, but as you use it more you would know what settings would produce better results under particular lighting conditions.
5. Use Image Editing Tools After Taking Photos to Bring Out the Best in Them
There are many image editing applications available on Play Store, these applications have tonnes of customization options which lets you bring out the best in your photo. You can even add filters to your images using these applications, they do a good job in making your photo better looking. There is the option of adding overlays to your photo in these image editing applications, which lets you add stickers or cartoons to bring out the fun part of your photo.
READ: Top Photo Editing Apps for Apps for Android
6. Keep Your Lens Clean
Smartphones are constantly used by people nowadays. As a result, they have to deal with a lot of drops, smudges, scratches and dirt. The camera lens being unprotected part of your smartphones, they are very prone to damage. The least you can do is wipe off any dirt or fingerprints on the camera lens before taking a photo. This will make sure enough light is absorbed while taking a shot and there is no blurriness due to fingerprints on your lens.
Hope these tips help you improve the quality of photos you take from your Android device. If you have any other tips for getting better photos with a smartphone feel free to comment down below.


A great tips, indeed! Especially The Rule of Thirds, I really don’t see how a grid can make a picture perfect. I’m surely gonna use all of the tips in this article. Thanks!
You are welcome 🙂