Google’s Chrome browser has been always on top of our endorsements’ list since the beginning of computing. The reason why we’ve always preferred Google Chrome over the other alternatives, like Firefox, Opera, or Internet Explorer is its tendency to utilize less RAM, and run more smooth. Moreover, with the Google Chrome web store, users can enjoy unlimited amounts of applications, or games onto their Google Chrome browser.
Another important event which took place with Android was the replacement of the Stock browser. As you might have noticed, with the Android 4.3, JellyBean update, Stock Android devices have been packed up with Google Chrome as their stock browser, rather than the previous one. Now, Google Chrome is the most used browser for both, Windows, and Android.
The reason why Chrome for Android is a better choice is all because of its simplicity, and smoother performance. Devices with medium to high-end specifications will be able to run Chrome really very fluid, without any lag. However, for the budget-oriented smartphone users, which have an Android device with low-end or not so top-notch specifications, will notice quite a bit of lag while using Google Chrome. Especially, with the new Material design update.
The reason why Chrome for Android stutters or lags a bit (or a lot) on some Android devices, is it is set to specific RAM usage options, depending on your smartphone. Say, if you have a smartphone with 1 Gig of RAM, then you might have difficulties while scrolling up and down, or flying between tabs on Chrome. So, what do you do? The answer here is really simple – If Chrome for Android is on-proposal utilizing less of your RAM, then why not simply pump up the amount of RAM which Chrome can access?
Now, this might seem a little bit risky, especially if you’re willing to pump up the RAM all the way up. However, we have tested it on both, High-end, and Low-end Android devices, and it has significantly helped with performance, with no issues whatsoever. The idea behind this is that you simply need to change and pump up the amount of RAM Google Chrome can access on your Android device. Rather than wasting any more time, let us see how we can do it.
Speed Up Chrome for Android
- Launch Google Chrome on your respective Android device.
- Now, tap on the address/search bar to access the writable area. Now, type the following code/address in:
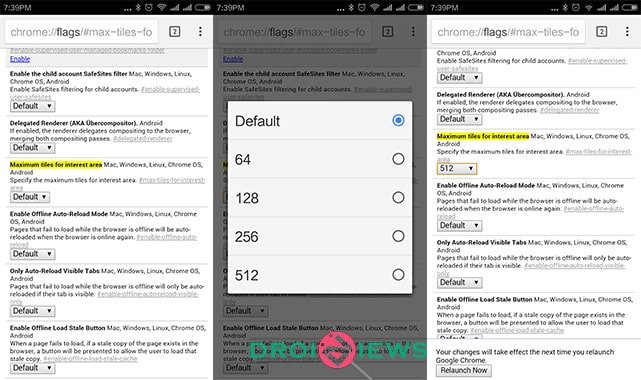
chrome://flags/#max-tiles-for-interest-area

- Once typed in, tap on search, or press ‘enter‘ on your virtual keyboard.
- This webpage might take some time to load up, as it has a lot of tweaks going on in the background. Once fully loaded, you will be able to have a look at some serious geeky stuff.
- Scroll down, until you find the option “Maximum tiles for interest area“. Note that this will be pre-highlighted since you have specifically searched for it in the address bar.
- For some bit of information, this option shows you and let’s you change the amount of RAM you have allocated to Chrome. It will be set to ‘Default‘ the first time you do this. If you notice even more precisely, you will see that there is a little drop-down menu for you to choose the amount of RAM allocated. On clicking, it’ll reveal the different options to choose from. Namely, 64, 128, 256, and 512 (All in the unit MB)
- You might want to think a little bit here. If you think that your Android device can handle 512 MB processes of Google Chrome, then choose it. Mostly, devices will a minimum of 1 GB RAM will be able to use this option. Else, go for the 256 MB option.

- Once selected, you will be required to restart Chrome for Android. You can do it manually, or in case if you’re too lazy to do so, Chrome has a one-tap option to re-launch it itself (clever!).
- Once re-launched, enjoy seamless browsing and scrolling without lag!
Make sure you share your experiences with us down below. If you have any queries regarding this article, feel free to refer us in the comments below!


Amazing Thank you so much
Ot you can just disable javascript and enable it on just few webpages.
Thanks so much
It works very well.
Glad to see this helped you. Increasing the amount of accessible RAM to a specific application always improves performance! Kudos.