In Part One of this article series, we discussed how swap can be utilized on an Android device to increase the kernel’s virtual memory and provide extra responsiveness. On Linux, swap can be enabled on a special swap file, on a dedicated partition, or on a whole disk. In the previous article, a step by step guide was provided for the swap file method. Today, we will provide instructions for enabling swap on a specialized SD card partition. Moreover, we will introduce the swappiness kernel parameter and suggest a method of changing it on Android. Keep reading to learn about Swap Partition method and how you can use it to make your Android faster.
Prerequisites
- Root Support
- parted command line tool
- A high-quality Micro SD card (class 10 or better recommended)
1. Speed Up Android Devices: Swap Partition Method
Notes:
- Swapping on a flash storage device (MMC, SD card) can degrade the storage’s life. That does not mean that your SD card will fail after some days of use, but its lifetime will be reduced. We recommend that you use an external high-quality SD card for swapping. Even if it fails, an SD card can be easily replaced. This guide will explain how to re-partition the external SD card for swapping.
- Always keep your data backed-up when using swap on an SD card. Also, backup all your external SD card data before following this guide, as the procedure described below will erase all data on it.
Make sure you have the parted binary available on your device:
Parted is a powerful command line utility that can manipulate several types of partitions. On this tutorial, we will use parted to create the partition layout of the SD card. Usually, it does not come pre-installed on Android ROMs.
Enter a Terminal App/adb shell and give the following command:
which parted
If you do not get any output, you do not have the parted binary on your system. If you have an ARM device, you can get parted from the Downloads section at the end of this article.
Must read: What are Android Security Patches and Should We Care About Them?
Find the block device that represents your SD card:
Linux kernel creates separate files (nodes) under the /dev/block directory for each storage device available on the system. Flash storage devices are most times represented by a node with a name starting with mmc (for example mmcblk0). Furthermore, each partition of a storage device is assigned a separate node, whose name is derived from the storage device name plus the partition number (for example, mmcblk1p1: this represents the 1st partition of the 1st block device). Keep in mind that storage device numbers on Linux start from 0. To understand things better, open a Terminal App/adb shell and enter following commands:
su
cd /dev/block
ls
On our example device, we get the following output:
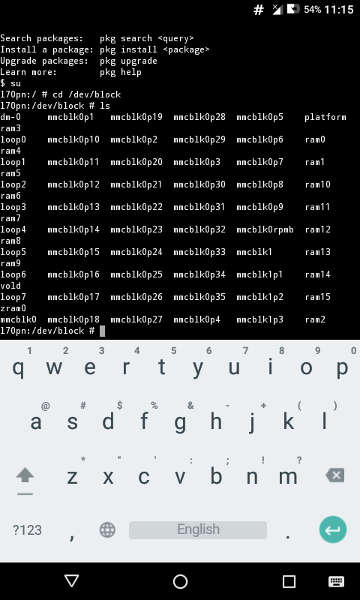
The kernel sees two storage devices (mmcblk0 and mmclbk1), each of them having different numbers of partitions. A general rule is that the storage device that has a high number of partitions is the internal storage, while the device that has only one or three (on devices with adaptable storage enabled) is the removable SD card. Take a note of the node representing your removable SD card (mmcblk1 on our example device).
Change partition layout using the parted tool:
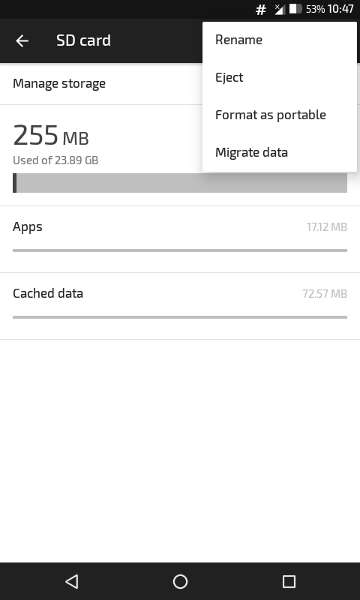
First, we need to unmount the external SD card, so we can make changes to it safely. SD card can be unmounted by going to Storage Settings, under Device Settings. Just click the eject sign next to the SD card to unmount it. To unmount adopted SD cards, you need to click on the card, then click the three-dot button on the top-right of the screen and click eject.
In the Terminal App/adb shell, enter the following command to execute parted tool for your SD card:
parted /dev/block/mmcblk1
Replacing /dev/block/mmcblk1 with your SD card node found in the previous step.
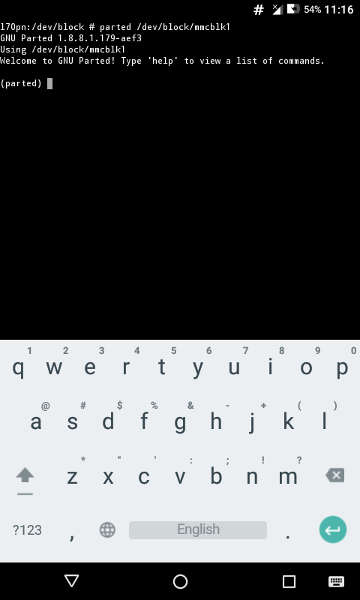
Parted has its own command line interface. All the changes are made in real-time after a command is given. We will give a general example on how to re-partition your SD card, using a pre-partitioned SD card with both portable (FAT32) and adoptable partitions. The idea is to remove the FAT32 partition and create two partitions in its place, one FAT32 and one Linux-swap. This way, we will not mess with adoptable partition and render it unusable.
On the parted command line, do the following:
unit b
This will change the units displayed in the parted tool into bytes. Then
p
This will display the current partition table.
This is the output on our example device:
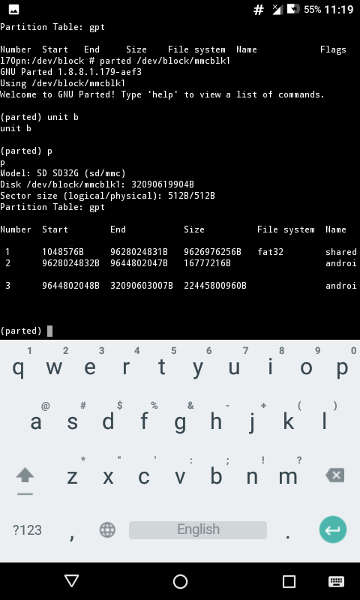
The first column displays the partition number, next three columns display the start, stop and total bytes of each partition respectively. The last three columns display the partition type, the partition name and partition flags (flags are not displayed on the screenshot above). On our example device, the fat32 partition is the partition with number 1 and name shared. Its size is 9181 MB (9626976256 bytes). Take note of all the information regarding this partition. To remove this partition, give the following command:
rm 1
This will delete the partition with number 1 immediately. Change the partition number according to your device.
This is the time you need to calculate the size of your swap partition. As mentioned in part one of this guide, a good starting size for a swap on Android is half the size of RAM. Our example device facilitates 1 GB of RAM, so we will create a swap partition of 512 MB, or 536870912 bytes (512*1024*1024). Make sure you take a note of your required swap size in bytes.
Now, we should re-create the fat32 partition with a smaller size, so the SD card will have room for the swap partition. On our example, the new size of this partition will be 9626976256 – 536870912 = 9090105344 bytes. So, the FAT32 partition will start at byte 1048576 (the same byte it started before re-partitioning the card) and end in byte 1048576 + 9090105344 = 9091153920. The swap partition must start on the next byte, 9091153921, and end one byte before the next partition on the card. This is byte 9628024831 (as seen on the partition layout screenshot above).
Let’s create the partitions:
mkpart primary 1048576 9091153920
This command will create the partition which will be formatted later to fat32. Remember to change the numbers according to your device. First, number is the start byte and second is the stop byte of the created partition.
Then, doing the following will create another empty partition to use for swap:
mkpart primary 9091153921 9628024831
Again, replace start and stop bytes with the values calculated for your device.
Note
There is a chance that parted tool will display a message telling you that it cannot create the partition on the specified ranges. This might happen due to several reasons and mainly because we do not align created partitions to sectors, in order to make this guide easier to follow. In case you get a message like that, check out the start/stop values that the program suggests. If you are fine with that values, write yes and hit enter. You might get a smaller swap partition in the end, but not by much.
Don’t miss: How to Fix File Permissions on Android Devices
Next, let’s display the new partition table:
p
Take note of the partition numbers of the fat32 and swap partitions, as we will need them later.
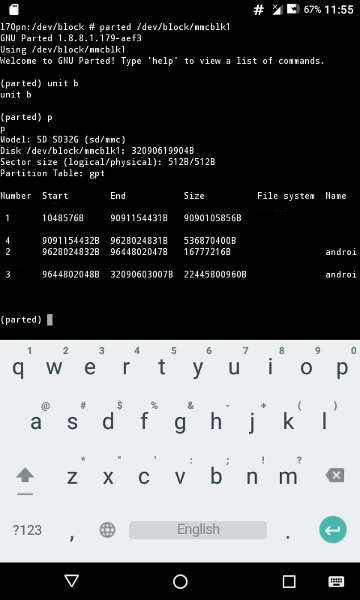
The last thing we need to do in parted, is to name our newly created partitions. We need to name the fat32 partition shared and (optionally) the swap partition swap:
name 1 shared
name 4 swap
changing the numbers to match the partition numbers of each partition on your device.
Give the following command to exit parted:
q
Format created Partitions and Enable swap:
Next thing we need to do, is to format the created partitions. To format the first created partition to fat32, give the following command in the Terminal App/adb shell:
mkfs.exfat /dev/block/mmcblk1p1
To set up the other partition for swap, give the following command:
mkswap /dev/block/mmcblk1p4
Replace /dev/block/mmcblk1p1 and /dev/block/mmcblk1p4 with the nodes representing the fat32 and swap partitions respectively. You can easily make out that nodes by adding a p# to the end of the SD card device node, where # are the partition numbers you took note of in the previous step.
Finally, to enable swap, give the following command:
swapon /dev/block/mmcblk1p4
replacing again the partition node as needed.
Swap will not persist after a device reboot. You need to manually enable it at each boot using the swapon command or use an init.d script to do this automatically. A sample init.d script is available at the end of the article. To learn more on how to install this script, please refer to Part One of this guide. If you make use of the script, make sure you edit it first and change the value of SWAP_PATH to point to your swap partition device node.
2. The Swappiness Kernel Parameter
Swappiness is a Linux kernel parameter that controls the relative weight given to swapping out of run-time memory, as opposed to completely removing memory data that are not in use. Swappiness can be set to values between 0 and 100 inclusive. A low value causes the Linux kernel to avoid swapping, while a higher value causes the kernel to use swap space more aggressively. The default value on Android is 60. Setting Swappiness higher will increase the performance of currently running processes at the cost of causing a pause (lag) when returning to inactive processes. The ideal Swappiness value for each user differs based on their device usage scenario. Experimentation will help you find out the best value.
To change swappiness parameter on Android, you can give the following command (with root privileges) in a Terminal App/adb shell:
sysctl -w vm.swappiness=value
replacing the value with a number between 0 and 100. This change will not persist after a reboot, but you can find an init.d script to automatically change it at boot at the Downloads section below. Make sure you edit the script and change the value of “SWAPPINESS=” with the value you need.
TIP
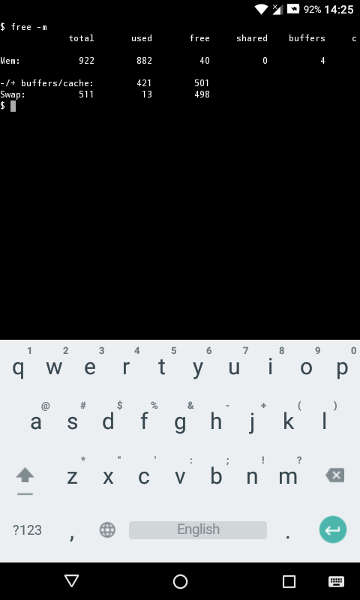
You can check out what amount of your swap file/partition is in use at any moment by entering a Terminal and giving the following command:
free -m
You will get an output like the following:
Downloads
- parted_arm_zipped
To install parted on your device, unzip the file above and use a root file manager app to move the parted file under /system/bin. You also need to change the permissions of the file to make it executable. - swap_on_partition
Init.d script for enabling swap partition at boot - set_swappiness
Init.d script for changing kernel Swappiness at boot


Join The Discussion: