Swap is a feature used by default on many desktop GNU/Linux installations including Android. You can speed up Android devices using Swap file method significantly and below, I’ll be describing in detail how you can do that.
In computing, paging is a memory management scheme that enables a computer to read and write data on storage devices for use in main memory. It is part of many modern Operating Systems and allows the use of storage devices (hard disks, flash memory devices etc) as virtual memory, in addition to physical memory (RAM).
Linux kernel and other Unix-like operating systems use the term ‘swap’ to describe both the act of moving data between physical and virtual storage as well as the region of the storage device that it is used as virtual memory. Linux can use entire disks, special partitions on disks (swap partitions) and also special files (swap files), for swapping.
Swapping enables Linux to extend its available memory (total memory = virtual memory + physical memory). The idea is the following: data in memory which are inactive are moved to swap and brought back when needed again. One limitation of this operation though is that moving data to and from swap can introduce considerable system lag since storage devices are several magnitudes slower than RAM.
Swap is a feature used by default on many desktop GNU/Linux installations because it can speed up operations significantly at some circumstances. Recent versions of Android, on the other hand, are using a kernel feature which is based on Swap and is known as zram. In simple words, zram is a compressed swap space that resides inside RAM. It essentially provides the same advantages as swap, without having the latter’s speed limitations. However, while zram seems like a great feature, it still has some disadvantages:
- To actually get some extra total memory, the virtual memory (that is actually inside the RAM as said above) is compressed. Compressing and decompressing data uses CPU power.
- While zram claims a 2:1 compression ratio, this ratio is not universal. Instead, it depends on the type of data moved to zram. Some kind of data might not get compressed at all. So, actual memory earnings can vary.
- Not all Android devices support zram. Even though it was introduced with Android 4.4, some stock kernels do not support it.
Don’t’ miss: Get More Free Space on Android Internal Storage with a VM tweak
Since Android is using the Linux kernel behind the scenes, it can use swap as long as the kernel has support for it. Nevertheless, using swap on an Android device can degrade the life of its storage device: Flash storage devices, which are used on most embedded platforms, have a finite write life. Enabling swap increases read and write operations significantly. This is the reason swap was never enabled by default on Android. Some users though still enable swap on their devices, usually on a dedicated partition on the external Micro SD card.
Notes:
- As mentioned above, you can use a whole disk, a separate partition or a file, for swapping. While all three are possible on Android, we will only discuss the partition and file methods.
- The file-based swap might not work on some file-systems on Android, as it requires that the swap file is written on a continuous location on disk. If you get errors while trying to enable swap using a swap file, you should try using a swap partition instead.
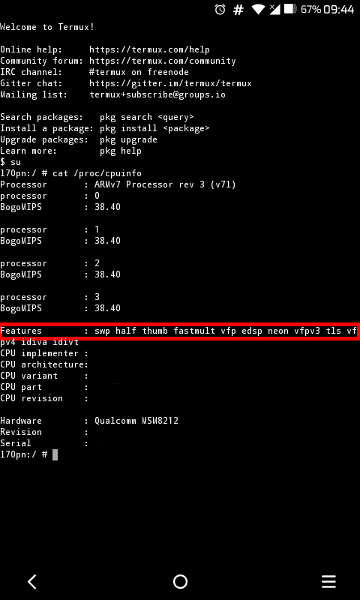
- To enable swap, your kernel must support it. You can check if your kernel supports swap by entering a terminal App or an adb shell and executing the following commands (root support is a requirement):
su
cat /proc/cpuinfo
These will give you an output like the following:

You are interested in the line marked with the red border on the image above. If swp or swap appears in this line, your kernel supports swap.
Swap File Method to Speed Up Android Devices
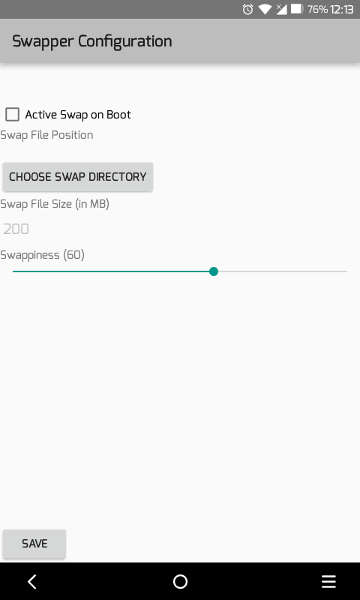
This is the easiest method of enabling swap on your device. Furthermore, using a swap file gives greater control to the user. It can be easily created, deleted and changed in size, without having to repartition the whole disk. There are some Apps on Play Store that can create this for you, like Swapper & Tools.
[googleplay url=”https://play.google.com/store/apps/details?id=com.allakore.swapper”]Its interface is straightforward and it can also automatically activate swap at boot. For now, leave the Swappiness parameter unchanged, as we will discuss it in the next part of the guide:

Must Read: 50 Best Apps for Rooted Android Devices
A more advanced way of creating a swap file (for experienced users), is using the Terminal:
- Open a Terminal App or an adb shell
- Execute the following command to become superuser:
su
- Navigate to the directory where you want to create the swap file. For this example, we will be creating the swap file on the top directory of the external Micro SD card. We will assume that this directory is /storage/AXXXXXX :
cd /storage/AXXXXXX
- Create an empty file with a specified file size. The file size will be the swap size (or in simpler words, the amount of extra memory). Opinions on the best swap size vary. Each device will fill swap space differently, based on the way the owner uses it. It is better to start with an amount half the RAM of your device and experiment with the size until satisfied. Let’s assume we want a swap size of 512 MB:
dd if=/dev/zero of=swapfile bs=1024 count=524288In the above command, count states the size of the file in KB (512*1024). Change this value according to your setup. Furthermore, the value after the of= parameter is the file name.
- Configure the file for swap use:
mkswap swapfile
- Enable swap
swapon swapfile
Disabling Swap
If you need to disable swap, you can enter a Terminal App and give the following command at any time:
swapoff /storage/AXXXXXX/swapfile
replacing /storage/AXXXXXX/swapfile with the location of your swap file.
Tip
If any of the above commands throw an “unknown command” error, please install busybox on your device and retry.
Editor’s pick: How to Convert Media Files Using FFmpeg and Termux
Enabling swap at boot
If you follow the steps to create and activate a swap file through the Terminal, Swap will not persist after a reboot. You can use a helper script to enable it automatically at each boot if you have init.d support on your device. If you are not familiar with init.d, you can read this DroidViews article. A simple shell script is available in the downloads section below. Here is what you need to do:
- Download the zip, extract the script and edit it with a text editor on your personal computer or your Android device.
- Change the value of SWAP_PATH to the absolute location of the swap file you will use. In our example this value will be /storage/AXXXXXX/swapfile . Make sure there are no spaces around the ‘=‘ sign: SWAP_PATH=/storage/AXXXXXX/swapfile .
- Save the file
- Use a root File Manager to move this script inside /system/etc/init.d directory of your device
- Change the permissions of the script file. They should be 755 or rwx–xr–xr.
Downloads
In the next part of this How-to Guide, we will discuss the Swappiness kernel parameter and the partition method of Swap.


Excellent, well written post which succintly details its content in a manner which can be understood by readers who may otherwise avoid “techie” articles.
BTW, it’s refreshing to see that proper English has not yet been exterminated by the excessive preponderance of so many writers and authors to use ‘U.S. English’ these days.
Thank you very much for the kind words. I am happy to find out that the article is easy to read and understand.
If you are interested in Swap, make sure you read the next part of is guide ( which will be coming soon ), as it will explain even more details about this useful feature