As soon a new smartphone is released, the Android developer community starts working for achieving root privilege and developing custom mods and ROMs to enrich its experience. The legendary developer Chainfire tweeted a few days ago that he was pretty close to achieve root on the Pixel devices. The developer later confirmed that he finally has found a way to root Google Pixel and Pixel XL.
Victory is mine! Full systemless root achieved. Boot image mods only, /system fully intact, dm-verity switchable. #pixel
— Chainfire XDA (@ChainfireXDA) October 27, 2016
Having successfully tested his exploit, Chainfire shared the news along with his new SuperSU package on his Google+ page. By installing SuperSU 2.78 SR2 using fastboot commands, you can finally root your Google Pixel or Pixel XL and start using customizing it in new ways. On the older versions of Android, SuperSU used to change files in the system partition to gain root access.
On the other hand, the new SuperSU gives you systemless root by making modifications in the boot image instead of the system partition. Thus, Chainfire’s new SuperSU package enables superuser access on Pixel phones without making any changes in the system partition and allowing for dm-verity to be toggled. So, if you get into a boot loop after installing SuperSU 2.78 SR2, you can simply fix your Google Pixel by flashing the stock ‘boot.img’ from the factory images for your device.
Must Read: 40+ Google Pixel Tips and Tricks
If you own the international Google Pixel or Pixel XL, the root can be achieved simply by issuing a few commands. However, since the systemless root method modifies the boot image, your Pixel must have an unlocked bootloader. That’s to say, if you purchased your Pixel phone from Verizon or EE, you must unlock the bootloader first using the dePixel8 tool by the SunShine team.
Update:
Follow this tutorial to get Root and TWRP both.
Getting Prepared
- Make sure your Google Pixel/Pixel XL has an unlocked bootloader. If you own the Verizon-Google Pixel or Pixel XL, you can unlock your bootloader easily through dePixel8 tool.
- Download the boot-to-root SuperSU image file for your phone and extract the zip to get boot-to-root.img:
Google Pixel (all variants): root-sailfish-pixel.zip
Google Pixel XL (all variants): root-marlin-pixelxl.zip
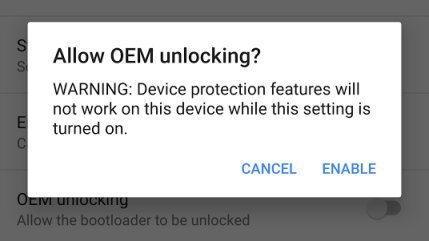
- Go to Settings> About phone> Build number and tap it 7 times to enable Developer options on your Google Pixel. Then go back to Settings> Developer options and enable USB Debugging and OEM unlocking.

- Download the Minimal ADB and Fasboot Setup and install it on your computer.
- Backup all your apps and data because your device’s storage will be wiped while unlocking the bootloader.
- Make sure your phone is properly charged.
Steps to Root Google Pixel and Pixel XL
Having made the above preparations and downloaded the required files, you’re all set to start with the rooting procedure. Just follow the steps described below:
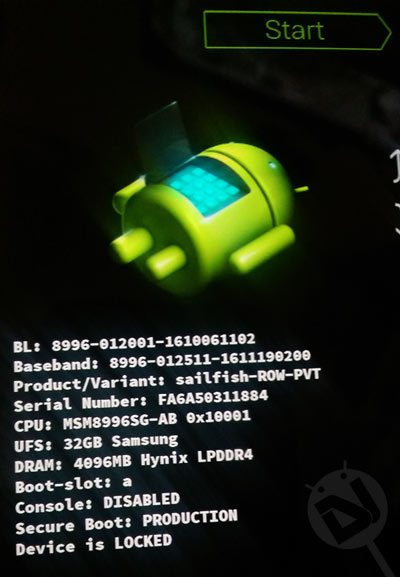
- Turn off your Google Pixel/Pixel XL and boot it into the Bootloader Mode by pressing and holding the Volume Down + Power buttons for 2-3 seconds.

- Connect your phone to your computer using a USB cable.
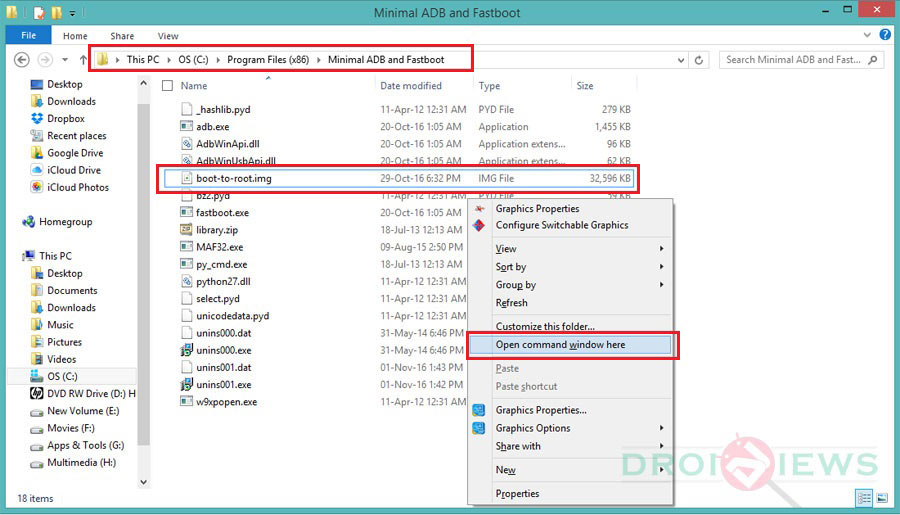
- Now go to the ADB and fastboot directory. If you have installed Minimal ADB Fasboot setup, navigate to the path where you installed it and open the folder.

- Now copy the boot-to-root.img file in this folder.
- It’s time now to launch a command window. You can do so by placing the mouse pointer at an empty space inside the folder window and then pressing Shift key + Right-click (on the mouse) and selecting Open command window here option.
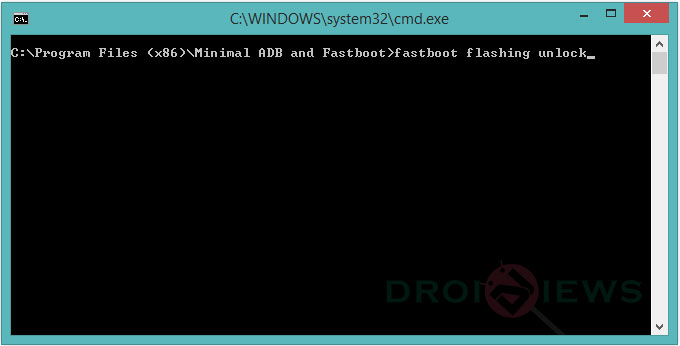
- Now issue the following command in the cmd window and hit the Enter key.

fastboot flashing unlock
- Now follow the on-screen instructions on your phone.
- Then run the following command in the command window:
fastboot oem unlock
- Having unlocked your Pixel phone, reboot your device into the Bootloader Mode again and type one more command in the command window and hit the Enter key:
fastboot boot boot-to-root.img - The boot-to-root image file will be installed on your Google Pixel. The process will take a few minutes and your phone will reboot 2 times. So, don’t panic and wait patiently.
Once your Google Pixel/Pixel XL boots up, it will have full root privilege. Enjoy!![]()
To verify root access on your Google Pixel, install and run the Root Check app from the Google Play Store.
[googleplay url=”https://play.google.com/store/apps/details?id=com.jrummyapps.rootchecker”/]


I am now stuck on a constant screen of the bouncing dots. This phone seems f****d now. *pissed off
Your phone is caught into a boot loop. Download the factory image and flash it to fix the device.
I did, and fixed the device. Thanks. I wasn’t actually p****d just frustrated. You know how it goes. Thanks for asking. I do have it unlocked, now I just have to figure out the ROOT!
Do you have the Verizon model, or did you take an OTA update after purchasing the phone?
I figured it out. I bought my Pixel XL 128GB straight from Google. I used the TWRP/SuperSU method. So yeah, like I said, thanks for your concern, but I figured it out. Patience on my part was key.
So, did the device get past the bouncing dot screen automatically?
Okay, glad to know!
Also, can you mention your phone’s firmware version?
Hi Christiopher, what’s the current status?