The Google Pixel 3 and Pixel 3 XL launched with just 4GB of RAM and pretty small batteries. Many expected Google might just be able to get away with it like Apple but that wasn’t to be. While those issues do plague the Pixel 3, it still gets software updates before anyone else and that’s not changing. If you’re rocking a Google Pixel 3 or any of its variants with Android Q beta, you can now root it. Keep reading to learn how you can root Pixel 3 or 3 XL. You can also use the steps given below to root Pixel 3a or Pixel 3a XL.
Requirements
- A Pixel 3, Pixel 3 XL, Pixel 3a or Pixel 3a XL.
- ADB and Fastboot must be installed on your PC.
- Enable USB Debugging and OEM Unlocking on your Pixel 3.
- Make sure your phone is charged up to at least 50%.
Warning
Rooting your phone will void your warranty. Worst case scenario, you may even end up with a non-usable device. DroidViews cannot be held responsible for your actions. Proceed at your own risk.
Get the stock boot image
Magisk works by modifying the stock bootloader image and it does that when you flash it from TWRP. We can do this manually but you will need the stock boot image for your device first and it can be found in your device’s firmware archive. You can download it from Google’s firmware download page for Pixel devices. Make sure you download the appropriate firmware. For your convenience, we’ve included the latest firmware links for the devices below.
Pixel 3a
- sargo-pq3b.190605.006-factory-81f898b7.zip | June 2019
- sargo-pq3b.190705.003-factory-55d7c2c4.zip | July 2019
Pixel 3a XL
- bonito-pq3b.190605.006-factory-8677ce70.zip | June 2019
- bonito-pq3b.190705.003-factory-db56e533.zip | July 2019
Pixel 3
- blueline-pq3a.190605.003-factory-258494df.zip | June 2019
- blueline-pq3a.190705.003-factory-c14bfb79.zip | July 2019
Pixel 3 XL
- crosshatch-pq3a.190605.003-factory-3a0d8bba.zip | June 2019
- crosshatch-pq3a.190705.003-factory-e59cf7a4.zip | July 2019
See Also: Top 5 Features I Miss in Stock Android
When you have the firmware, open it using any archive manager. You’ll find another folder inside it, so open that too. In this folder, look for an archive which has a name starting with image-crosshatch or image-blueline. Inside this archive, you’ll find several image files (files with .img extension) and also a file named boot.img which is the stock bootloader image that we’re looking for.
How to unlock bootloader on Google Pixel 3
Unlike other OEMs, unlocking the bootloader does not require an unlock key from the OEM. All it takes is a simple adb command.
- Go to the platform-tools folder on your PC. On a Windows PC, type cmd in the address bar and press Enter to launch adb in the command prompt. On a Mac or Linux system, right-click inside the folder and select Open in Terminal to launch the terminal.
- Now reboot your Pixel 3 into fastboot mode and connect it to your PC. To enter fastboot mode,
- Restart your phone.
- Press and hold the Volume down button as soon as the screen turns off. You’ll soon see the fastboot menu appear on the screen.
- Alternatively, you can connect your phone to the PC first, allow USB debugging from the pop-up dialog that appears and then, use the following adb command.
adb reboot bootloader
- Once your phone is connected to the PC in fastboot mode, unlock the bootloader by issuing one of the following two commands.
fastboot flashing unlock
OR
fastboot flashing unlock_critical
On some devices, a critical unlock might be required in order to flash bootloader files. In general, if you have a Pixel 3 XL, try the critical unlock command.
- On your phone, use the Volume keys to highlight Unlock the bootloader and press the Power key to select it. If you used the critical unlock command before, you will have to now push the standard to unlock command.
fastboot flashing unlock
- On your phone, highlight Start using the Volume keys if it is not already and press the Power button. Your device will then wipe itself clean and the bootloader will be unlocked.
How to Root Google Pixel 3
To root the Google Pixel 3 and its siblings like the Pixel 3 XL and Pixel 3a or Pixel 3a XL, we’ll need to use Magisk Canary since it is the only Magisk version right now that has support for the Pixel 3 on Android Q beta.
- Download the Magisk Manager Canary build and install it on your device. You’ll need to enable Unknown sources in Settings > Security to install an APK.
- Transfer the extracted boot image to your device. You can use the MTP connection or the following adb command. Using the command will push the boot image file to the Download folder on your device’s internal storage.
adb push <path to file> /sdCard/Download
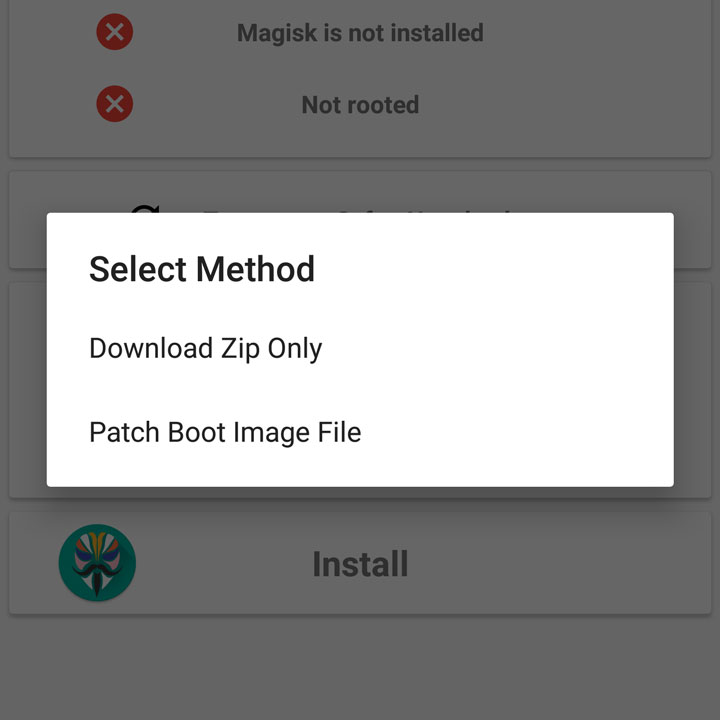
- Open Magisk Manager and wait a few seconds while it checks for root. When it’s not detected, a pop-up will appear, tap on INSTALL.

- Then select Patch Boot Image File and a file manager will open.
- Navigate to and select the boot image you just transferred to your device and Magisk will patch it.
- The patched boot image can be found in the Magisk Manager folder on your device’s internal storage. Copy it to your adb installation folder over the MTP connection or use the following adb command.
adb pull /sdcard/MagiskManager/magisk_patched.img
- Reboot your phone into fastboot mode again.
adb reboot bootloader
- Flash the patched boot image with this command.
fastboot flash boot magisk_patched.img
- Disconnect and reboot your device.
You should have a rooted Pixel 3 or Pixel 3a when it turns back on.
Read Next: 5 Magisk Modules You Must Try

Join The Discussion: