The Galaxy S9 and S9 Plus are the latest flagships from the Samsung’s popular S-series smartphones. There is a huge fan base for Samsung flagships as they bring the latest hardware and software innovations in the market. Along with the huge fan base comes a great developer support for Samsung devices. So, you’ll get to try a number of custom ROMs, mods, custom kernels and themes to take full control of your device and, unlock its full potential. Rooting your device is the first step to the customization business. So, today we will show you how to root Galaxy S9 and S9 Plus Exynos variants with official Magisk.
Samsung is known for its extreme security measures, so rooting Galaxy smartphones is always a challenge. But once you root your smartphone, you can get rid of all the bloatware on the device. Also, you can install many awesome apps that require root access. In this tutorial, we will see how to root Galaxy S9 and S9 Plus Exynos variants. So, don’t follow this tutorial if your S9/S9 Plus device runs on the Snapdragon variant. We will install the compatible TWRP recovery on your device followed by Magisk 17.1 to root your device. SafetyNet fails on Magisk 17.1, so you won’t be able to run certain apps which require SafetyNet to pass.
Rooting your device unlocks the device’s true potential and it has its downsides. The below-mentioned process is tested by many S9/S9 Plus users but you might still run into problems if you don’t properly follow the process. You will lose the warranty of your device as the rooting process will trip Samsung’s Knox security. Also, users will lose Samsung Pay and Secure Folder features forever after rooting the device. Currently, you can’t get these features back even if you unroot your device. So, consider these things before you root Galaxy S9 or S9 Plus smartphones. If you ever want to unroot your device, you can simply flash the stock firmware. So, if you’re willing to root your device, follow the below procedure carefully.
You may like: How to Disable Bloatware on Galaxy S9, S9 Plus and Note 8
Prerequisites
- This process is only for Galaxy S9/S9 Plus smartphones running on Exynos chipset.
- Install the latest Samsung USB Drivers on your PC for it to detect your smartphone.
- Enable USB debugging and OEM Unlock on your Galaxy S9/S9 Plus. To do this, go to your Settings » About phone » Software information. Now tap on the Build number 7 times until you see a toast message “Developer option enabled”. Go back to Settings and you should see Developer Options listed towards the bottom. Tap on it and enable OEM Unlock and USB Debugging.
- Make sure you have at least 60% charge so the device won’t go dead during the process.
- Backup all your important data from your phone to PC. This process will wipe your entire device including internal storage.
Downloads
- Download Latest Odin Tool
- Official TWRP for Galaxy S9
- Official TWRP for Galaxy S9 Plus
- no-verity-opt-encrypt-samsung-1.0.zip
- Magisk 17.1
- Magisk Manager
Read on: Capture Sharper Images with Galaxy S9 Plus Pro Mode Camera Tweaks
How to Root Galaxy S9 and S9 Plus [Exynos] with Official Magisk
- Download the TWRP recovery file for your Galaxy S9 or Galaxy S9 Plus.
- Download the Odin package and extract the contents to your PC.
- Now, boot your device to Download Mode. To do this:
- Turn off the device and wait for 5 seconds.
- Hold the Volume Down + Bixby + Power buttons simultaneously for 2-3 seconds and press the Volume Up key when you see the blue screen with exclamation sign to enter the Download or Odin mode.
- Connect your device to the PC with a USB cable. You will see Odin display Added!! when your device is detected. The ID:COM Port should also turn blue. If this does not happen, you may need to check your USB drivers setup on your PC or the USB cable.
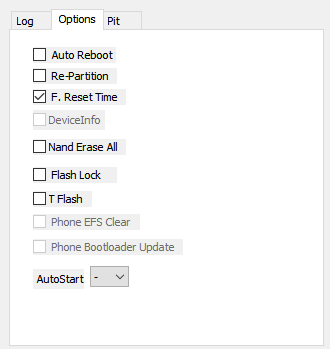
- Open Odin on your PC and disable the “Auto Reboot” setting from the Options tab.

- Now, select the TWRP file (tar image) in the AP tab of Odin and click Start to begin flashing the TWRP image.
- If the flashing process is successful, you will see “Passed” in Odin.
- Disconnect your device from PC and hold Volume Down + Power button till the screen goes off. Then immediately press Volume Up + Bixby + Power buttons to reboot to TWRP.
- If it asks, swipe to confirm “Select to Allow modifications“
- In TWRP, select the Wipe menu and format Data. You need to type “Yes” to perform the wipe. This step will erase all data on your device.
- Once the format is complete, go back to the main menu and select “Reboot” menu. Here click on “Recovery” to reboot to TWRP again.
- Download and flash “no-verity-opt-encrypt-samsung-1.0.zip” from the Install menu.
- Similarly, flash the Magisk file.
- Once successfully flashed, reboot the device.
- After the reboot, you should see the Magisk Manager installed. If it’s not installed somehow, you need to download the Magisk Manager app from the downloads section and install it manually.
That’s all. You have successfully installed TWRP and rooted your Galaxy S9/S9 Plus smartphone.
Related article: How to Root Galaxy S9/S9 Plus, Install TWRP and Fix OEM Unlock [Exynos]
Source: XDA


Join The Discussion: