Samsung is one Android OEM that goes head to head with Apple. As such, the Korean manufacturer is serious about the security on its devices. This, in turn, has resulted in Samsung’s devices becoming really hard to root. The security suit on Samsung devices called Knox is probably the major reason behind this. Any modifications done to the device trip it and that disables Samsung Pay permanently. Not to mention it also voids your warranty. Knox can’t be restored to its original state either so these changes are permanent. Thanks to XDA Senior Member me2151 and his team through the Snapdragon US variant of the Galaxy Note 8 has received root, without tripping Knox.
This means the device can be rooted without losing any of the device features such as Samsung Pay. This root method that the developers call SamFAIL does come with its own set of compromises. None of these is as major an issue as Knox being tripped though. Unless you count tripping SafetyNet but at least it can be restored, unlike Knox. Rooting your Galaxy Note 8 with SamFAIL does not SIM unlock your device nor does it unlock the bootloader. All it does is simply root it which means getting things back to how they were would be that much easier.
SamFAIL has been available for a while but there’s a new updated version available now. The previous version failed to root the Note 8 running the latest firmware from Samsung. SamFAIL v2 solves this problem. Some original issues from the previous version are still there.
Issues
- Once rooted with SamFAIL, you won’t be able to charge your device above 80%.
- There can be screen issues sometimes but that can be easily fixed, albeit temporarily, by turning the screen off and then on.
- Bixby home may possibly crash.
- SuperSU may ask to be updated multiple times.
Apart from these issues, there are some others as well. These issues arise due to the way SamFAIL roots your device so they’re not exactly issues but compromises you’d have to make. SamFAIL roots your device by installing a reworked boot image to your device and changes the system partition. So while Knox doesn’t trip, SafetyNet does. This means you won’t be able to use Snapchat, Android Pay, NetFlix, Pokemon Go and possibly some other apps. Also, due to the modification of the stock boot image, Magisk isn’t compatible.
Downloads
How to root Galaxy Note 8 (Snapdragon)
Flash N8_SamFAILV2_SYSTEM Odexed
This process remains the same as before. Since we’ve already published a guide before, here’s the process copied and pasted as it is, with correct file names of course.
- Download the N8_SamFAILV2_SYSTEM Odexed file from above. This is a pre-rooted system file.
- Extract the system.tar and PIT files from the zip.
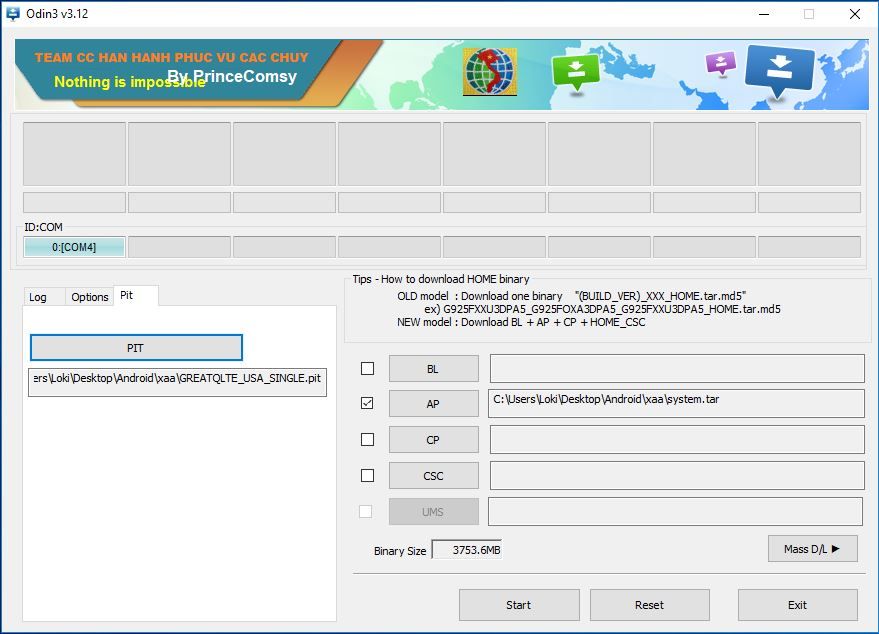
- Launch Comsey ODIN on your PC. If you don’t already have the Comsey ODIN you can download it from above.
- Boot your Note 8 into Download mode. To do so, power it off and then press and hold the Bixby and Volume Down buttons together. While holding the two buttons press and hold the power button to switch on the device. Leave the keys once you see a message displayed on the screen and press Volume Up to boot into download mode.
- Now connect it to your PC via a USB cable. Make sure the connection isn’t loose.
- If your Note 8 is detected correctly, you’ll notice the ID:COM port turns blue.
- Click on the AP button and select the extracted system.tar file.

- Go to the Pit tab on the left and click OK or Close on the warning box. Then click on the PIT button and select the extracted PIT file.
- Now go to the Options tab and select the following :
- Auto Reboot
- F. Reset Time
- Nand Erase All
- Re-Partition.
- Make sure nothing else is selected and then click on the Start button.
- At the end of the process, ODIN will show a FAIL! message. This isn’t unexpected however so there’s no need to worry.

- Boot your phone into Download Mode again and don’t fret if it says it is in an emergency mode. This too is expected behavior.
Flash N8_SamFAILV2_FIRMWARE
- Download and extract the N8_SamFAILV2_FIRMWARE on your PC.
- On ODIN, click Reset or close it and launch it again.
- Now to select the firmware, click on the BL button and select the bl.tar file. Similarly, click on the AP and CP buttons and select the ap.tar, and cp.tar files respectively.
- Head over to the Options tab and this time select only Auto Reboot and F. Reset Time. Do not select Nand Erase All or you’ll just have to repeat the whole process again.
- Click on Start now to begin the process.
- This time, you should see a PASS! message and your phone will reboot automatically.
- When it reboots, go through the setup process until you reach the home screen.
- Now find the SuperSU app in your app drawer and launch it.
- You will be asked to update the SU binary.
![How To Root Samsung Galaxy Note 8 Snapdragon USA Variant [N950U,N950U1,N950W]](https://www.droidviews.com/wp-content/uploads/2017/12/superSU-update-binary.jpg)
- Tap CONTINUE and then select NORMAL.
- Once the SuperSU binary is updated, it will ask you to REBOOT your device. Do it.
- You may have to update the SU binary again after reboot. Possibly a couple of times or maybe even three or four times. After that, you can enjoy the benefits of root access on your device.
source: xda


Join The Discussion: