Samsung is the company that introduced big displays to most of us. Once smaller and compact devices ruled the roost, but with the advent of Phablet devices, people are going crazy with the display size. Bigger the display means better multimedia experience on your smartphone, but way too much bigger display is not so trendy. One such device from Samsung is the Galaxy Mega 6.3 with a humongous 6.3-inch screen which will please the big boys out there.
The monstrous Mega 6.3 device is very cool for multimedia experience and browsing web, but if you want get your hands dirty and do some development stuff with the Mega 6.3, here we are to help you with the rooting and installing recovery on your device. Rooting is a process of exploiting the Android OS to unlock all the features to the user and give all permission to the user making him the true owner of the device. Once the device is rooted, you can decide what operation the device can perform.
Rooting gives you the ability to make your device faster by installing performance mods or removing junk apps from your device that are pre-installed by your manufacturer and can’t be uninstalled without root user permission. But sometimes, rooting also puts the device in danger which is why we prefer a custom recovery to backup the device in case of any misfortunes.
So here we are today, to help you with the rooting and installing TWRP recovery on your Galaxy Mega device with a few simple steps. So let’s get on with the procedure to root and install recovery on your device.
WARNING
This Guide is intended only for the Galaxy Mega 6.3 GT-I9200, not for any other device of Samsung. Be extra cautious when you choose the recovery builds as flashing wrong recoveries might result in a bricked device.
Rooting and installing a Custom Recovery will void your device warranty either temporarily or permanently. You alone are responsible for any consequences that might occur during the process. DroidViews or any of its community members shall not be held responsible for any damage to your device.
PREPARE YOUR DEVICE
- Charge your Galaxy S5 above 60% battery level to avoid shutdowns during the process.
- Enable USB Debugging: Link
- Install Required USB Drivers: Link
- Backup your device storage, Contacts, SMS etc. using Google Sync service or any third-party app.
- Download the Odin flashing tool and extract the downloaded zip to your PC, so now you have Odin3.09 folder: Odin3 v3.09.zip
ROOT GALAXY MEGA GT-I9200 on KITKAT (ANDROID 4.4.2)
- Download the Odin flash-able pre-rooted kernel file: vcoreroot-v2.tar
- Move the downloaded .tar file from the download location to the Odin3.09 folder on the desktop.
- Double-click on Odin3 v3.09.exe to start the flashing tool.
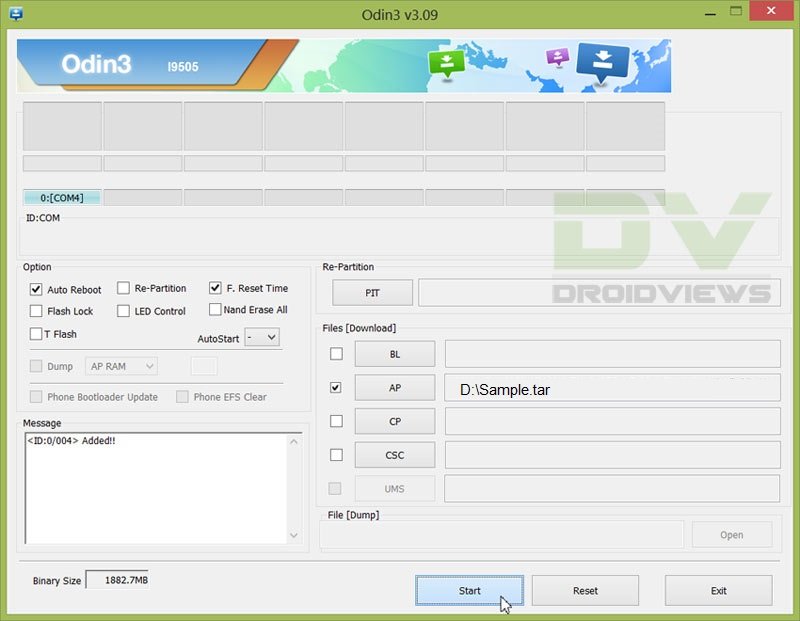
- In the Odin window, make sure Auto Reboot and F. Reset Time are checked and everything else is unchecked.
- Make sure that Re-Partition is not checked as this might corrupt your partitions.
- Power off your phone. Now press the Volume Down, Home and Power buttons altogether until you see the warning screen, then use the power button to confirm and enter Download Mode.

- Connect the device to the PC.
- As soon as you connect, the Odin window will display the acquired ID:COM port on the top-left and message box shall display Added!! message.
- Click on AP and select the vcoreroot-v2.tar.
- Click on Start and the process will begin.
- It will take a few seconds to complete the flashing process and upon completion will display a PASS!! message.
- Your Galaxy Mega 6.3 will reboot automatically after the process is finished.
Note: Sometimes the device does not boot into recovery mode. In that case follow the entire process but uncheck Auto Reboot option. After flashing, pull the battery and manually boot the device into recovery by pressing Volume Up, Home and Power Keys simultaneously to start the process.
That’s it, rooting your device is quite easy right?
Now let’s install the Official TWRP recovery on your device. Currently, the latest version available is 2.8.0.1.
INSTALL TWRP ON GALAXY MEGA GT-I9200
- Download the latest Odin flashable TWRP file, openrecovery-twrp-2.6.3.0-melius.tar
- Move the downloaded .tar file from the download location to the Odin3.09 folder on the desktop.
- Double-click on Odin3 v3.09.exe to start the flashing tool.
- In the Odin window, make sure Auto Reboot and F. Reset Time are checked and everything else is unchecked.
- Make sure that Re-Partition is not checked as this might corrupt your partitions.
- Power off your phone. Now press the Volume Down, Home and Power buttons altogether until you see the warning screen, then use the power button to confirm and enter Download Mode.
- Connect the device to the PC.
- As soon as you connect, the Odin window will display the acquired ID:COM port on the top-left and message box shall display Added!! message.
- Click on AP and select openrecovery-twrp-2.6.3.0-melius.tar.
- Click on Start and the process will begin.
- It will take a few seconds to complete the flashing process and upon completion will display a PASS!! message.
- Your Galaxy Mega 6.3 will reboot automatically after the process is finished.
Note: Sometimes the device does not boot into recovery mode. In that case follow the entire process but uncheck Auto Reboot option. After flashing, pull the battery and manually boot the device into recovery by pressing Volume Up, Home and Power Keys simultaneously to start the process.
That’s it. You have successfully installed TWRP recovery on device. Let us know your experience with the guide in the comments section below.


vcoreroot-v2.tar doesn’t work, after rebooting you get a black screen. Just use TWRP
NO INTSALEN ESTOS ARCHIVOS … TENGO ANDORID 4.4.2 .. EN MI MEGA .6.3 Y ME METI UN BRICK… NO PASA DE EL LOGO .. TUBE Q REINSTALAR EL SISTEMA COMLETO GRACAIS A ESTE HIJO DE LA GRAN PUTA !!
same here now phone is bricked
It set warranty bit kernel
BULLSHIT ! IT RUINED MY PHONE ! IT DISPLAYS set warranty bit kernel !
thanks !