After buying a new smartphone, the first thing we begin to look for a working method of rooting it. In most cases, our developers are fast enough to come with a rooting exploit within hours of a device’s release, and when it is a Samsung Galaxy flagship, it is just obvious that we look to one man, Chainfire.
CF-Auto-Root packages by Chainfire are the most known tools for rooting Samsung devices, and this time too the man is back in time with his weapon to gain root access on the Galaxy Note 3. With the release of his rooting package, it has now become very easy to root this new phablet device in just a few clicks. In the present guide, we would not only tell how to root Galaxy Note 3 SM-N900, but also describe the steps to install CWM Recovery on it.
Disclaimer:
The procedure given below is considered risky and so it must not be taken for granted. Rooting voids the warranty of your device and the method might put your phone at risk. In case of any mishap, DroidViews or the developers will not be liable for the same. You are the master of your phone and decision both.
Note:
The rooting method described here works on Android 4.3 Jelly Bean and Android 4.4.2 KitKat both.
Prerequisites:
Here are a few things to be taken care of before you move on to the real action. Please do not miss even a single item to avoid failure.
- Download the Odin tool and unzip the file: Odin3_v1.85.zip
- Download Chainfire’s rooting package for the Galaxy Note 3 and extract the zip: CF-Auto-Root-ha3g-ha3gxx-smn900.zip
- Download TWRP Recovery for Note 3 SM-N900: openrecovery-twrp-2.6.3.7-ha3g.img.tar
- Make sure you have install Samsung USB Drivers or Kies on your computer.
- Turn on USB Debugging on your device by going to Settings> General> Developer options. If this option is disabled on your device, read this guide to enable it.
- Go to Settings> General> Security and turn off Reactivation Lock.
Root Galaxy Note 3 SM-N900:
- Boot your Note 3 into Download Mode. To do so, turn off your device and then press and hold the Volume Down + Home + Power buttons simultaneously for 2-3 seconds. When you see the warning screen, press Volume Up to continue to the Download Mode.
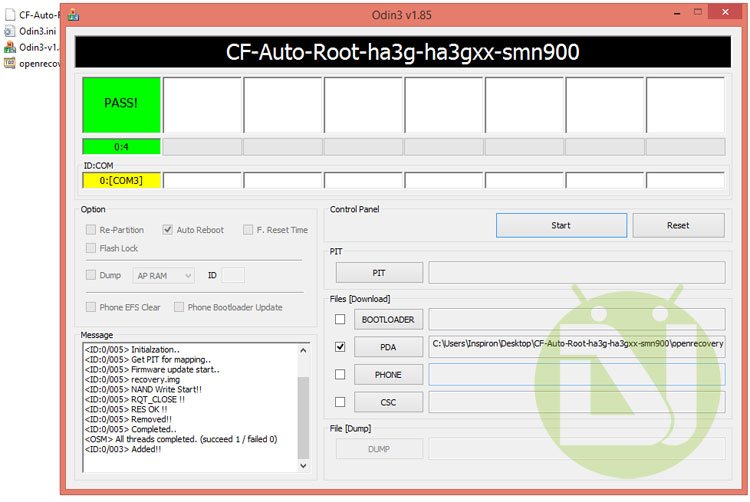
- Launch Odin and connect your phone to computer via USB cable. Wait till Odin detects your device. This is signaled by the ID:COM port turning Yellow and “Added!!” text at the message box on Odin.
- Make sure that only Auto Reboot and F. Reset Time option are checked on Odin.
- Click the PDA button and select the CF-Auto-Root file with .tar.md5 extension.
- Finally, click the Start button to initiate installation.
- CF-Root will be installed to your device in a matter of seconds and then you will see RESET! / PASS! message on Odin followed by automatic device reboot.

- Disconnect the USB cable and wait till the device reboots.
Go to your phone’s app drawer. You should now see a new app called “SuperSU” there. This indicates that your device has root access now. To further verify it, install the Root Checker app from the Google Play Store and run it.
Installing TWRP Recovery on Note 3:
Having rooted your Galaxy Note 3 SM-N900, you can also install TWRP recovery on it. Please note that this step is mandatory. Install a custom recovery only if you plan to install custom ROMs or mods, or backup your ROM. As for the installation method for the TWRP file, it is the same as the rooting part. Just repeat all the steps from above. The only thing to be be careful about this time is to select openrecovery-twrp-2.6.3.7-ha3g.img.tar file at the 4th step when you click the PDA button.
You Might Also Like:
How to Install Official Firmware on Galaxy Note 3 (All Models)


bootloader spec
ODIN MODE
PRODUCT NAME: SM-N900V
CURREBT BINARY: CUSTOM
REACTIVATION LOCK: OFF
QUALCOMM SECUREBOOT: ENABLE (CSB)
RP SWREV:S1, T1, R1. A4. P1
SECURE DOWNLOAD: ENABLE
UDC START
hi my note 3 verizon version SM-N900V i root it from kingroot after that i install rom jasmine lolipop from xda firmware N900VVRUEOB6_PartialFirmware.tar.md5 flash it with odin AP after that i install jasmine rom zip N900V_JasmineROM_v5.0 file to my external sd car click it after some time i got an error e footer is wrong e verification failed
Andriod system recovery
reboot system now
apply update from ABD
apply update from external storage
apply update from cache
wipe data/factory reset
wipe cache partition
reboot to bootloader
power down
view recover logs
Enable cp logging
Disable cp logging
more info is given at techglen website
Oh please get this for the Verizon variant I am so in need :/
Hi, you’ll have wait for about a week hopefully. When a rooting method is available for the device, I’ll let you know.
I’m willing to wait I just wanted to make sure it was going to be possible. Just before my return period is up.
Actually, Verizon’s device are a bit harder to root and unlock and so it takes a little more time for a working method to arrive. I’ll soon be hare as it has happened in the past.
Well ok then, wait I will.
I’m seeing a dev over on XDA says he’s just about got it. I’m hoping by tonight if that’s true.
Right, there is also a bounty offer for the dev who successfully roots and finds a way to install custom recovery. It’ll hopefully out soon.
Verizon Note 3 Rooted!!
See this: https://www.droidviews.com/root-verizon-galaxy-note-3-sm-n900v/
I saw it this morning and was able to root my VZW Note 3. I’m so happy right now .
Nice