Doing a reverse image search is a great way of getting in-depth detail about an image. Reverse searching images is pretty easy on a desktop. You just need to visit the Google Images site and click on the camera icon. Upload the image and that’s it. You will get all the details about the uploaded image. Unfortunately, the process of reverse image search using an Android device is not that easy.
Therefore in this guide, we will try to explain all the steps involved in the easiest possible manner. Although the process is shown below is carried out on the Google Chrome Browser, yet you may use any of the browsers. Also, if you are new to this browser, then don’t forget to check out these tips and tricks for Chrome Browser on Android.
What’s Reverse Image Search?
Reverse image search is a technology used by search engines to find a specific image no matter where it appears online. It takes a user-uploaded image as an input and gives you image results as outputs related to the query. This is a very practical feature for professionals and enthusiasts as it lets them do the following things:
- Find the higher quality and resolution versions of an image.
- Find out the faked out and duplicated versions of an image.
- To ensure the observation of copyright of an image.
- Find more information about an image.
- Get details about the products or objects displayed in an image.
Reverse Image Search on Android Devices
There are quite a few apps and websites that are capable of doing a reverse image search and they do the job pretty well. But they are not as efficient as the Google Search Engine. So the process will be carried out using Google Search using the Chrome Browser. Just follow the below steps:
- Open the Chrome browser on your Android device.
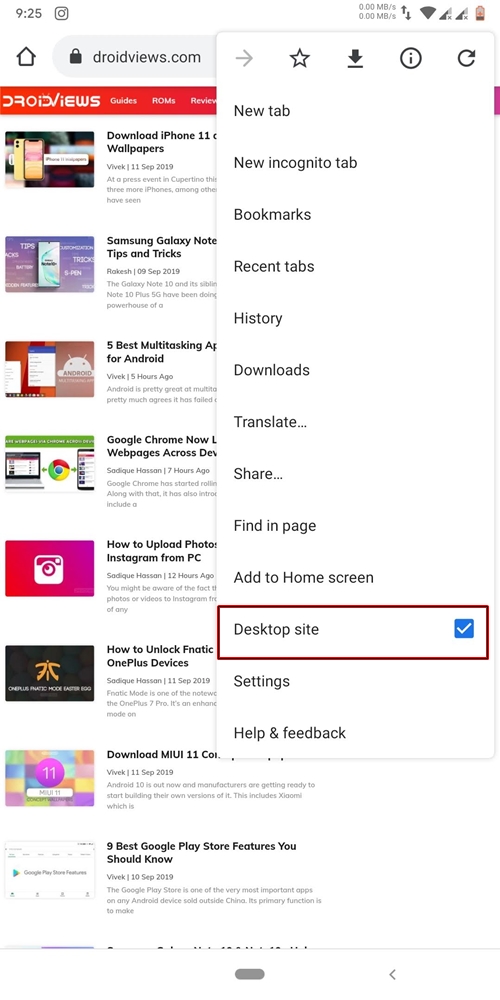
- Tap on the three vertical dots present at the top right and checkmark the box next to the Desktop site.

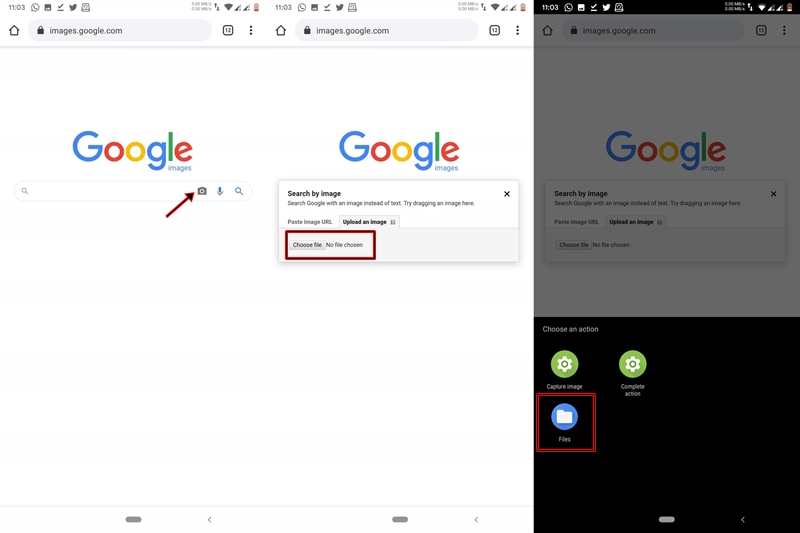
- Now open the Google Images website.
- Next, tap on the camera icon present inside the search box.
- You may now either paste the URL of any image or directly upload the image from your device. Here, we would be doing the latter.
- Tap on Upload an image and click on the Choose file option.

- Browse for and select the desired image using the Files app.
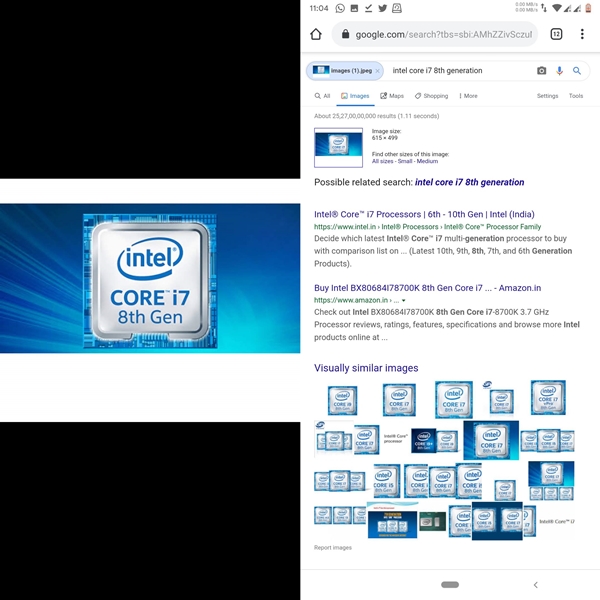
- The selected photo will now get uploaded and subsequently, Google will do a reverse search on it. Within a second or two, you will be presented with the complete details of the image.
- Below the image, Google will also suggest webpages which might contain the matching images. If you aren’t satisfied with the reverse image’s search, then try visiting any of these webpages.

The uploaded image on the left and Google’s reverse image result on the right
With that, you have successfully done a reverse image search using an Android device. As already mentioned, this process could be carried out with any browser. Just make sure to enable the Desktop View before visiting the Google Images site.
Google Reverse Image Search Alternatives
Apart from Google, there are other third-party apps and websites which are also capable of doing a reverse image search. Some of them are:
- Kiwi Browser’s built-in “Search by Google Image” tool
- TinEye
- Google Lens– although not a reverse image tool, but it does the job quite well. Just open any image using Google Photos and click on the Lens icon (third icon from left). You will now be presented with all the information related to the image. You may also take the help of our detailed guide on using Google Lens on Android devices.
With this, we come to the end of the guide on how to do a reverse image search on an Android device. Do let us know whether Google was able to provide all the necessary information you needed, or you had to opt for some alternatives.
Read Next: Hack the Hidden Google Chrome Dinosaur Game


Join The Discussion: