Google Nexus 9 – The most remarkable Android based tablet by Google and manufactured by HTC. The tablet has been long rumoured by the names of “Next-Gen Nexus 7”, “Revised Nexus 10” and even the “Nexus 8”, and it finally came out with the announcement of Android 5.0 Lollipop, presenting it to be also one of the first two devices to run Lollipop out-of-the-box. The Nexus 9 has proved itself to be strong contender to the every device in the tablet marketplace and especially to Apple’s iPad. HTC has been pioneer In terms of manufacturing and choosing it might have been the best decision made by Google, just like the Nexus One, which was in itself a huge success.
What makes the Nexus 9 a rare piece of work? Is it the display? Well, that is one aspect but it is not what counts the most. The brilliant tablet is one of its kind supporting 64-bit architecture, running a powerful NVIDIA Tegra K1 “Denver” processor, an 8.9-inch high-definition IPS LCD display, Kepler DX1 GPU for amazing gaming experience, with dual front-facing HTC BoomSound capabilities and much more.
Not much time before the device was out in public hands, our root expert Chainfire had his hands to work and got the device running root permissions. We covered a guide on How to Root Nexus 9 and Unlock Its Bootloader and How to Install TWRP recovery on Nexus 9. Both this guides are the basic requirements, if you’ve wished to install custom ROM on your Nexus 9.
Now that you have installed a custom ROM, Recovery, Kernel or tweaks on your tablet, are you not satisfied with them? If no, then you’re just at the right place to revert back and restore Nexus 9 to stock by flashing the Factory Images provided by Google. The procedure is simple and requires a few tools with a little command line knowledge. This will restore all the Nexus 9 partitions back to stock.
Warning!
Installing factory images or hanling the device partitions in a wrong way may damage your Nexus 9. DroidViews or any of its community members do not hold any responsibility for any damage to your device.
Before You Begin
- Backup your Nexus 9 completely, this includes your device storage, SMS, contacts, calendars etc, because everything will be wiped off your device.
- Enable USB Debugging in Developer Options under Settings, for the device to be recognized by ADB. If you don’t know how, read our guide.
- Charge your device to at least 60% battery to avoid any sudden shutdowns during the process.
- Download required tools package (see Downloads below).
- Install WinRAR or similar archive manager.
Downloads
- Nexus 9 Factory Image: Link
- Android tools package: Link
Instructions to Restore Nexus 9 to Stock
- Browse to location where the Factory Image is placed on your PC. Right-click on the file and click on Extract here.
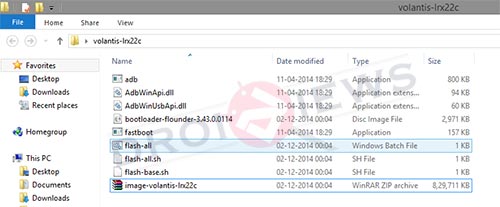
- Open the extracted folder which will be containing all the required files. Suppose in this case it is “volantis-lrx22c”, which contains all the files including bootloader and firmware images, and also the flashing scripts for the three different OS.
- Open the location where the android-tools.zip was downloaded, right-click on it and select Extract here. Now, move the contents of the extracted android-tools folder to the volantis-lrx22c folder.
- Now, you have all the required tools and firmware files inside one single folder.

- Connect your Nexus 9 to the PC via USB cable.
- Open the volantis-lrx22c folder, press SHIFT key and right-click on an empty space inside it. Select Open command window here from the pop-up menu that flashes.
- Enter the command below to reboot your device into bootloader mode for the further flashing procedure.
adb reboot bootloader
- Now since I am using the latest 5.0.2 factory image, the file names may differ from the earlier or the upcoming images in the future. So, make sure to replace the highlighted file name with the corresponding, on your PC. Enter the commands one after the other, in the order as written.
fastboot flash bootloader bootloader-flounder-3.43.0.0114.imgfastboot reboot-bootloader
fastboot –w update image-volantis-lrx22c.zip
- The flashing process will take sufficient time to complete, so hold on and let it finish. The device will reboot automatically once its done.
- The last step would be to lock the bootloader again, to do so, reboot back to bootloader mode and enter the command:
fastboot oem lock
- The device will perform a complete reset with everything stock.
Google has been generous for those who are completely new to this procedure, you can also run the scripts mentioned below and the process will run automatically on the respective operating systems.
- flash-all.bat (Windows)
- flash-all.sh (OSX)
- flash-all.sh (Linux)
So now you have been successful in the process to restore Nexus 9 to Stock by flashing the Factory Image. Have you come across an error during any of the mentioned steps? Post them below and we will do the best at our hands to help you out. Also, provide us with your valuable feedback, to help us build a better community.
More For Nexus Users
How to Use USB OTG on Nexus 5 without Root


I did EXACTLY as said but it didn’t work. Looks like I’m stuck with a unstable custom rom because apparently it’s RANDOM whether something works or not with tech. Looks like I might need a new tablet and this time I won’t bother with trying new roms because there is no going back due to how crappy things work when you try to go back