We have known that the smartphones from the past few years have started to come with the Corning Gorilla Glass which has been developed by Corning. It is known that the Corning Gorilla Glass is extremely durable and scratch-resistant and we have seen the latest version of Gorilla Glass, the Gorilla Glass 5 coming with all the smartphones launched this year. However, it may happen that you have dropped your smartphone for the first time ever and you see that your screen has been completely shattered.
Also, it is obvious that the only solution to the shattered screen is to replace the screen via an RMA. However, if you have important data on your smartphone which you want to access urgently and you can’t do so as you have a shattered screen then we have attached a guide below which will help you pull all the data from your phone without even touching your phone. Thanks to XDA member FuzzyMeep Two‘s ADB Data Recovery Tool that makes recovering data easier.
Prerequisites
- You should have ADB and Fastboot installed on your PC. In order to install ADB and Fastboot, you have to follow our tutorial to install ADB and fastboot on your pc
- Enable USB Debugging and Developer options on your smartphone if you have not done that already. To do so, you need to follow this guide to enable USB debugging and developer options on your phone
- This guide also assumes that you have installed a custom recovery on your smartphone like TWRP. If you don’t know about the steps to install a custom recovery, you can find the guide for your smartphone from here.
- Also, you need to have at least 50% battery or more on the device to proceed with the below tutorial
Downloads
ADB Data Recovery Tool by FuzzyMeep Two | Mirror
Steps to recover data from a damaged Android phone using ADB Data Recovery Tool
- First of all, you will have to necessarily complete each and every step mentioned in the prerequisites section above.
- Now that you have completed all the steps from the Prerequisites section, you will have to download and install the ADB Data Recovery Tool from the Downloads section above.
- Now, turn off your damaged smartphone completely and reboot it to the fastboot mode by pressing Power+Volume Down button for 4-5 seconds.
- After this, you will have to open the folder in which you have installed ADB and Fastboot as mentioned in the prerequisites section and open command prompt window inside it.
- Now, make sure that the device has been attached via the USB cable to the PC properly. In order to check this, you have to type the below command:
fastboot devices[If you see an alphanumeric code in the next line after this command, you can rest assured that your phone is properly connected to PC]
- Now, enter the recovery mode on your smartphone by turning off your device once again and pressing Power + Volume Up button for 4-5 seconds and you will see the custom recovery screen on your device.
- After this, you will have to move to the ADB Data Recovery Tool that you downloaded on your PC and open the application.
- Once in the ADB Data Recovery tool, you will see four options for the Data Recovery on your device which we have listed down below
1.(OUT)..... OUTPUT LOCATION (default=C:\RecoveredData)
2.(ADB)..... SET ADB LOCATION (def=C:\Android\platform-tools)
3.(DEV)..... SET DEVICE TO USE(USB DEvice or Emulator)
3.(RUN)..... RUN
- Now, if you need to change the default Output Location then you need to enter 1 and proceed so that you can change the default folder for output.
- You also need to set the ADB location by copying the path of the ADB installation folder on your device and pasting it into the application. For this, you have to type 2, press enter and paste the link to the folder.
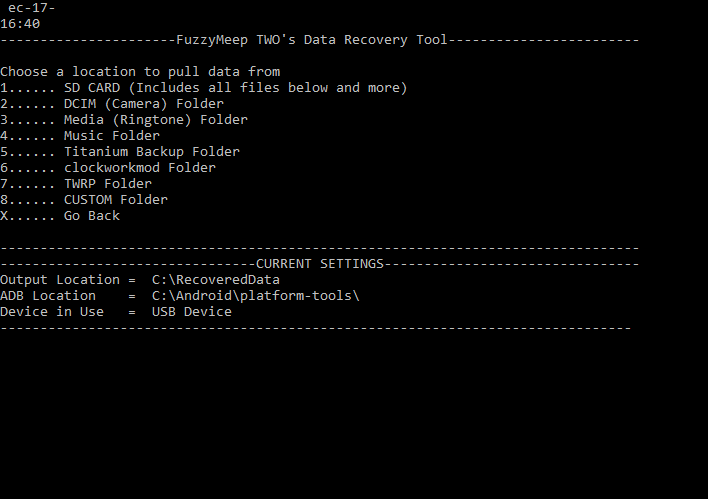
- Once you are happy with all the settings of the application, you will have to type 4 and enter the typed number. This will run the application for Data Recovery via ADB and you will see the screen as attached below.
- You will have the option to pull data from the SD card via entering 1. Other than that, you can also choose between other options like pulling data from DCIM folder, Media folder, Music folder as well as other folders that are present on the phone.
- However, it is recommended that you enter 1 and pull all the data that is available on your SD card which will take anywhere around a few seconds to a few minutes to complete the entire process and you need to visit the output location to check all your pulled data.
- After this step, all your data from the smartphone will be pulled via ADB and will be available on your PC for future use.
Make sure to follow the above guide properly and you should be able to pull all the data from your device to your PC. However, if you have any issues with the usage of the application or the device then you can comment in the comments section below with your problem and we will try to help you solve the problem as much as we can.
Here are some more data recovery tools for Android:
- iSkysoft Data Recovery – Seamlessly Recover Your Lost Files on Windows/Mac
- Recover Lost Data Using EaseUS Data Recovery Software
- iSkysoft Toolbox – A Handy Android Data Recovery Tool
- How to Recover Deleted Files from Android Devices and Windows Computer
- PhoneRescue Recovers All Types of Lost Data Including WhatsApp Messages


This might be a good tutorial for people who can still use their phone. But when you have a damaged phone “if you have important data on your smartphone which you want to access urgently and you can’t do so as you have a shattered screen then we have attached a guide below […]” then the prerequisite:
“Enable USB Debugging and Developer options on your smartphone if you have not done that already. To do so, you need to follow this guide to enable USB debugging and developer options on your phone”. How can you activate that on a damaged phone that you can’t access?
I am sorry, but this guide is useless for people who haven’t had activated usb debugging before the phone was damaged.