Generally, most Android devices that are released all over the world have different variants, even though the hardware is pretty much the same. Manufacturers do this because different regions of the world have different needs and different networks. It is important to meet the requirements and that requires minor modifications to the software. Essentially, the devices are still the same in most cases, not all. The Honor 8 Pro is no different. There’s a Chinese variant (DUK-AL20), and several international variants (DUK-L09). And all of these variants are basically the same except for the presence of VoLTE on the Indian variant. This makes it bit less risky and a little bit easy to rebrand Honor 8 Pro.
Rebranding your device to a different variant not best suited for your region might sound like a foolish task. It is not, especially when there aren’t any major differences but for a few pre-installed apps you aren’t using anyway. The trade provides you the benefit of being able to install updates before you’re supposed to. That is if you rebrand your Honor 8 Pro to a region that receives updates before yours. For instance, Android Oreo beta running EMUI 8.0 is available for DUK-L09C900 and DUK-AL20C900 right now. Which means you can install the update before it is officially released in your region if you rebrand.
Requirements
There are a couple of requirements without which you cannot rebrand your Honor 8 Pro.
- One of those being that the bootloader on your device should be unlocked. This is also required to fulfill the second requirement.
- The second requirement being that your device should have TWRP recovery v3.1.1 installed. Fortunately for you, we have a guide that you can follow to unlock the bootloader and install TWRP on Honor 8 Pro. Don’t go ahead and root the device though since it is going to be wiped clean anyway. So make sure you back up everything important.
- ADB and Fasbtoot must be installed on your PC as well as the necessary USB drivers.
- You will also need an external microSD card.
Note
Rebranding is not officially supported by manufacturers so we’re not sure if your warranty will remain intact. Regardless, you must follow the tutorial below at your own risk. DroidViews cannot be held responsible for any damage to your device. Your data will be wiped a few times during the process so make sure you have everything backed up.
Rebranding is currently available only for the following Honor 8 Pro variants:
- DUK-AL20C00
- DUK-L09C432
- DUK-L09C900
Downloads
OEMInfo
- oeminfo_DUK-AL20C00.bin – DUK-AL20C00
- oeminfo_DUK-L09C900.bin – DUK-L09C432
- oeminfo_DUK-L09C432.bin – DUK-L09C900
Modified stock recovery
Stock ROM
- DUK-AL20C00B173
- DUK-L09C432B120
- DUK-L09C900B122
How to rebrand Honor 8 Pro
- Download the oeminfo for the Honor 8 Pro variant that you want to rebrand your device to. Also, download both the nocheck recovery images and transfer them to the ADB installation folder. You’ll also need to download the stock ROM of the device you want to rebrand to.
- Transfer the downloaded oeminfo file to the root of your device’s internal storage.
- Now reboot your device into the recovery mode. To do that, first power off your phone. Then Press and hold the Volume Up button and then the Power button, together. Release the Power button when you see the Honor logo.
- Once in TWRP recovery, go to Advanced > Terminal.
- Type the terminal command below to flash the oeminfo to the correct partition.
dd if=/external_sd/oeminfo_DUK-<model number>.bin of=/dev/block/bootdevice/by-name/oeminfo
- Now connect your phone to the PC with a USB cable and reboot it into fastboot mode. You can easily do this by going back to TWRP main page and selecting Reboot > Bootloader.
- Now launch the ADB command interface on your PC and use the following command to flash the downloaded stock recovery images. Disconnect the cable when done.
fastboot flash recovery DUK-RECOVERY-NoCheck.img
fastboot flash recovery2 DUK-RECOVERY-NoCheck.img
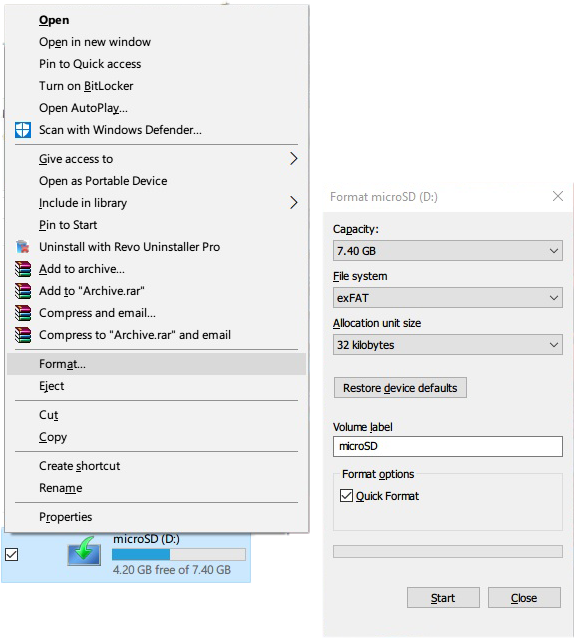
- Extract the ROM archive on your PC. Transfer the extracted dload folder to an external microSD card and insert it into your phone. You’ll need to format the microSD to exFAT first, in order to transfer the dload folder into to.

- Insert the microSD into your phone, then press and hold all the three buttons (Power + Volume Up + Volume Down) together. Keep holding the buttons until your device reboots and until you see the upgrade starting on the screen.
- This will reset your device’s bootloader, thus wiping all data.
source: xda


Join The Discussion: