An advanced Android user always wants to minimize the work during the development process so that more focus can be beamed onto the target. ADB or Android Debug Bridge is a great tool for those who want to perform tasks on Android via computer. You can, for example, push and pull files using ADB push and ADB pull commands on any Android device.
During the development of a ROM or a Mod, many tiny operations like retrieving files from the device, flashing the mods, restore the backups if the device is bricked and so on. These tiny operations consume a major chunk of time during this process, and one most important operation is the pushing files to and pulling files from an Android device.
Transferring the APK’s and other files in and out using the normal process where you need to transfer the files using a USB cable and then using the root explorer to copy it to the system partition and then assigning permissions is a lengthy and tiresome process. Even if you make flashable Zips which can be flashed using recovery, you need to reboot to recovery every time you want to try the modification. The ADB method is the easiest way to transfer files from your computer to phone using ADB Push command, and pull the files from your Android device to your computer using ADB Pull command.
Using the ADB tool, you can push and pull files with simple commands, so you don’t even need to touch your device while trying your mods. Today, we will show you how to push and pull files on an Android device using the ADB commands. Recently, we compiled a huge list of ADB and Fastboot commands that can be helpful to you in doing amazing things on your Android phone or tablet.
Prepare Your Device
- Charge your device above 60% battery level to avoid shutdowns during the process.
- Install proper device drivers on your PC and check if the device is detected. You can find the USB drivers for your device from our drivers downloads page.
- Enable USB Debugging on your phone from Settings> Developer options. If you do not find Developer option under device settings, read the instructions given here.
- Either setup ADB and Fastboot on your computer, or download the Minimal Fastboot/ADB tool and unzip it: adb-platform-tools.zip
Push and Pull Files Using ADB Commands
- Download and extract the platform-tools.zip on your Windows, Mac, or Linux computer.
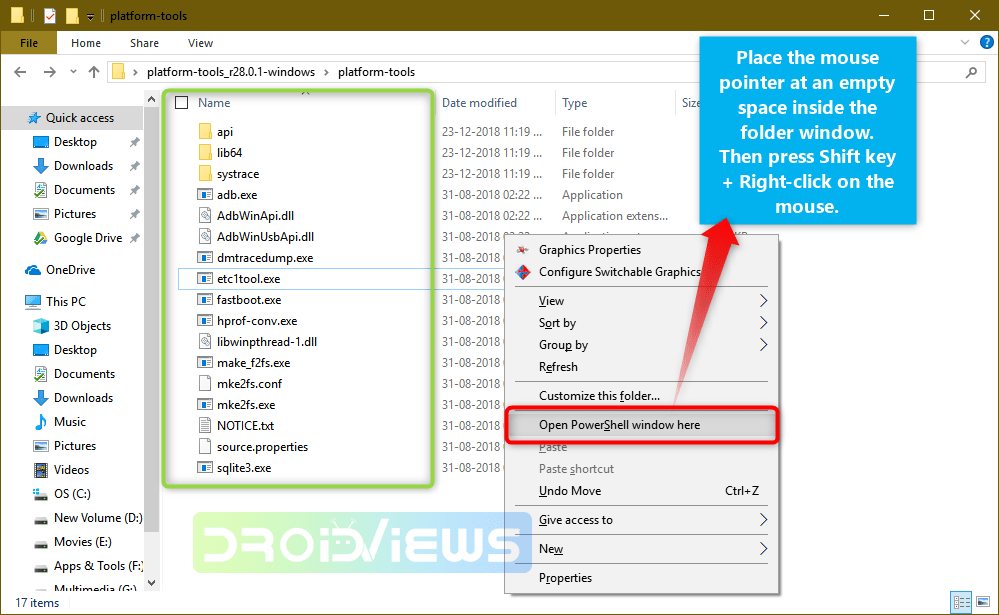
- Open a command prompt in the ADB folder by right-clicking on the mouse in the empty space of the folder while holding the Shift key. Select ‘Open command window here‘ or ‘Open PowerShell window here‘ option.

ADB SDK Platform-Tools Command Window - Now to pull any file from your device, you need to know its path. Once you know the path of the file, enter the following command to pull the file.
adb pull <path-of-the-file>
For instance, let’s pull the Settings.apk which is located in the /System/app/ folder on your device.
adb pull /system/app/Settings.apk - The file will be pulled and saved in the ADB folder itself and you can see the transfer rate in the command prompt.

adb-pull - Pulling any file from the device is easy but pushing files to the device needs permissions. You can push any file to the internal or external SD card without any issue, but when you’re pushing it to the System partitions you might get this error:

adb-push-mount-error - So you need to mount the file system as Read-Write rather than Read-only, so execute the following commands one-by-one to mount the system writable:
adb shell
su
mount -o remount,rw /system
- Your device might prompt for root permissions when you type SU, grant them. You will get the following output if everything went right.:

adb-mount-writable - Once you are done making changes, you should remount with the original Read-Only.
mount -o remount,ro /system
- To push a file to the device, just type the following command:
adb push <source-path> <target-path>
For instance:
adb push Settings.apk /system/apps/ - If the file is pushed correctly to your device, you’ll get a similar output on the command prompt:

adb-push
So you now know how to push and pull files using the ADB commands. These commands are important yet simple, aren’t they?
Leave your feedback in the comments section below.


this doesn’t work without root, at least on Android Oreo
UH, you left out one very important thing; how do I FIND the path to said files/directories/SD card???
I am in adb, and within platform-tools. BUT…I have no idea how to ‘see’ where the SD card is on my phone. What the path is, or what is in it.
Basically I am trying to copy files from the SD card to my Linux machine, switch out the SD card in my phone to a bigger one, then copy back said files to the new card.
How can I put it in a Windows batch file? I am able to do it interactively but I need to put it in a batch file and pass a filename as a parameter to transfer from the PC to the device. TIA.
Should it work for unrooted devices?
I’m getting “not found” when typing “su”.
same here
Thanks for pointing that out. We’ve made the required changes.
Not helpful. I still get mount: “Permission denied after doing”
su
mount -o ro remount /system
from step 6.
Why don’t you show how to check if the read/write permissions are properly set after doing the remount? Something like ls -l and what the columns should show. That would at least tell us if we did the steps properly or not
There should be a comma instead of a space between -o and remount. It should be -o,remount.