Iudesk’s Photo Editor is a powerful image editing app for Android. It offers features including sharpening, bloom, diffuse, blur effect, sketch, swap and others, editing image metadata, perspective, red-eye, white balance, and backlight corrections.
In the world of digital photography, a professional image editing software is a photographer’s best friend. With enough skill, minor face imperfections on photos can go away after some clicks. Also, with small enhancements, natural colors can shine even on pictures taken by low-quality digital cameras. The most-known professional image editing software is Adobe’s proprietary Photoshop on Windows and Mac OS, and GIMP on GNU/Linux. These two products are almost on-par in terms of capabilities and can open and save images in almost every image file format available.
However, things are a bit different on Android. The design of the Android operating system makes it difficult to develop applications that process media files without requiring extreme hardware specifications. Anywise, Android is developed having mobile platforms in mind, which generally are far less powerful than desktop Personal Computers. Moreover, small screen sizes make it difficult to implement clean user interfaces for such complicated Applications.
Most Android image editing Apps are limited to providing some special image effects, which are often not configurable by the user. Also, image rotating, scaling and cropping are commonly available too.
The closest to a professional image editor that you can get on Android, is Iudesk’s Photo Editor. This App’s image effects and their configuration options make it very powerful. It is fast and relatively lightweight, and provides a pretty straightforward user interface, despite its complexity.
Iudesk’s Photo Editor Features List:
- Adjust colors. The user can fine-tune colors using a curves interface.
- Apply a wide variety of image effects including sharpening, bloom, diffuse, blur, sketch, swap and others. All available effects are highly configurable.
- Add frames to images.
- Add text, images or shapes over the image.
- Rotate, crop and resize
- Perspective, red-eye, white balance, and backlight corrections.
- Drawing tools
- Touch and pinch-to-zoom interface.
- Save images in JPEG, PNG, GIF, WebP, and PDF, with configurable JPEG quality.
- View, edit, or delete Metadata (EXIF, IPTC, XMP).
- Share images via e-mail, Picasa, Facebook, Twitter, and others.
- Compress files to ZIP
- Create PDF from image files
- Create Animated GIFs
- Webpage Capture
- Video Capture (requires Android Ice Cream Sandwich and up).
Note
As already mentioned, image manipulation might require large amounts of memory on Android. There is a chance for this App to get out of memory, it will then display a message asking for restarting it. Whether it will run out-of-memory depends on the device memory size, the applied effects, and the image resolution. Working with lower resolution images might resolve this issue.
Don’t miss: Edit Photos and Earn Money with Mendr
Following are two interesting image effects you can achieve with this App:
-
Zoom Blur effect (also known as DSLR Effect)
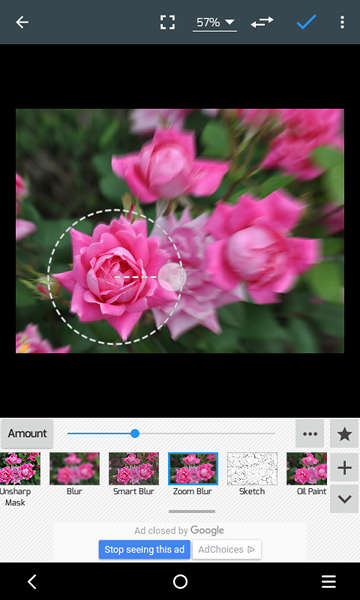
By applying the blur effect to the area around an object of interest in a photo, you can create a fake camera focus effect. Applying this effect inside Iudesk’s Photo Editor is quite easy:
- Open the Photo Editor App from the launcher
- Find and open your image from the App’s main screen
- Click Effect and then Zoom Blur
Here is what it looks like:
The amount, radius and center (x and y) parameters of this effect are configurable. Just click the button with three horizontal dots to cycle through parameters. Use the slider to adjust.
For example, reducing the amount parameter on the above image makes it look a little more real:
Click the tick button on the top of the screen to apply the effect to the image when you are done.
Don’t miss: 5 Apps to Add Blur Effect in Pictures on Android
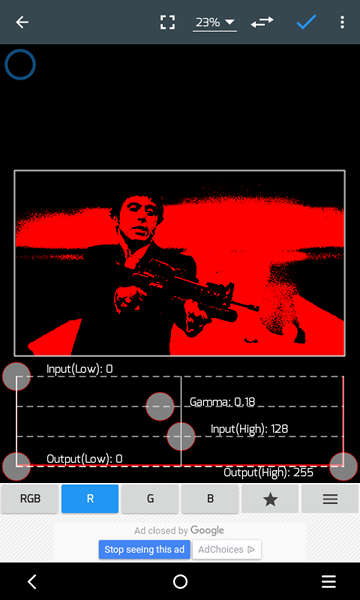
This effect is somewhat more difficult to achieve and takes advantage of this App’s capability to adjust the levels of image colors. The idea behind this effect is the following:
- First, remove lighting from the image to give it a 2-D look.
- Then, make the person’s characteristics more prominent.
- Lastly, change the color palette of the image to only black and red.
One way to get this effect using this image editor is the following:
- Open the image you want to apply the effect to. For this example, we will use a picture of Tony Montana from the classic Hollywood movie Scarface.
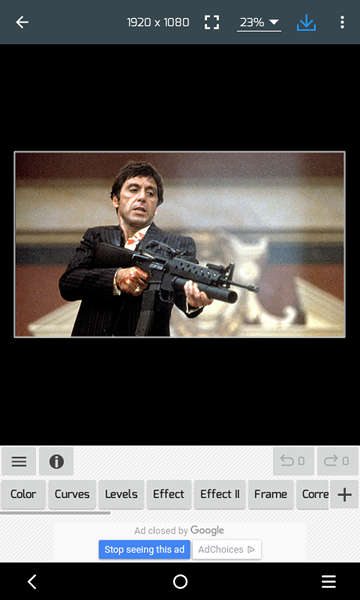
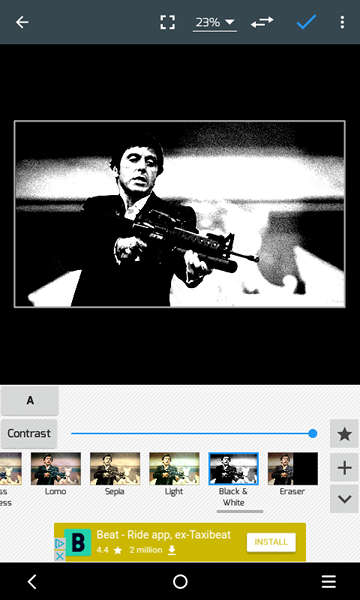
- Turn the image to black and white and change the contrast: Go to Effect and then select Black and White. Adjust the contrast using the slider. The best contrast value should be the one that gives the image a near-2-D look while keeping the human silhouette visible. Click the tick button on the top bar to apply the effect.
- Adjust the RGB color levels of the image: Click Level. The screen will now show four buttons, RGB, R, G, B. We are interested only in the last three buttons. They stand for Red, Green, and Blue respectively. Click the G button and set all the sliders to most left.
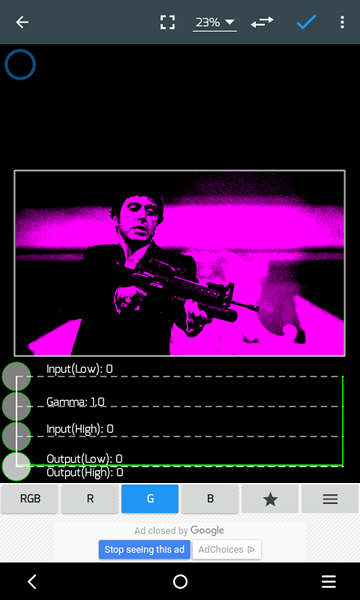 Next, do the same for the Blue color: Click the B button and move all the sliders to the most left. We have just removed the blue and green colors from the image, so it should now be black and red. Finally, click on the R button and experiment with moving the sliders around until you get a satisfying result. Click the tick button on top when you are finished to apply the effect.
Tip
Most cameras and websites use the JPEG format for images. This is a lossy image compression format and has the disadvantage of losing in quality every time it is opened and saved by image manipulation software. A general rule of image processing is saving the edited images in a lossless format, like PNG.
To summarize, Iudesk’s Photo Editor is a really powerful image editor. It enables features missing from most of the rival products on the Play Store while giving full control to the user for configuration. This App can be downloaded and used free of charge, and it is supported by Ads. As you can see from the screenshots above, Ads are not obstructive and are displayed on the bottom of the screen. You might also get a full-screen Ad when you exit the App. You could purchase an Ad-free version of the App through the settings menu and support the developer.
Let us know in the comments section below if you would like to see more tutorials for this great image editor.
[googleplay url=”https://play.google.com/store/apps/details?id=com.iudesk.android.photo.editor”/]Read next: 5 Best Photo Editing Apps for Android



Join The Discussion: