
Samsung is the leading smartphone manufacturer in the world owning around 30% smartphone industry. One of the key business strategies of Samsung is to bombard the market with their smartphones in all price brackets. Well, we meant it in a literal way. You can find a Samsung Galaxy smartphone in all price ranges. The Galaxy J5 and J5 Pro (2017) is one of the mid-range smartphones from Samsung which was launched in 2017. It comes with Android 7.0 Nougat out-of-the-box and is now upgradable to Android Oreo. Since Samsung’s updates always roll out in phases, you can download and install Android Oreo firmware on Galaxy J5 (SM-J530F) and J7 Pro 2017 (SM-J530G/GM) manually and install it now.
The Android Oreo version for Galaxy J5 2017 variant is different for different geographical locations. Some of them are upgraded to Android 8.1 Oreo while some are still at 8.0 Oreo. We hope all the devices with the SM-J530F and SM-J530G/GM model numbers will slowly get the latest Oreo upgrade. If you want to check whether you received the update or not, you can navigate to Settings » About phone and tap Software update. If you don’t see any OTA update here, don’t worry, we got you covered. You can download the stock Android Oreo firmware for Galaxy J5 2017 and manually flash it using Odin tool. If you’re not familiar with the Odin tool and firmware flashing, we will guide you through the step-by-step process.
The Android Oreo firmware for Galaxy J5 2017 comes with the latest Android Security patch and brings many Oreo specific features. You will find a smooth interface, better battery performance and several bug fixes in the latest update.
Download Oreo Firmware for Galaxy J5 (SM-J530F) and J7 Pro 2017 (SM-J530G/GM)
The update is not carrier branded which means it’s not specific to a particular carrier and can be installed on any Galaxy J5 2017 smartphone with model number SM-J530F. You will find the country specific firmware in the download link provided below. Choose the firmware for your J5 2017 based on your country/region. If you can’t find your country’s firmware, you may install firmware from another region. But we would recommend choosing from a firmware closer to your region and take a full backup of your device just to make sure your data is safe even if something goes wrong.
Samsung Galaxy J5 (SM-J530F)
Samsung Galaxy J7 Pro 2017 (SM-J530G)
Samsung Galaxy J7 Pro 2017 (SM-J530GM)
Prerequisites
- Charge your Galaxy J5 2017 above 60% battery level to avoid shutdowns during the process.
- Install the latest Samsung USB Drivers on your PC for it to detect your smartphone.
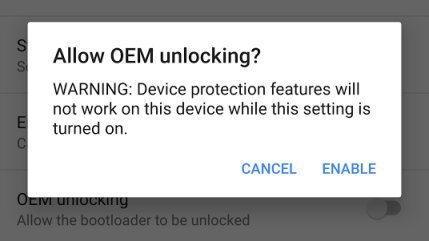
- Go to Settings » About phone » Build number and tap it 7 times to enable Developer options on your device. Then go back to Settings » Developer options and enable USB Debugging and OEM unlocking (if available).
- Backup your device storage, Contacts, SMS etc. using Google Sync service or any third-party app as flashing stock firmware will wipe the entire device including internal storage.
- Download the latest Odin tool from here.
How to Install Android Oreo Firmware on Galaxy J5 (SM-J530F) and J7 Pro 2017 (SM-J530G/GM)
- Download the firmware that is compatible with your device. The firmware file should be either with .tar or .tar.md5 extension. If you have a ZIP/Rar file, extract them to get the original firmware files.
- Download the latest Odin zip file and extract the file on your PC.
- Double-click the Odin3 vx.xx.exe file. This will open an Odin window.
- Now turn off your Galaxy J5 2017 and boot it into the Download Mode. To do this:
- Power off your device and wait for 5-10 seconds until the device is fully switched off.
- Press and hold Volume Down + Home + Power buttons together and release them once you see the Warning screen on your device.
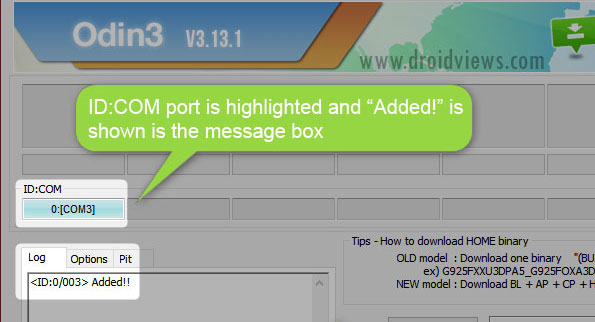
- Now connect your device to the computer using a USB cable and make sure it’s detected.
- As soon as you connect the device the ID:COM port on Odin will turn Blue. You’ll also see “Added!!” message to indicate successful connection.
- Add the AP, BL, CP, and CSC files to Odin as shown below [Screnshot only for reference].
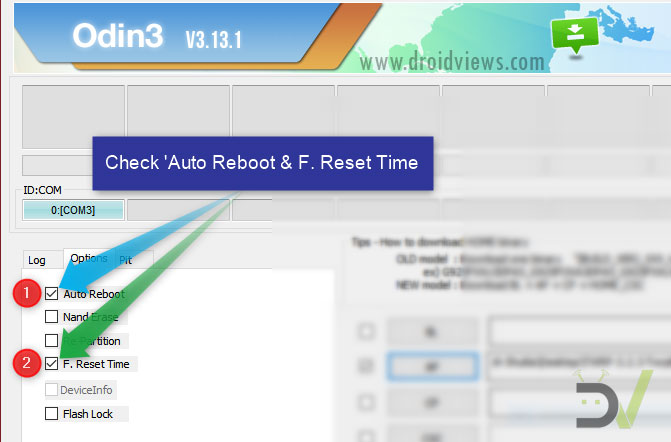
Note: Make sure that you choose the ‘HOME_CSC’ file and not the regular CSC file. Using the regular CSC file will wipe your phone completely, including the internal storage. - In the Options section, make sure that only the Auto Reboot and F. Reset Time boxes are checked and everything else is unchecked.
- Click the Start button on Odin to start the installation. It might take some time depending on the firmware size.
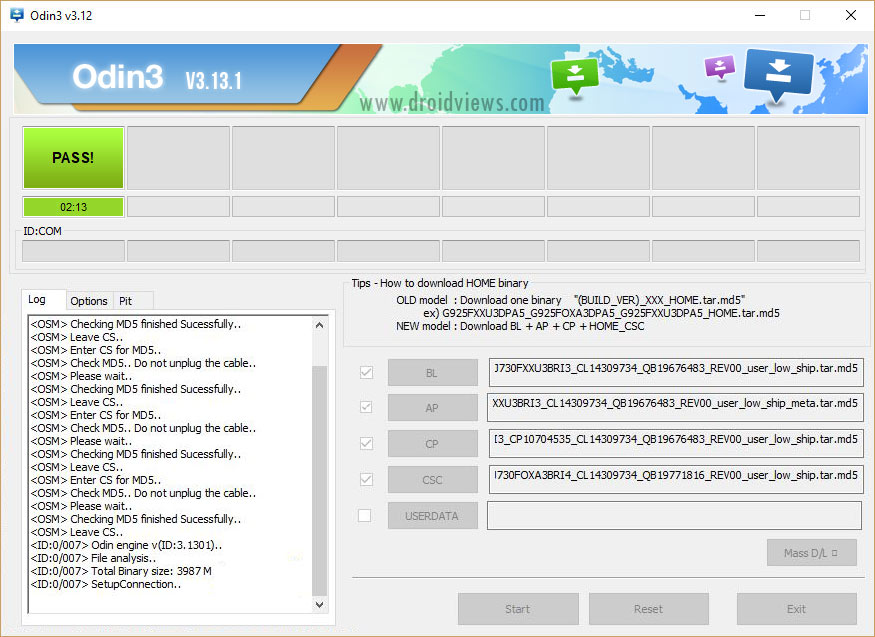
- A successful Odin flash is indicated by PASS! message on Odin and then your device will restart immediately after the process is completed.
It will take some time for your device to boot into Android Oreo. So, sit back and relax while your device boots into Android Oreo interface.


Join The Discussion: