Hey folks, here we look forward to guiding the Google Nexus S users to go custom with their device. We shall try to put forth the best and the simplest steps to make our ways to your minds. All the Nexus devices use almost the same methods to go custom as you have already seen here and here. Before we put over hands on the device and begin with the instructions, I would like to state some general terms, for your ease.
Terms & Understanding
Unlock Bootloader: A bootloader is a boot initializing component which is generally locked by the device manufacturer to avoid any messing around with the OS. We need to unlock it for the same reason. Once unlocked it will allow us to change the boot sequence and modify the OS in accordance with our needs.
Rooting: It is a process of gaining root privileges over an Android subsystem. Rooting an Android device is easy in most cases. If you will to Install custom ROMs, kernels, other patches or add-ons to your Android device, rooting is what you will need. It can be achieved in two ways; either by manual method (using fastboot) or by automatic method (using toolkit or software). We are going to guide you with the manual method by using fastboot commands.
ClockworkMod (CWM):
A Linux/UNIX operating system employs a recovery and since Android being based on Linux also has a recovery. ClockworkMod is a secondary recovery system created by Koush, which adds enormous features like wiping partitions, flashing flashable .zip files like ROMs, kernels, patches etc to the stock device recovery.
Custom ROMs:
These are the aftermarket Android firmware which are not officially supported by the device manufacturer. They are made available to the world by Android developers all around the world. Custom ROMs are either built from Google’s source code i.e AOSP (Android Open Source Project) or are modified versions of the device manufacturer’s ROM (Stock ROMs or Factory ROMs) with additional tweaks and extend functions which are not delivered with the Stock ROMs. Some of the popular Custom ROMs include CyanogenMod (CM), Android Open Kang Project (AOKP), MIUI, Codename Android (CNA), Oxygen, ParanoidAndroid and many more.
Google Apps (Gapps):
Android devices. Most of the applications can now be found and updated via the Google Play Store. Some of the apps include the Google Play Store itself, Google Talk, Google Sync (for adding and synchronizing Google accounts), Google Backup Transport, Car Home, Gmail, Google Maps, YouTube, Google Search, Google Voice Search, Google Music, and Google Docs. In some ROMs, the Google Apps are included. These are usually stock ROMs, smaller or less-common ROMs, or those from areas where intellectual property laws are less commonly obeyed. But many AOSP ROMs, most famously CyanogenMod and AOKP, do not include the Google Apps due to licensing issues. They are after all proprietary code owned by Google and not included in the Android Open Source Project.
Prerequisites
- At least 60% of battery to ensure no random shutdowns due to low battery.
- Backup your storage completely. Also your text messages using some backup app.
- Install Google and Samsung USB drivers. [Download here]
- A compatible USB data cable for undisturbed connection between PC and device.
- Enable USB Debugging in your device’s settings [Settings > Developer Settings > USB Debugging].
- A PC with Windows OS.
- Download Required files. [Download here]
- Extract the downloaded NexusS_files.zip to the desktop. So now you will have a folder named “NSFiles” on your desktop which beholds all the needed files during the process.
Now since we are done with the general information and the requirements. we shall begin with the steps.
Unlock Bootloader
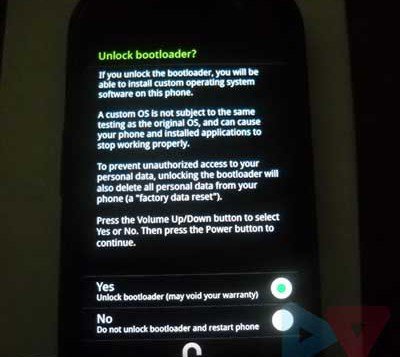
Remember, unlocking the bootloader will erase all the data on the phone as well as SD storage. So be sure to back everything up.
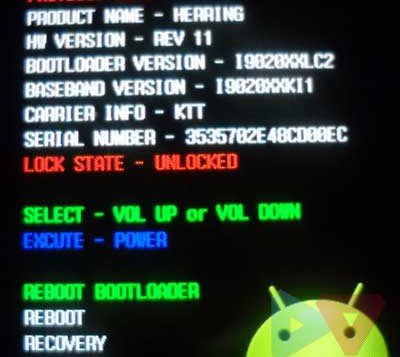
- Reboot your Nexus S into bootloader mode by pressing volume up + power buttons simultaneously until you see the bootloader screen.
- Connect your device to the PC via the USB data cable.
- Open the extracted folder “NSFiles” that we have on the desktop. On an empty space inside the folder, press shift and right click and then select “Open command prompt here”. This will execute a new CMD window which is already cd’ed to the folder’s location.
- Type in CMD:
fastboot oem unlock
- You will now receive a message on the screen. Use the volume keys to highlight “Yes” and select it using the power button.

- Your bootloader is now unlocked.

- Highlight and select “Reboot” to reboot your device.
Installing Custom Recovery
- Reboot your phone into bootloader mode by pressing volume up + power buttons altogether.
- Connect it to the PC via USB data cable.
- While in the “NSFiles” folder on your desktop, press shift + right click on an empty space and go to “Open command prompt here“.
- This will execute a command window which is already cd’ed to your current location.
- To Install ClockworkMod touch 6.0.1.0
Type in CMD:
fastboot flash recovery CWM-T.img
- To Install ClockworkMod non-touch 6.0.1.0
Type in CMD:fastboot flash recovery CWM.img
- To Install TWRP 2.3.1.0
Type in CMD:fastboot flash recovery TWRP.img
- The CMD prompt will indicate when the flashing is complete, it barely takes a few seconds.
- Do not exit the bootloader mode, since this is the way to boot into recovery.
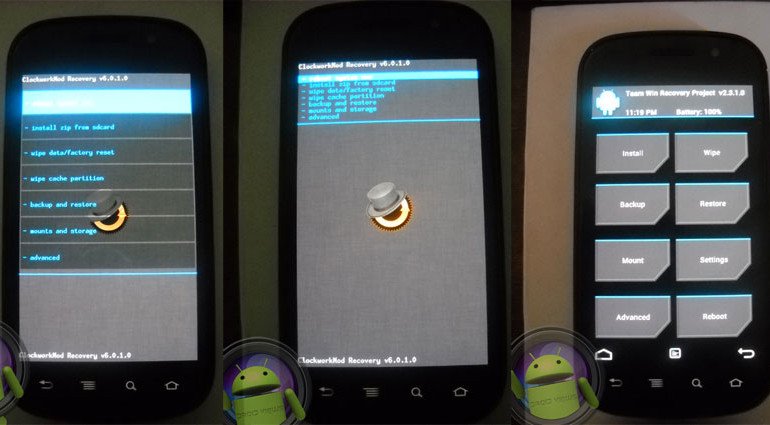
- Now to boot into your new custom recovery, highlight “RECOVERY” and select it using the power button.

- For your reference, I am posting screenshots of all the three Recoveries.
Rooting the Nexus S
If you plan to use the stock (factory) ROM, it is preferable to root. Otherwise, all the Custom ROMs out there already have root access.
- Download CWM-SuperSU-v1.20.zip. [Download here]
- Power off your device and boot into the bootloader mode by pressing volume up + power buttons simultaneously until you see the bootloader screen. Highlight”RECOVERY” using the volume buttons and select it using the power button.
- Now, your Nexus S is in recovery mode.
- Go to “mounts and storage” > scroll to the very last and select “mount USB storage“.
- This will mount your device’s storage to the PC.
- Drag the downloaded “CWM-SuperSU-v0.97.zip” to the root of your storage.
- Select “unmount” to exit the USB storage mode.
- Go to “install zip from sdcard” > “choose zip from sdcard” > select the “CWM-SuperSU-v0.97.zip” you placed in the storage and flash it.
- Once flashed, select “reboot system now“.
- You now have your device rooted. You can officially declare yourself as the true master of your device.
How to Install a Custom ROM
- Installing a ROM is quite a simple process, you can say that it is the easiest of all.
- First, you need to choose a suitable ROM that meets your requirements.
- Once you have chosen, download the ROM’s .zip (flashable zip file) as provided by the Author/Developer.
- Also make sure to download specific Gapps and other add-ons if provided by the developer himself.
- Put the downloaded files to your SD storage either by using USB mass storage directly or by mounting USB storage in recovery mode.
- Reboot your Nexus S into Recovery mode. Power off your device and boot into the bootloader mode by pressing volume up + power buttons simultaneously until you see the bootloader screen. Highlight”RECOVERY” using the volume buttons and select it using the power button.
Using CWM:
- wipe data/factory reset.
- Go to “mounts and storage” > “format /system“.
- Go to “install zip from sdcard” > “choose zip from sdcard” > select your ROM .zip file that you placed in step #6. Flash it.
- Gapps are the next to be flashed just after flashing the ROM. So, flash Gapps following the same way as the ROM. further, if you are provided any add-on in a flashable zip format you can flash it the same way after flashing the ROM and Gapps successfully.
- Once everything has flashed successfully, select “reboot system now“.
Using TWRP:
- Go to “Wipe” > “System” and “Factory Reset“.
- Go to “Install” > choose the ROM .zip file and flash it.
- Gapps are the next to be flashed just after flashing the ROM. So, flash Gapps following the same way as the ROM. If you are provided an add-on in a flashable zip format you can flash it the same way after flashing the ROM and Gapps successfully.
- When flashed, go to “Reboot” > “System“.
Your phone will now boot into the custom ROM. You shall now enjoy the full packed potential of your wonderful Nexus S.
If you have got any questions/ queries or you’ve stuck anywhere in the mid-process, comment here. We will give it the best shot and provide you a helping hand.


hi!
I am using a nexus s recently updated with 4.1.2 (sojua-jzo54k) I basically tried re-updating the same version and follow your steps to root the stock (factory) ROM.
But, I am unable to apply the update (UPDATE-SuperSU-v1.20.zip)
Everytime I run it, it says…
— Install /sdcard …
Finding update package…
Opening update package…
Verifying update package…
Installation aborted.
Please help. If this works, then I could peacefully use this phone without any memory-run-out issues. Thanks.
hiiiiiii i’m using nexus s n it is already rooted with nexus root tool kit……i have installed 4.3 n now i want to downgrade it n i’m doing as u said in the instructions n it is giving as “waiting for the device”.now i have a doubt regarding this……mobile should be in which state while doing downgrading i.e.,in recovery mode r in normal mode??? n sometimes it is an error as device not found???
Hi there I have a Nexus S. After unlocking the bootloader and installing the CWM 6.01.0 I get the error Unable to mount USB storage. It says “E: Unable to write to ums 1unfile (no such file or directory). Now my phone is stuck on the Google logo and cant start. Pls suggest a way to mount the USB storage so that I can load the Zip files. (At this stage does the Phone have an Operating System?) Plz help
You didn’t wipe anything, did you?
Hi
Initially the fone was completely dead. The phone repairer said some register was short so he fixed it and the fone would start but get stuck on the google logo. After that I unlocked the bootloader and installed CWM. Later I did a factory reset but the fone still does not start and gets stuck at google logo. I am unable to mount the USB drive.
Is the fone completely useless now? or there is still some ray of hope?
What is update.zip in CWM?
i am have trouble with finding a suitable cynogen mod for my google nexus 4.1.2 and the gapps any suggestions??
Hello t534
CyanogenMod 10.1 is based on Jellybean 4.2.2
ROM link: http://get.cm/?device=crespo
CyanogenMod 10 is based on Jellybean 4.1.2
ROM link: http://get.cm/get/4No
GApps link: http://goo.im/gapps
Select the GApps package corrosponding to your ROM.
does it matter if i pick the 10.1 i mean will it do anyharm to my phone
No harm at all. Feel free to flash and experience.
Thank you very much for this guide! But I’ve an issue just at the beginning: I’m using windows 8 64bit and it seems that the pc doesn’t recognize correctly the device in recovery mode. When I plug USC cable and i run the command fastboot oem unlock, the message that appear is waiting for device, after that nothing appear. Maybe is it something related to the Google USB Drivers? How can I use it?
Thank you!
Maybe done following this stupid hack http://forums.androidcentral.com/verizon-galaxy-nexus-rooting-roms-hacks/142017-android-1-0-driver-problem-check-here.html
Yes, its most probably the Android 1.0 error.
Use that link or use mskip’s toolkit to fix it: http://forum.xda-developers.com/showthread.php?t=1995688
Fantastic this has been fixed. As I’m new to this, under the heading “Rooting the Nexus S” the last step is to “reboot system now”, which leads to the option “Yes – Disable recovery flash”. Is this the correct thing to do? I’m planning on installing a custom Rom, so should i skip this step and after flashing “UPDATE-SuperSU-v1.20.zip” immediately flash the custom Rom too? Thanks for your help!
If you’re planning to flash a Custom ROM, then you don’t need to root your device. Skipping the rooting section 😉
If you’re planning for a Custom ROM, you do not need to root. The ROMs are pre-rooted.
So, skip the rooting part and head towards flashing a Custom ROM.
This guide is fantastic! Many thanks, especially for the fast responses. I’m now enjoying the minimalistic SlimRom.
You’re welcome. Kindly stay connected and you shall definitely see more 😉
Hi, I’m looking to follow this guide, but your link to “CWM-SuperSU-v0.97.zip” comes up with the error “Sorry, this file is infected with a virus. Only the owner is allowed to download infected files.”. Presumably this is simple due to the nature of the file, and not an actual virus – correct? If so, how does one download this file?
I found that I can download each file individually, then zip it back together on my pc. The error I’m describing above is when selecting “File –> Download (Ctrl+S)”
The problem was majorly due to my deceased Google Drive files.
Now, I have updated the link to download the latest version 1.20 zip. Kindly try again.
Thanks for the guide, I’m a custom rom noob and I couldn’t find an updated one.
Doesh this work with the i9023 SLCD version as well? Any potential issues?
What’s the difference between CWM and TWRP?
Thanks!
You have our heartiest welcome for that.
Yes, this shall work easily on your i9023. There are no issues with this process. But you might have some bugs in the Custom ROM you install, so make sure to choose the one which meets all your requirements. Don’t worry reading that since this is universal. Rather I would advise you to just lean forward towards the guide.
As for CWM and TWRP, both are Custom Recoveries available for Android. While pin pointing everything out here is not possible. But I advise you to flash CWM to be handy to the Android Custom Recovery system, then you shall head over to TWRP 🙂
Thanks for your help! I’ll attempt soon, hope I won’t have to post anything but successful results 🙂
I wish the same. Good luck 🙂
and please take out a few minutes for a feedback too. It will be very much appreciated.
Totally forgot about this haha, commenting 4 months later!
Everything went well, I had only one problem: after flashing CWM I rebooted the phone and everything went lost, so I had to repeat the step!
Thanks a lot 😀
Better late than never 😀