Chrome Browser comes preloaded with tons of features, thereby giving users a rich browsing experience. But on the other hand, this itself leads to the laggy nature of the browser which ends up hogging quite a lot of memory. As a result, many have switched over to the Brave browser. However, if you would still like to stick with Chrome, then this guide is definitely going to help you out. So let’s start the guide on how to effectively manage your Chrome tabs using the OneTab Chrome extension. Carrying out the below-mentioned instructions lead to a decrease in RAM consumption as well (nearly by 50% in my case). Although the results may vary, you will definitely get a much fluid browsing experience.
Effectively Managing Various Chrome Tabs

In this guide, we will be using the OneTab Chrome Extension to effectively manage various Chrome tabs. Although I tried out many such extensions, this one stood out for me. So, head over to the Chrome Web Store and look for the OneTab extension. Or you may also directly download the extension. Since it is used for handling Chrome tabs, it requires permission to read and change your browsing activities on the websites you visit. If it sounds well and good, then go ahead and click on the Add to Chrome button. Once the extension gets added, follow the below steps to efficaciously manage your Chrome tabs.
Condense All Scattered Tabs
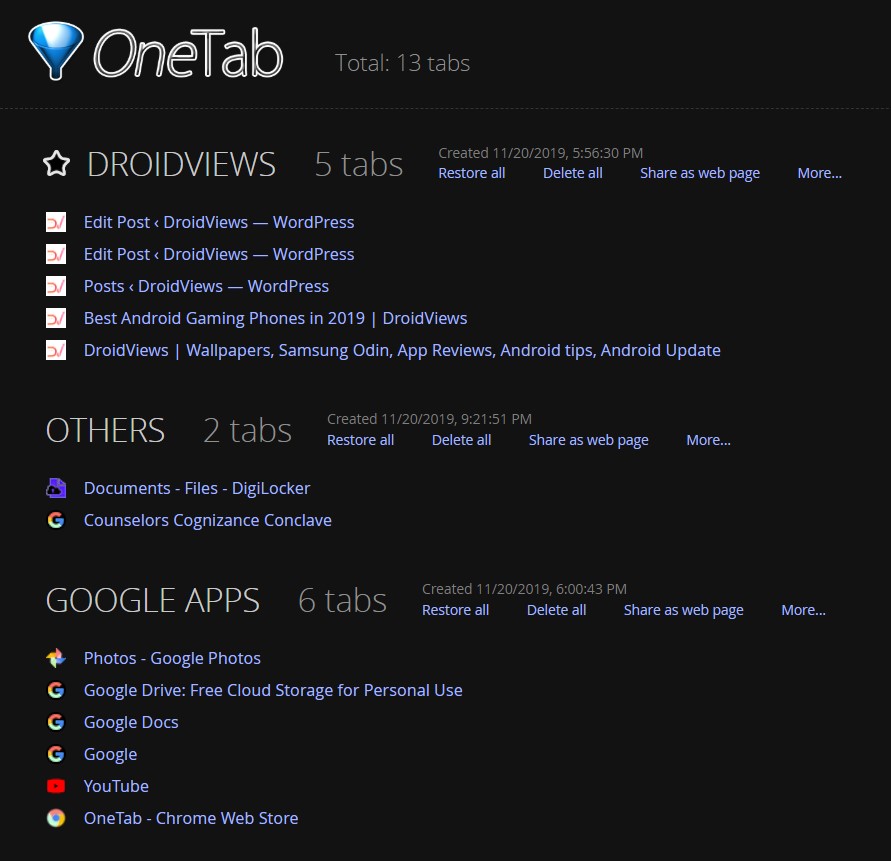
Everyone has this habit of keeping opened various tabs simultaneously in the Chrome browser. This not only consumed too much memory but also proves to be challenging in working or switching between them. In these cases, OneTab will definitely come in handy. All you have to do is click on the extension icon and all the opened tabs will get condensed under a single roof. All your opened tabs will be subsequently replaced with a single tab of OneTab. This would definitely help to effectively manage these Chrome tabs.
Don’t Miss: How to Manage Malicious Chrome Extensions
To restore these condensed tabs, all you have to do is click on the Restore option. In some cases, the restore feature reopens the page from scratch. So, make sure that to save your work before handing it over to OneTab. On the other hand, if you wish to close all the tabs at once, clicking on the Delete All option should do the job for you. Let’s have a look at some other ways to successfully manage various Chrome tabs.
Managing These Chrome Tabs
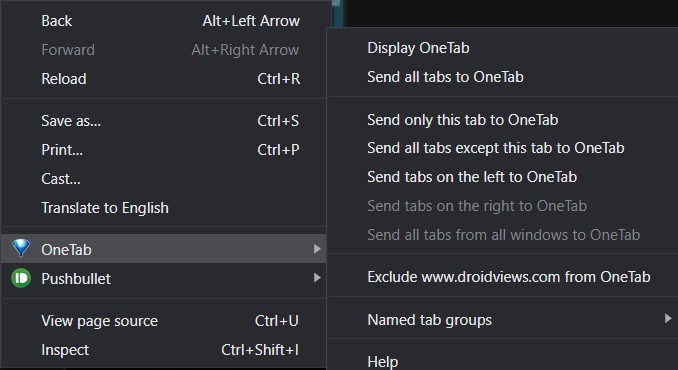
When you right-click on any web page, you could now see the OneTab option as well. You will see quite a lot of features. Some of them worth mentioning are:
- Display OneTab: To manually open the OneTab extension.
- Send all tabs to OneTab: Choosing this option will condense all the Chrome tabs under a single OneTab tab.
- Send all tabs except this tab: Sends all the tabs under the OneTab group, except the current tab you are working on. So you may continue your work on the current tab while the extension manages other Chrome tabs.
- Exclude this website: You may blacklist any website from getting added over to the OneTab.
- Named tab group: This feature allows you to send the tabs to an already group.
That’s not all. There are other methods of effectively managing and handling these Chrome tabs and their related groups. Let’s have a look at them as well.
Managing Groups

If you go ahead and open other tabs and again click on the extension, a new group with the second set of tabs will be added. You could transfer tabs between the various groups. You may also give each group a name to distinguish it from others. To do so, click on the More > Name this tab group. Go ahead and give this group of tabs a name.
Others ways to manage these Chrome tabs in an effectual manner includes the Restore All and Delete All feature. These features are only applicable to their respective groups. So, clicking on the Delete All option will only close all the tabs of its own group without affecting the opened tabs of other groups. However, if you wish to prevent any group of tabs from getting accidentally deleted (i.e. closed), you may lock the said group. This will grey out the “Delete All” option. To do so, click on More > Lock this tab group.
Sharing Chrome Tabs and their Groups
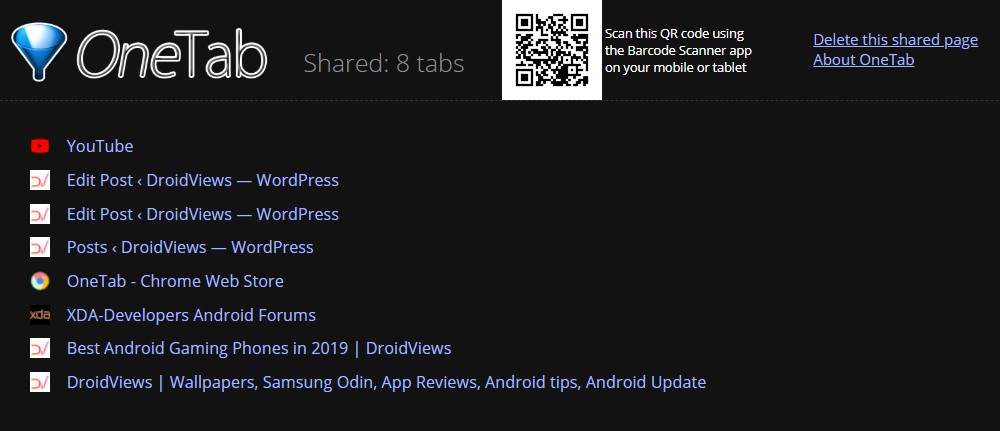
Another useful feature to manage Chrome tabs in a constructive way includes its ability to share groups between various devices. The process is simple. All you have to do is click on the Share as web page option next to the desired group. It will then generate a QR Code. You just have to scan this code on your other device and all the tabs of that group will get exported over to the other device.
There exist other methods of sharing tabs as well. Clicking on the Export/Import option will give you the list of all the opened webpage’s URL. You could simply copy them and send them via Gmail or other sharing apps like AirDrop, PushBullet, etc. Finally, don’t forget to check out below-mentioned little nifty hacks to effectively manage your Chrome tabs
Other Useful Features
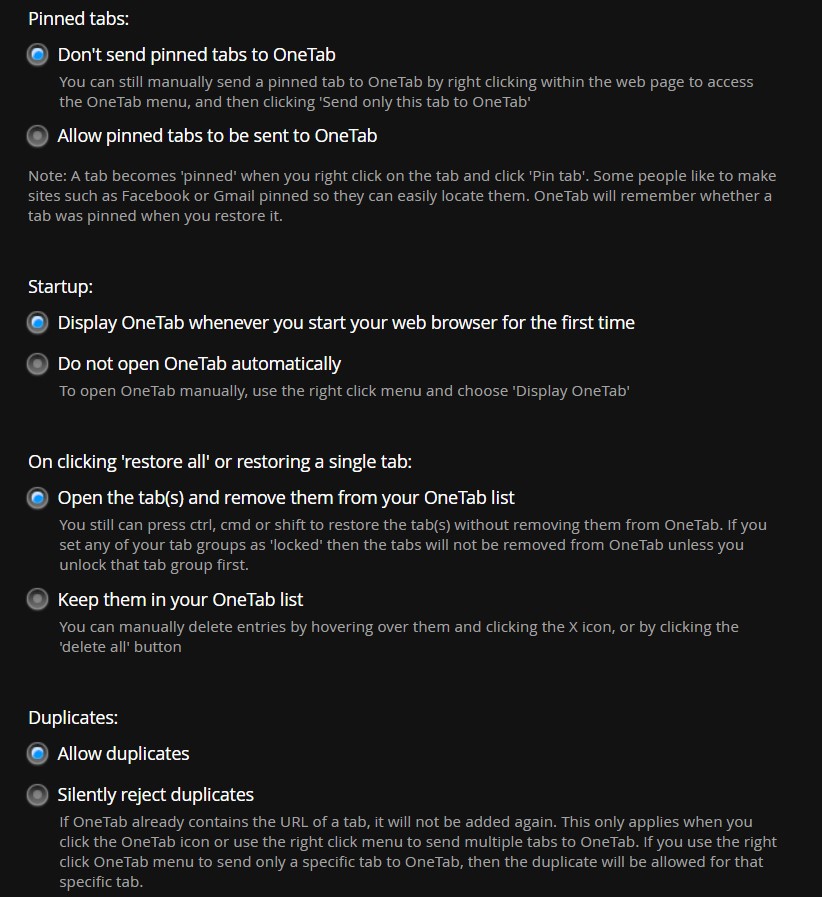
Let’s have a look at some of its other important features that might come in handy. All these features could be accessed via the Options menu itself. This is situated at the top right of the OneTab page.
- Pinned Tabs: These are the tabs that are pinned to your browser and moves to the left side of the screen. You cannot close these tabs until you unpin them manually. Most people tend to pin the frequently visited sites. To do so, you just have to right-click on the desired tab and select Pin.
As far as OneTab goes, it performs no action on these pinned tabs, by default. However, if you want the pinned tabs to get condensed as well along with other tabs, then consider choosing the Allow pinned tabs to be sent to OneTab. Indeed a pretty useful feature to productively manage these Chrome tabs. - Startup: This feature handles whether or not you want the OneTab to get active on starting the Chrome browser. If not, you will have to manually start it. This could be done by right-clicking and selecting the Display OneTab.
- On clicking Restore all: You may either let the OneTab close all the tabs from the group as soon as they get restored. Or you have the option of keeping them condensed inside the OneTab, even after restoring them. But this may end up consuming more RAM, so make your decision accordingly.
- Allow Duplicates: Whether or not you want two similar websites under OneTab. The Allow Duplicates option will allow the sites with similar URLs to be a part of the OneTab. On the other hand, Silently reject duplicates will block these similar websites from getting re-added.
With this, we conclude the guide on how to effectively manage various Chrome Tabs using the OneTab extension. We would love to hear from you about this extension. Use the comments box below and drop in your views on the same.
Read Next: Useful Chrome Shortcuts- Windows, Chrome OS, and macOS


Join The Discussion: