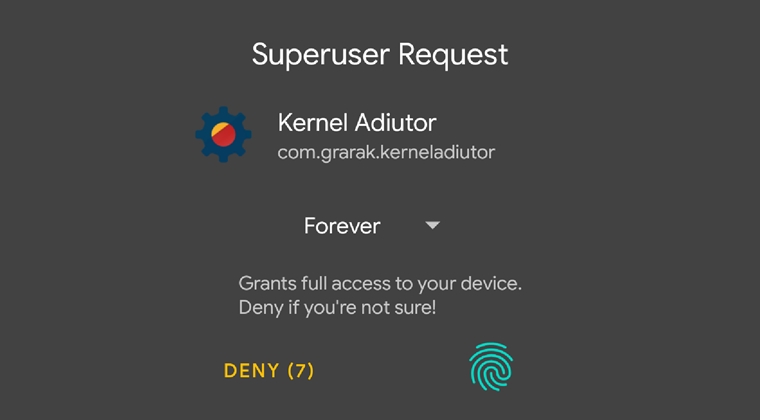
Up until now, you used to provide access to the superuser request simply by tapping on the ‘Grant’ button. But there is also a more secure way of doing so. You could authenticate the Magisk superuser request using the device’s fingerprint capabilities as well. Let’s see how we can have Magisk fingerprint authentication for granting permissions for Superuser requests on Android devices.
Having a rooted device opens the door to a plethora of new opportunities. You could now tweak your device’s system files as you wish. From installing various Magisk modules and frameworks to theming your device via Substratum Theme Engine, the possibilities are endless. But unfortunately, the risks associated with it are also quite alarming.
If any hacker gets access to your device, then not only may he damage your system files but can even get access to your personal data. This fact gets even scarier if your device is rooted. This is because in such cases, hackers could easily get unrestricted access to your system files and carry out the desired malicious activity on it. But fortunately, there is a workaround for this.
You could now use the fingerprint authentication feature on the Magisk app to approve or revoke the superuser access of any app. It uses the same system-level API which your device uses for fingerprint purposes. There is no need to download any standalone third-party app for it. So the next time if you receive any superuser request, rather than tapping on the Grant button, you will need to authenticate it using your fingerprint. This further solidifies your device from the security point of view.
Let us now have a look at how to authenticate the Magisk’s superuser request using your device’s fingerprint.
Enable Magisk Fingerprint Authentication for Superuser
As already mentioned, this will only work if you have rooted your device using Magisk. If you have obtained root access using any of the one-click root methods or even via SuperSU, this feature won’t work for you. Also, make sure that the fingerprint is already added on your device. If that is not the case, then do so by going to Settings > Security & location > Fingerprint > Add fingerprint.
With that said, follow the detailed instructions to enable Magisk fingerprint authentication for superuser requests using your device’s fingerprint scanner.
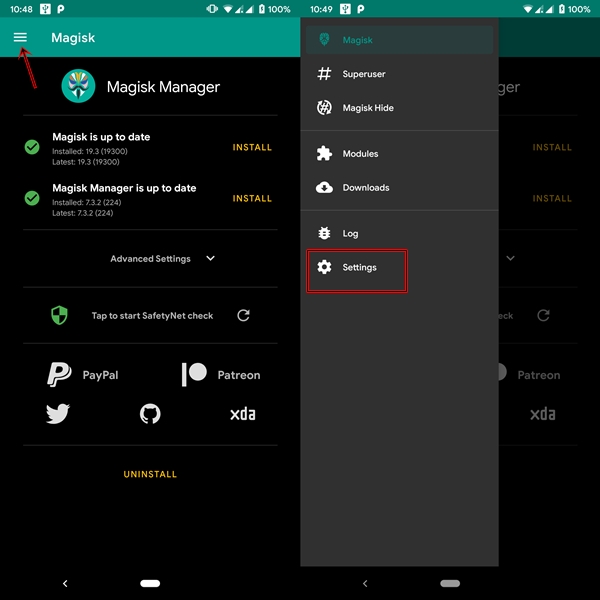
- Open the Magisk Manager app on your device.
- Tap on the hamburger menu (three horizontal lines situated at the top left).

- Navigate to the Settings section.
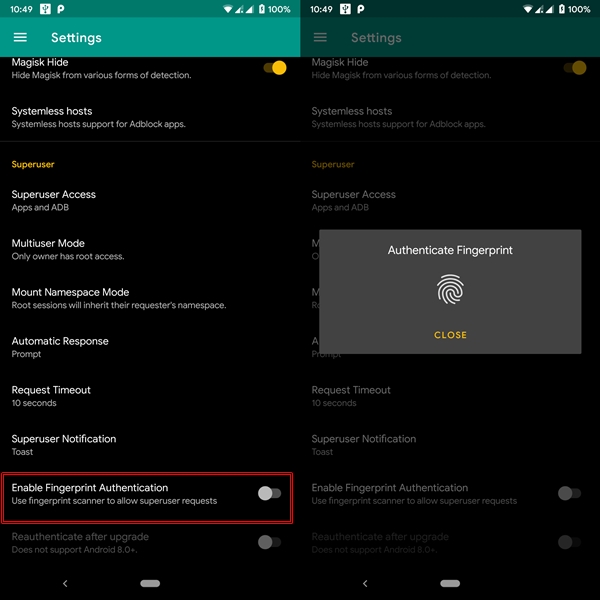
- Next, scroll down to the bottom until you find the Enable Fingerprint Authentication option.

- Toggle on the switch.
- Now Magisk will ask to authenticate your fingerprint once.
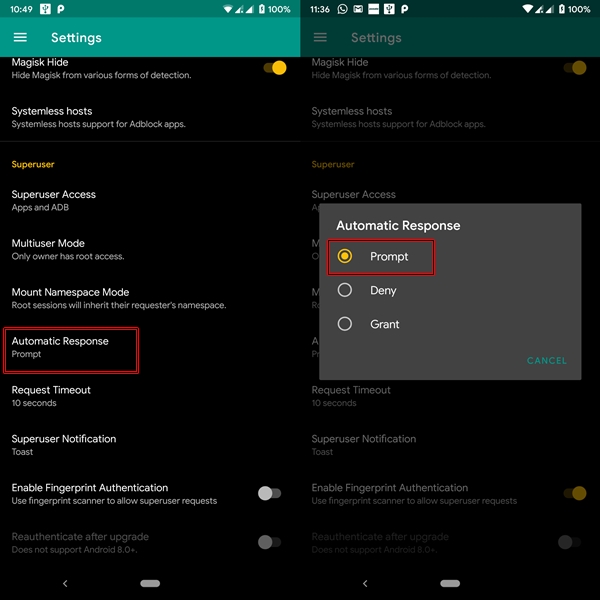
That’s it. Your biometrics has been successfully set up under the Magisk app. Now, every time a new superuser request comes, it will ask for your fingerprint authentication rather than the usual Grant or Deny options. Also, don’t forget to change the Automatic Response to Prompt. By default, it is set to Grant. To change it, go to Settings > Superuser section > Automatic Response > select the Prompt option.

So now that you could control all the superuser requests using your fingerprint, the device has further become more safe and secure. With this, we conclude our guide on how to authenticate the Magisk superuser request via the device fingerprint. If you have any queries, do let us know in the comments below.
If you want to use your device’s fingerprint sensor in more awesome ways than just unlocking your device, here are some of the best Android apps with fingerprint scanner support.


Join The Discussion: