Sony’s Xperia XA Ultra is a mid-range phablet offering from the company sporting a 6 inch full HD display. It’s a decent phone with some decent specs as long as you don’t bring into account its price. The Japanese giant has been maintaining a good record when it comes to pushing out updates for its devices and the XA Ultra too was one of the lucky Android devices to have tasted an official Android 7.0 Nougat update. Updates are cool and exciting. But when you’re rooted, they tend to cause some problems like wiping root access. You can still install TWRP and root Xperia XA Ultra running on the Android 7.0 Nougat firmware from Sony though, and we’ll show you how.
Requirements
- Enable USB Debugging on your Xperia XA Ultra.
- Download the latest unofficial Sony Flashtool with integrated Xperifirm for Windows.
- Ensure that you have the necessary USB drivers for Xperia XA Ultra installed on your PC. In case you need any help installing the flash tool and the drivers, you can refer to our guide here.
- You’ll also need to have your device’s bootloader unlocked beforehand. Sony has an official guide on how to do just that so you may check it out.
- Make sure that your phone has enough charge left preferably somewhere north of 50% at least.
- The process described below will wipe your data so make sure you have a back up of all your important data.
Downloads
Download the boot image and TWRP recovery image from below and rename them boot.img and twrp.img respectively. Then transfer both the files to C:\Flashtool\x10flasher_lib\
Also download the following files and transfer these to your phone, preferably on the external storage if it has any.
How to Install TWRP Recovery on Xperia XA Ultra
- Power off your device, then connect it to your PC while holding the Volume Down button on your phone via a USB cable. This should boot your phone in flash mode and you should be seeing a green LED indicating the same.
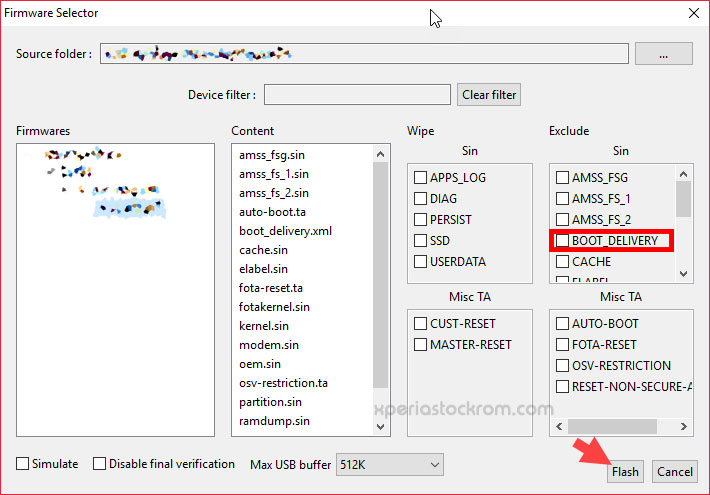
- Download the official Marshmallow firmware for your device using XperiFirm and flash just the ‘bootdeliver.xml’ from it to your device using flashtool. If you’re entirely new to the flash tool and XperiFirm, you can check out our guide on how to flash stock firmware on Xperia devices using XperiFirm and flashtool. Just make sure that only boot_delivery.xml is selected in the Content column before you click the flash button.

- When the boot_delivery has been flashed, close the flashtool, disconnect your device and power it off again if it isn’t already.
- Now re-connect it to your PC with the USB cable, while holding the Volume Up button this time. This boots the phone in the fastboot mode indicated by a blue LED.
- Browse to the folder C:\Flashtool\x10flasher_lib\ on your PC, this is where you should already have copied the boot image and the TWRP image files. In the address bar enter cmd and hit Enter to open a command window inside the folder.
- With your phone connected in fastboot mode, enter the following command in the command window to check if the connection is proper.
fastboot devices
- If you see a serial number listed, you’re good to go. Push the commands below one by one to flash the boot image and then the TWRP image to your device.
fastboot flash boot boot.img
fastboot flash recovery twrp.img
- Disconnect your phone again once the flashing is complete.
How To Root Xperia XA Ultra
- Power off your phone and hold the Volume Down and the Power buttons together for a while until your phone vibrates. This will boot your phone in recovery mode.
- In the TWRP recovery, hit Cancel on the password prompt and then swipe right to allow modifications.
- Tap on the Wipe button and select Advanced wipe. Select the userdata and the data partitions only and then swipe to wipe it clean. This is required to remove encryption and allow TWRP recovery access the /data partition. If you ignore this step, your phone might end up stuck in a boot loop.
- When done, you can now proceed to root your device, but it might be a good idea to tap the Reboot system and just see if your device boots up at this point.
- Most probably, it will boot up without any problems, it just may take around 10 minutes to do so.
- Power it off again and boot into recovery mode.
- In recovery, select Install and then select the Magisk zip that you’ve downloaded. Swipe to flash it.
- Tap on the Reboot system button again after the flashing is complete.
- When your phone comes back up, install the Magisk Manager APK.
There you have it, a rooted Xperia XA Ultra running on the official Android 7.0 Nougat from Sony.


please help me it says failed Remote : This partition does not exist when I am flashing TWRP recovery. And my phone is also looping in Sony logo.
Apaga el dispositivo con volumen arriba o abajo hasta que vibre dos o tres veces eso indica que se apagó, me paso igual alguno de los pasos no es el correcto o no son compatibles los ISO; y luego con la herramienta flashtool cargas el firmware con las indicaciones del software, espera a que termine la aplicación y recuperas el dispositivo.