Samsung’s latest and arguably the best flagship to date is the Galaxy Note 9. The smartphone has everything one can hope for in 2018 and more. While Samsung’s software is not something everyone is a fan of it’s definitely not as bad as it used to be. The Galaxy Note is still one of the most popular devices around ensuring more than good third-party developer support. As a testament to that, a little over 2 weeks since launch, you can already install TWRP and root Galaxy Note 9 (Exynos variant) with the model number SM-N960F, SM-N960FD, and SM-N960N.
Now, as is usually the case every year, the internationally sold Exynos variants (N960F/FD/N) of the Samsung Galaxy flagship is the only one you can root right now. The rooting method was found and shared originally by XDA member dr.ketan. He lists two methods to root the Galaxy Note 9.
One of these is using the TWRP recovery while the other uses the stock Samsung recovery. We will only be using TWRP recovery since the method to root it via the stock recovery is not entirely safe. But then again, when has rooting ever been entirely safe? So if you want you can check out that method by following the source link at the bottom.
Warning
Installing a custom recovery on your device requires unlocking the bootloader which will void its warranty. If you’re here though you’ve probably already made up your mind about it. We can assure you that the method mentioned below has been successfully tested and that it works perfectly fine. What we can not assure you of is that everything that you do (even if you follow this guide exactly) will produce the desired result. That is to say, there’s always a risk that something can go wrong. In which case, you must understand that you were warned, and you still went with it anyway. Therefore, DroidViews cannot be held liable for any damage to your device.
Requirements
- A Samsung Galaxy Note 9 Exynos variant (N960F/FD/N) with an unlocked bootloader.
- A Windows, Mac or Linux computer with ADB and fastboot installed and set up. We do have dedicated, detailed guides on how to do just that for all the three platforms. You can check them out by following the links below.
- Windows users will also need to install the latest Samsung USB Drivers in order to get things working.
- Enable USB debugging and OEM Unlock on your Galaxy Note 9. To do this go to your Settings > About phone > Software information. Now tap on the Build number 7 times until you see a toast message “Developer option enabled”. Go back to Settings and you should see Developer Options listed towards the bottom. Tap on it and enable OEM Unlock and USB Debugging. In case you don’t see an OEM Unlock option here, there’s currently no workaround so you will just have to wait until there is.
- Ensure that your Galaxy Note 9 has at least 50% battery.
- The process does require you to format your device so make sure you have backed up everything important, including files and folders on your device’s internal storage.
Downloads
Download and transfer the N960_Root_for_OEM_issue_devices_V1.zip file to an external SDcard or a USB OTG and connect it to your Note 9.
Install TWRP & Root Samsung Galaxy Note 9
- Turn off your Galaxy Note 9 and then connect it to your PC via a USB cable while holding down the Volume down and Bixby buttons. This will boot it into Download mode.
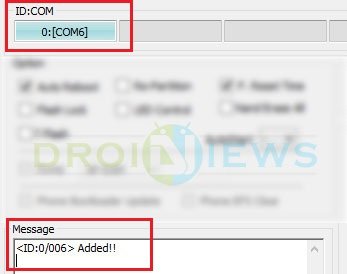
- Run Odin on your PC and disable Auto reboot under the Options tab. You should be seeing the ID: COM port in blue on Odin which means it can detect your device.

- Click on the AP button in Odin and select the downloaded TWRP tar file then click on the Start button.
- When TWRP has been successfully flashed, you’ll see a PASS! message on Odin.
- Disconnect the device and then press and hold down the Volume down and Power button until the screen goes off. Once it does, immediately press and hold the Power + Volume up and Bixby button to reboot into recovery.
- Once you get past the TWRP splash screen, swipe at the bottom to allow modifications.
- Once in the main menu, select Wipe > Format data and type yes to perform a factory reset. This will wipe everything on your device including your device’s internal storage.
- After the format is complete, go back to the main menu and select Reboot > Recovery.
- Once it reboots back to TWRP recovery select Install then navigate to and select N960_Root_for_OEM_issue_devices_V1.zip from the external SDcard. Swipe at the bottom to flash it. Select Magisk from the rooting method choices and then select the OEM Patch after that.
- When the flashing completes successfully, reboot your device.
Magisk Manager may not appear in the app drawer when you reboot the device but it should after one more reboot.


Join The Discussion: