In this tutorial, we’ll learn how we can install third-party apps as system apps. Having installed an app from the Play Store or sideloading an APK, you can easily convert user apps into systems apps.
There are two different types of Android apps: system apps and third-party apps. System apps are the ones responsible for the core functionality of the Android System. Apps such as Dialer, Messages, Settings, Camera, Google Play Store. These apps come pre-installed with the phone out of the box when you buy it. Manufacturers do not provide an option to remove these apps as doing so might impact the core functioning of the system.
And then there are third-party apps; the apps that you download from Play Store or sideload with an APK file. Apps such as Amazon, Splitwise, MX Player, etc. These apps can be uninstalled anytime without any restrictions. Also, system apps tend to have more permissions and hence more control over the phone than the normal third-party apps. In this post, I will tell you how to install third-party apps as system apps on Android.
Why convert Third-Party apps into System apps?
That’s a good question, and I’ll tell you why.
There are times when you might need to format (factory reset) your device to get rid of an annoying problem in your device (Weird errors pop-up every now then and won’t go away, it happens!) or if your device is not working the way, it’s supposed to. The problem with the factory reset it that it deletes all the user data and third-party apps. Your favorite music player you installed from Play Store, gone. That nice file manager you installed from Play Store, gone. If you convert these third-party apps into system apps, they’d still be there even after the reset, yay!
Must Read: 50 Best Apps for Rooted Android Devices
Prerequisites
- A Rooted Android Phone.
- A File Manager of your choice that allows you to access/modify root files.
Install Apps as System Apps on Android
Step 1: We are going to use File Explorer Root Browser. It is free, and you can grab it from the Google Play Store by clicking below:
[googleplay url=”https://play.google.com/store/apps/details?id=com.jrummy.root.browserfree”/]Note: If you’re willing to shell out a few bucks, I highly recommend using ‘Root Explorer’ (download link below). But as it is a paid app, File Explorer Root Browser is used in this tutorial.
[googleplay url=”https://play.google.com/store/apps/details?id=com.speedsoftware.rootexplorer”/]Step 2: Once you install File Explorer Root Browser, open the app. Swipe from the left and tap on the ‘Root Explorer’ option to enable it. You will be prompted to grant superuser (root) permissions for the app, tap ‘Allow.’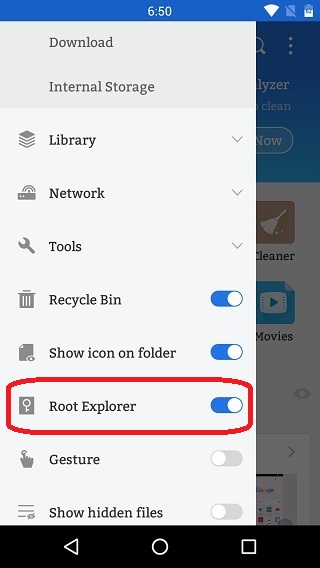
Step 3: Go back to the app’s home page and tap on the ‘Internal Storage’ option and then tap on the ‘/’ on the top left corner to go to the root directory where the system files are present.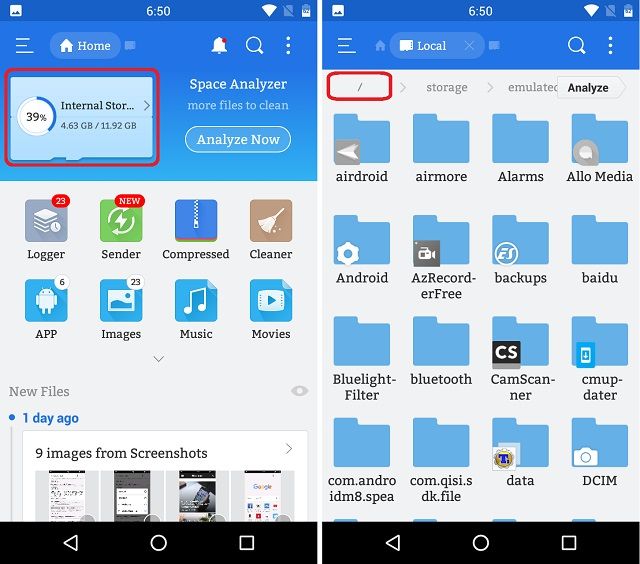
Step 4: Once you are inside the “/“ folder which is the root folder of your device, open the ‘data‘ folder and then the “app” folder to access the data of all the user-installed apps. Every app’s data will be in its own separate folder. Now, long press on the folder of the app that you want to convert as a system app and select the “cut” option.
Don’t Miss: Hide Root and Pass SafteyNet Check on Android
For the purpose of this tutorial, we will make use of the Facebook Lite app. The data of this app will be stored in the folder named ‘com.facebook.lite-1’. 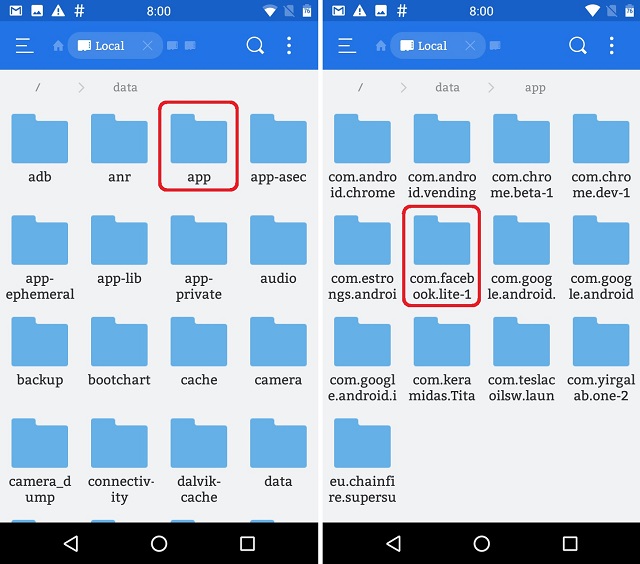
Step 5: Go back to the root (‘/’) folder again and navigate to the ‘system’ folder and then to the ‘app’ folder. This is the place where the data of all the system app are stored. Paste the folder (‘com.facebook.lite-1’) we copied here. 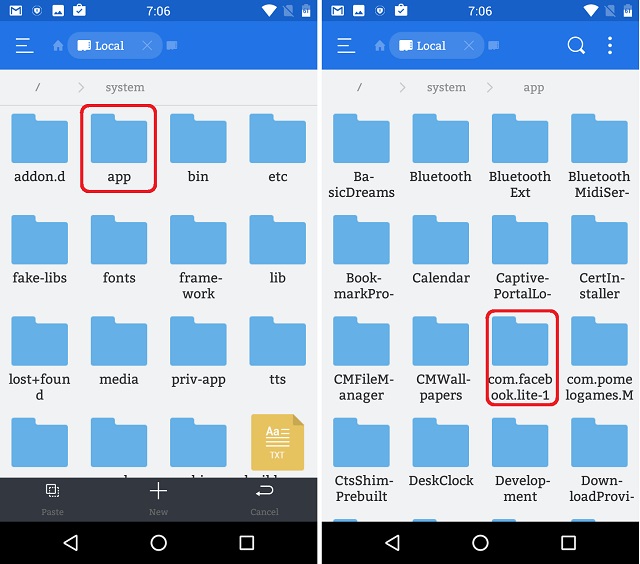
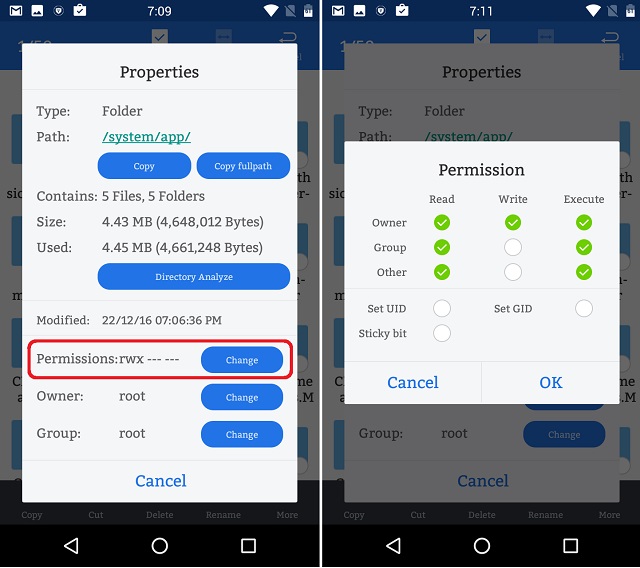
Step 6: The next step is to set proper permissions for the folder you just copied to make sure it has all the permissions of a system app. For that,
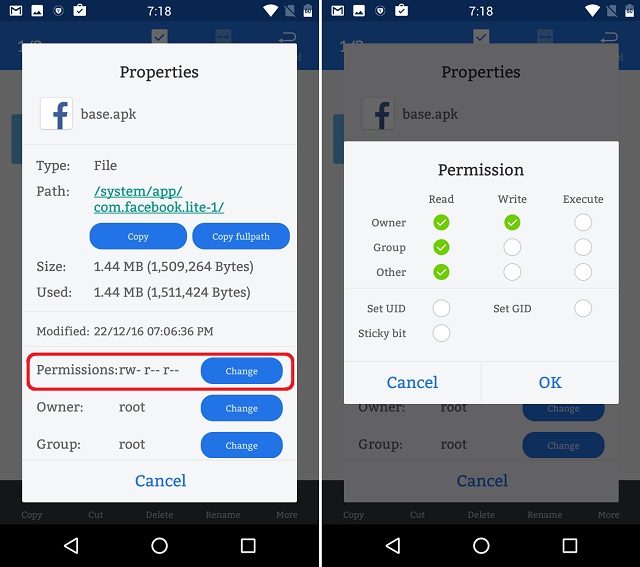
Step 7: Inside the folder you just copied, there is an APK file which is the actual app. You need to configure permission of this APK file too, to make sure it has all the permissions of a system app. To do this, open the folder you just copied, find the APK file and open its properties. Then set the permissions as shown below:
Once you have completed the steps as mentioned above, simply reboot your device for the changes to take effect. This step is a must! Upon reboot, you will find that the app will be installed as a system app. To confirm this, go to Settings > Apps > Facebook Lite (in this example) to open the app’s details. The screen should look like this now: 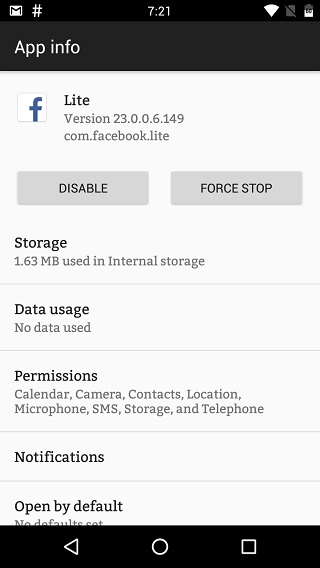
If you notice, the uninstall option will not be present for this app now. You can either choose to disable or force stop the app, just like the apps that came pre-installed on your device.
Things to keep in mind
Before you convert a particular app into system app, make sure the app is clean and does not contain any harmful code. Refrain from downloading APK files from unknown/Chinese website and do not convert these apps to system apps as system apps have permission to do almost anything on your phone.
Do let us know if this worked out fine for you. Do not hesitate to ask us any questions regarding any of the steps mentioned in this guide through the comments sections below.


Join The Discussion: