Huawei has been launching the latest smartphones in the Honor and Huawei series this year and the company has just launched the latest flagship smartphone from the company which has been named as the Huawei Mate 9. Now, the smartphone has recently got the latest update to Android 8.0 Oreo which is the latest version of Android that was released by Google earlier this year.
Since the update has been rolled out for the Huawei Mate 9, there have been questions among the users of the Huawei smartphone about the procedure to install the latest updates on their smartphones. Now, we are going to share a guide with you down below which will help you in understanding the process of installing official updates which are released by the company to be installed on your device if you have the firmware files downloaded on your PC or Laptop.
Now, the below method for updating to the latest version works on most of the Huawei devices that have been released in the recent times and it is not limited to any one particular device but you should always look at the files that you have downloaded as they should be of the device for which you are going to install the update. Talking about the updater process, you will need to download some files which are necessary for the process and we have linked them down below for your convenience in the Downloads section along with a step-by-step tutorial for the entire process after the Downloads section.
Note
- Make sure that you have at least 50% battery left on your device before beginning the process of installing the latest update on Huawei devices.
- Also, it is recommended that you take a backup of your device before installing the update via this process so that you can keep all your important data secure.
Downloads
Also download: Huawei Mate 10 Stock Wallpapers
Steps to install latest OS updates on Huawei devices using Huawei updater
- You will need to install the Huawei Updater 2.0 application and the Huawei HiSuite tool before beginning the process on your PC/Laptop.
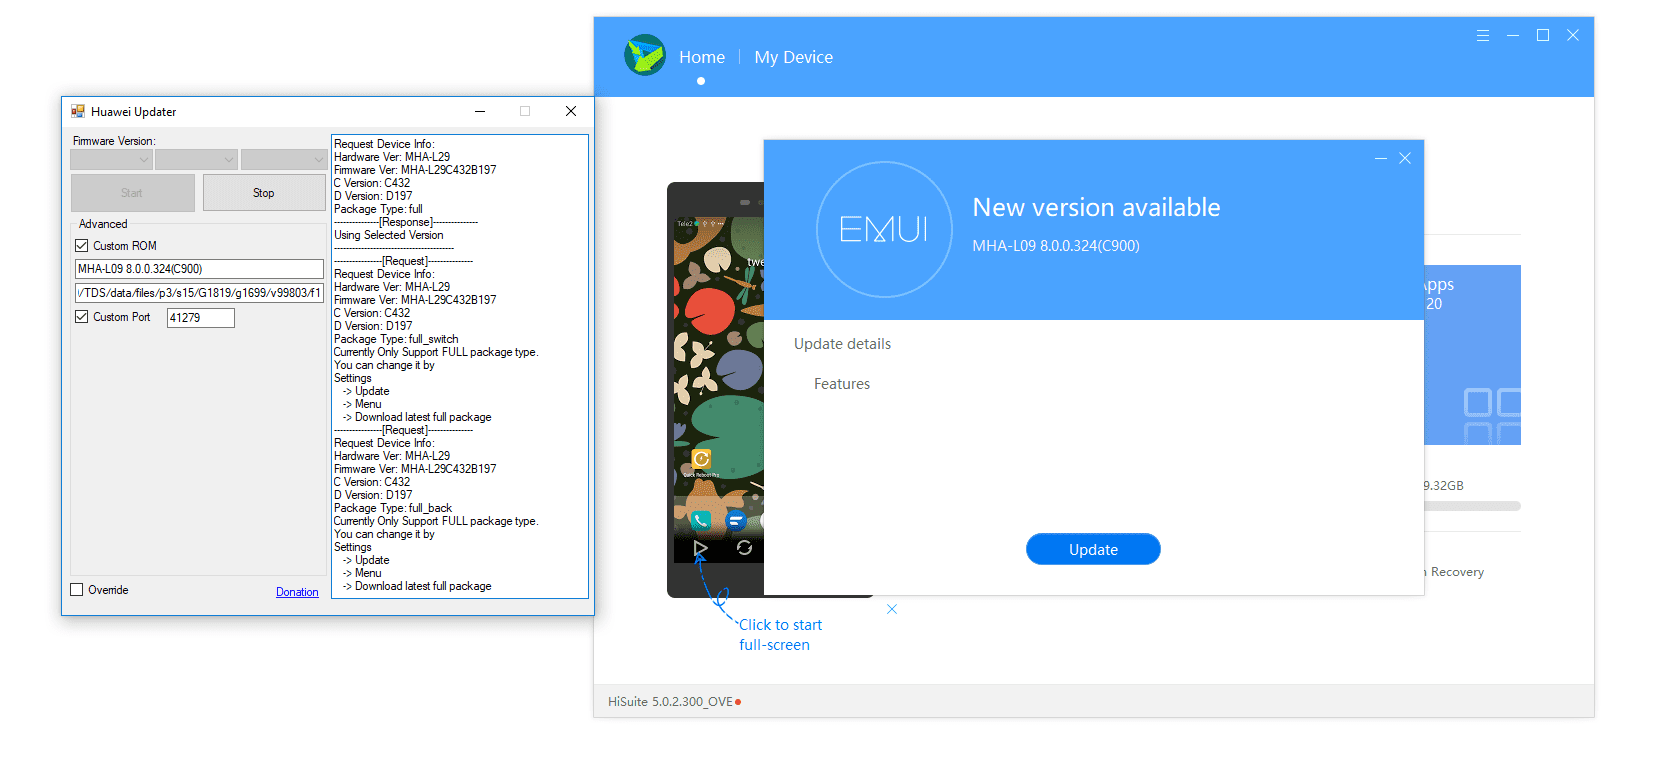
- Once installed, you have to run the Huawei Updater 2.0 application and then check on Custom ROM and Custom Port tickbox. This can be seen from the screenshot attached below.

Huawei Updater screenshot - In the Custom ROM section of the Huawei Updater application, you have to enter the ROM version which you are going to flash on your device. For example, in the above screenshot, the version number is MHA-L09 8.0.0.324 (C900).
- Now, Enter the URL of Custom ROM for your device in the Custom ROM URL box. For example, we have the attached the URL seen in the screenshot down below. https://update.hicloud.com:8180/TDS/data/files/p3/s15/G1819/g1699/v100248/f1
- Now, you have to click on Start button inside the Huawei Updater application.
- After this, connect your phone to PC via the HiSuite application. You need to ensure that your device has been connected properly to your PC and the device has been recognized in the HiSuite application.
- In HiSuite application, go to Settings -> General -> Custom Proxy. Here, you will have to set custom proxy for two fields which we have mentioned below:
Address: 127.0.0.1
Port: 41279
- Now, go back to the main HiSuite application window and then click on System Update button.
- After this, you have to click on Install and your firmware will start downloading to your device and you will have to wait for a few minutes till the process takes place.
- After the download is complete, your device will reboot and your Huawei device will be updated to the latest firmware.
Now, make sure that you download and install the correct firmware which is compatible with the device and follow the step by step procedure from above to begin the installation process.
Also read: Improve Your Android’s Performance by Tweaking VM Heap Size
However, if you are stuck at any step in the guide mentioned above then you can comment on your problems in the comment section below.


hi.when i configured the hisuite i get no inernrt connection
DE DONDE SACA LA URL PARA LLENAR LA CASILLA DE KA ROM PERSONALIZADA