Google has introduced Android M at the Google I/O 2015 conference just a few hours back. Following the last year’s strategy, Google has released the Android M developer preview images for Nexus 5, Nexus 6, Nexus 9 and Nexus Player as well. The Android M Developer Preview images are available live for download on the Android Developer’s website for the aforementioned devices. Google also promises OTA updates for the devices flashed with Android M images, so this is a great news for Nexus users.
Android M brings a lot of new features to the Android ecosystem like the Granular permissions which improves handling the permissions at a granular level which installing and upgrading apps, App Links, which allows app developers to associate an app with a domain they own. Now on tap that offers contextual information just a tap away in Google Now, Android Pay & Fingerprint integration, Doze and App Standby power-saving features, new assist technology and more to be revealed.
The Android M preview images can be installed like any other Nexus images but users have reported ‘missing system.img’ error while flashing. So, you need to dirty flash the images for a error free installation of Android M on your device. Grab the Android M preview images from the below links and the follow the simple procedure to install Android M on your Nexus device.
Android M Developer Preview Images
- Nexus 5
- Nexus 6
- Nexus 9
- Nexus Player
Prerequisites
- Charge your Nexus device above 60% battery level to avoid shutdowns during the process.
- Backup your device storage, Contacts, SMS etc. using Google Sync service or any third-party app as the entire device will be wiped clean.
- Enable USB Debugging option on your phone: Settings> Developer options> USB Debugging. If you do not find the developer options, you’ll have to make it visible manually. See the instructions here.
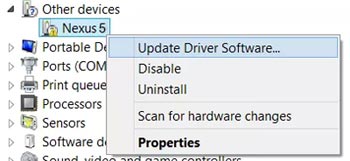
- Download and install the latest Google USB Driver on your Windows PC. Since the USB drivers is not an executable file but a zip, it requires special steps to install it. Download and extract the zip to your desktop. Connect your device to the computer. Press Windows+X keys on the keyboard and click on Device Manager option. Now click on the “Other Devices” expander button. Right click on Nexus 5 (with yellow triangle sign) and select “Update Driver Software”. Then click on “Browse My Computer for Driver Software”. Locate the “latest_usb_driver_windows” folder and select Install option. When the driver is installed, you device should show in device manager as“Android Composite ADB Interface”.
- Download and setup Android-SDK on your computer, or simply download the Minimal ADB and Fastboot tool: adb-and-fastboot.zip (rename mfastboot.exe to fastboot.exe for convenience)
Install Android M Developer Preview on Nexus 5, 6, 9 and Player
- Download the Fastboot zip from above and extract the files to a working folder on your PC.
- Download the Android M preview image and extract it to get a bunch of files along with a zip file which contains about 4-6 image files like:
- boot.img
- cache.img
- recovery.img
- system.img
- userdata.img
- The initial .tgz image you have downloaded contains .img files for bootloader, radio. The vendor.img only appears in the Nexus 9 preview images as this img file contains the drivers for Nexus 9, so don’t worry if you don’t find this for other devices.
- Copy all the .img files to the folder where you have extracted the ADB and Fastboot files.
- Navigate to the folder where you’ve extracted the ADB and Fastboot files and open a command prompt by pressing Shift + Right-click on any empty space inside the folder, and select Open command window here from the context menu.
- Connect your Nexus device to the PC using a USB cable and reboot into bootloader mode by executing the following command in the command prompt:
adb reboot bootloader
- Flash the bootloader.img and radio.img one-by-one using the following commands:
fastboot flash bootloader bootloader.imgfastboot flash radio radio.img - Reboot the bootloader once you flashed the new bootloader and radio images. Don’t skip this step.
fastboot reboot-bootloader
- Once the device boots into new bootloader, flash the rest of the images one-by-one using the following commands:
fastboot flash recovery recovery.imgfastboot flash boot boot.imgfastboot flash system system.img - If you want to do a full wipe of the device, issue the following commands one-by-one (Recommended):
fastboot flash cache cache.imgfastboot flash userdata userdata.img - Nexus 9 users have to flash the vendor.img as well. So, flash it with the below command:
fastboot flash vendor vendor.img - Finally, reboot your device using the below command:
fastboot reboot
That’s it, your device will now boot into the latest Android M. Be patient and excited at the same time.


Join The Discussion: