Samsung has been quite busy lately releasing a bunch of flagship models to gain a monopoly in the Android market. With Galaxy S6 & S6 Edge, Samsung took a turn where the style meets the performance. The Galaxy S6 & S6 Edge devices are premium built with an awe-inspiring design which reflects the craftsmanship of the Samsung design engineers. Moreover, Samsung is quite good at releasing frequent updates to its devices and the Galaxy S6 range devices are already on the latest Android 5.1.1 Lollipop. We also expect the Android 6.0 update to be released as soon as the Google unveils it on its Nexus.
However, frequent updates are sometimes annoying as users lose their precious customizations that are made after rooting. Sometimes, it’s also hectic to root devices on new firmware as Samsung is equally good at restricting users from unauthorized tampering. Today we will show you how to root Samsung Galaxy S6 & S6 Edge models on Android 5.1.1 Lollipop. The rooting process includes flashing a custom kernel which is pre-rooted and also includes memory optimizations, DHA tweaks on build.prop, Busybox support and various init.d scripts included.
This tutorial works on the below mention variants of Galaxy S6 and S6 Edge smartphone. So, don’t try this on other variants.
Samsung Galaxy S6
- SM-G920F
- SM-G920I
- SM-G920S
- SM-G920K
- SM-G920L
- SM-G920T
- SM-G920W8
Samsung Galaxy S6 edge
- SM-G925F
- SM-G925I
- SM-G925S
- SM-G925K
- SM-G925L
- SM-G925T
- SM-G925W8
Warning!
Rooting your device might void the warranty either temporarily or permanently. The procedure followed in this tutorial is considered risky and might brick your device in extreme cases but you can always restore the device with stock firmware. We are not responsible for any damage done to your device during the process, proceed at your own risk.
Prerequisites
- Make sure your device is charged above 60% to avoid unexpected shutdowns during the rooting process.
- Enable USB Debugging on your Galaxy S6: Go to Settings » About » Build number and tap it 7 times to unlock Developer options. Now return to Settings » Developer options and tick the USB Debugging check-box.
- Install the latest Samsung USB drivers on your PC.
- Install TWRP recovery on your Galaxy S6.
How to Root Galaxy S6 on Android 5.1.1 Lollipop
The custom kernel is available both in Odin flashable tar package and recovery flashable package. Choose the method of your choice and follow the instructions carefully.
Method 1: Using Odin Tool
- Download Odin tool: Odin3_v3.10.6.zip and extract the files on your PC.
- Now download the custom kernel of your choice from the below links and place it in the same folder where you’ve extracted the Odin tool.
-
- UniBase TAR: S6-UniBase_BOG8_v2.tar
- UniKernel TAR: S6-UniKernel_v6-0001-ODIN.tar
-
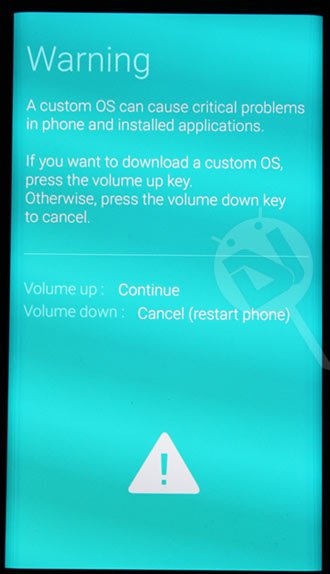
- Now turn off your Galaxy S6/S6 Edge and reboot it into the Download Mode by pressing the Volume Down+Home+Power keys simultaneously for 3-5 seconds. When you see the warning screen with an exclamation sign, press the Volume up key.

- Double-click Odin3-v3.10.6.exe to launch the program.
- Connect your phone to the computer using a USB cable. ID:COM port of Odin will be highlighted to show that your device has been detected by the tool.
- Click the AP button and select the custom kernel which is the .tar file.
- Finally, click the Start button to trigger the installation.
- The installation will be finished within a few moments and you’ll get PASS! message on Odin.
Method 2: Using TWRP Recovery
- Download the recovery flashable custom kernel of your choice from the below links and transfer it to your device’s storage.
- UniBase ZIP: S6-UniBase_BOG8_v2.zip
- UniKernel ZIP: S6-UniKernel_v6-0001.zip
- Boot into recovery mode on your device. To do this:
- Switch off your Galaxy S6/S6 Edge.
- Press and hold the Power + Volume Up + Home buttons simultaneously until you enter the recovery mode.
- In the recovery mode, tap the Install button, choose the kernel file and flash it on your device.
- Get back to the main menu and reboot the device once the installation is completed.
That’s it. Your device is now rooted on Android 5.1.1 Lollipop. Let us know if you’re facing any issue during the rooting process.
Read Next: Samsung Wings Fonts 3 (APK): Custom Fonts with One UI Support


al termine dell’installazione mi da un errore di avvio “recovery is not seandroid unforcing”
Have anyone rooted their Samsung Galaxy S6 with this process? I want to hear if people have successfully rooted their Samsung Galaxy S6 with this so root my phone also.
Please update the portion of your story to include this method does in fact trip the KNOX hardware counter and your warranty is voided indefinitely. Other than that one fact this is a very straight forward and very well written post. Thank you for the information. XDA forums has further information about the hardware counter.