
A new Nexus flagship device might not be as great as those from manufacturers like Samsung, HTC, Sony and LG but being a true Google phone makes it pretty special in its own right. Owning a Nexus device gives a sense of privilege because all latest updates of Android come to it first. The Nexus 5 is the thing of sensation in the world of Android, not only because it is a new phone but also because it comes with the latest version of the OS, Android 4.4 KitKat, as an exclusive treat.
So, if have been lucky enough to get the brand new Nexus 5 and having played around for some time, wish to root it, you have just landed on the right spot. In the present guide, we’ll first see Chainfire’s root method with the well-known CF-Auto-Root package and then get acquainted with a couple of all-in-one tools that are capable of rooting Nexus 5, unlocking the bootloader and installing a custom recovery as well.
If you are new to Android and are not familiar with the positive and negative sides of rooting, do not forget to read our informative article on the pros and cons of rooting devices. By rooting your Nexus 5, you will be able to use hundreds of awesome apps that let you enjoy customization, faster performance, extended features, and better battery life. If you also choose to install TWRP recovery, you can install and backup and restore ROMs, mods, and kernels to get the best possible performance out of it.
Warning!
Rooting will void the warranty of your device. The procedure and tools mentioned below have been well tested and found working successfully, yet we do not guarantee that they are 100% risk-proof. Proceed only if you understand its implications and consequences.
Preparations
Here are a few prerequisites that you need to make before rooting your Nexus 5 and installing TWRP recovery on it.
- Charge your device to have 50% battery power at least.
- Download and install Nexus 5 USB Drivers on your Windows/ Mac/ Linux computer. Connect your device to the computer, if you have an internet connection, your computer will recognize the device and install all required drivers automatically. To verify if our device is properly connected on your Windows PC, click Windows+X key and select Device Manager. Now connect your Nexus 5 to the computer and check if it shows your device listed there or not. If you see a yellow triangle on your device name, download the latest Google USB drivers and unzip it. Open Device Manager on PC again, right-click on your device name and select “Install/update drivers”, then select on browse option and locate the latest USB drivers folder. Then click OK. When you are prompted, select the “Install” option. You’ll now be able to see your Nexus 5 listed as an Android Composite device.
- Set up Android ADB and Fastboot on your computer.
- Enable USB Debugging on your Nexus 5: open Settings> About and go to Build Number. Then tap it for 7 times to activate Developer Options. Now return to settings and you will see Developer Options there. Tap it, turn it on by tapping the slider and check the box before USB Debugging.
- Backup your phone’s data to be on the safer side.
Root Nexus 5 Using CF-Auto-Root (Win, Mac, Linux)
- Download CF-Auto-Root package by Chainfire: CF-Auto-Root-hammerhead-hammerhead-nexus5.zip
- Extract the zip file.
- Boot your Nexus 5 into Bootloader/ Fastboot mode. You can do this by turning the device off and by holding the Volume down key followed by Power button.
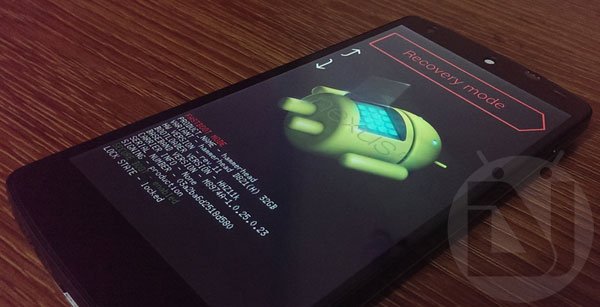
- When the device boots into Fastboot, open the CF-Auto-Root package folder and run the program depending on the OS of your computer:
- Windows: root-windows.bat
- Mac: root-mac.sh
- Linux: root-linux.sh
- When you see the cmd window, connect your phone to the computer using a USB cable.
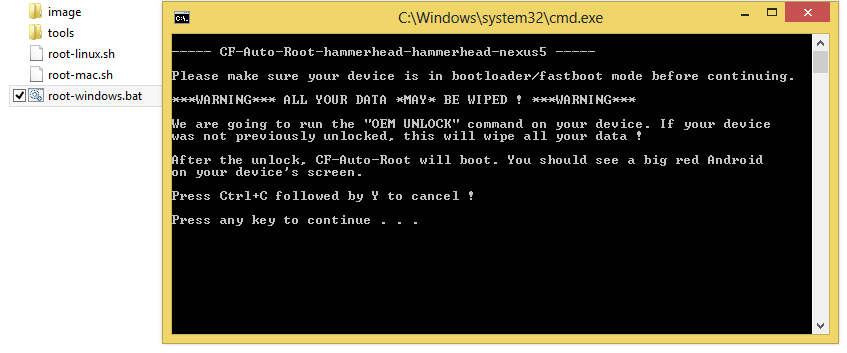
- Now follow the on-screen instruction both on the cmd and your Nexus 5. When you see unlock bootloader prompt on your phone’s screen, press Volume up key to highlight “Yes” and then press the Power button to confirm.
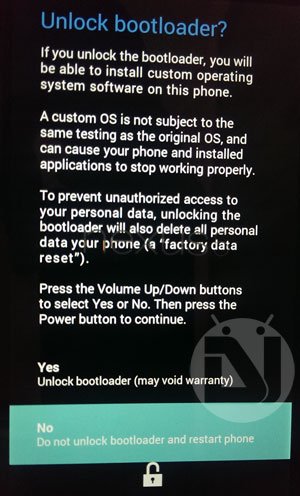
- At the completion of the procedure, SuperSU will installed to your phone and it’ll be rooted.
Unlock Nexus 5 Bootloader and Install TWRP (Win only)
Soon after Chainfire came up his CF-Auto-Root, XDA members ricky310711 and Kwongger released their all-in-one toolkits. By using any of these tools, you can easily root your Nexus 5 (GSM/LTE), unlock its bootloader and also install TWRP recovery on it. The tools require no special knowledge and demand very little effort.
- Download the latest version of any of the following Nexus 5 Toolkits:
- Nexus 5 Multi-Tool.zip (no longer updated by the developer)
- Kwongger’s NEXUS 5 All-In-One Toolkit.zip
- Unzip the downloaded file and run the batch file to launch cmd window:
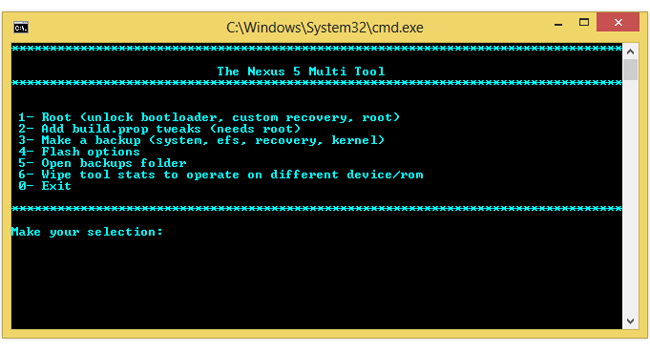
- Boot your Nexus 5 in Fastboot mode (see the steps for doing it below).
- Connect your phone to computer via USB.
- All you need to do is to type the corresponding number for the task you want to perform. For example, if you want to root, unlock bootloader and install TWRP recovery, type “1” and hit the Enter key.
- The tool will then ask for your confirmation. Type “Y” for yes.
- If you are using Kwongger’s NEXUS 5 All-In-One Toolkit, type “1” to select “Continue” option.
- Just keep following the on-screen prompts and you will have a Nexus 5 with root access, unlocked bootloader and TWRP installed on it.
Root Nexus 5 Unlock and Install TWRP (Mac users)
If you are a Mac user, there is another all-in-one tool for you that can easily root your Nexus 5, unlock its bootloader and install TWRP recovery on it.
- Install Android File Transfer Tool on your computer.
- Download the 3 toolkits from below and unzip all of them:
- RootNexus5.zip
- TWRP.RecoveryNexus5.zip
- UnlockBootloaderNexus5.zip
- RootNexus5.zip
- Inside each extracted toolkit folder, you’ll see a green Android icon. You have to click this icon to perform the corresponding task.
- Turn off your Nexus 5 and boot it into Fastboot mode (see below for how to steps).
- Connect your phone to your Mac computer using micro USB.
- Launch the root toolkit and follow the on-screen directions.
When your Nexus 5 is rooted, you can launch other tools in turn and unlock the bootloader first and then install TWRP recovery.
How to Verify Root Access
To verify if your phone is properly rooted or not, install an app called Root Checker and run it.
[googleplay url=”https://play.google.com/store/apps/details?id=com.joeykrim.rootcheck”]Installing CWM/TWRP Recovery on Nexus 5
In case the Nexus 5 toolkit provided above do not help you, you can install the latest version of ClockworkMod or TWRP recovery on your phone following the steps given below. Make sure you have already unlocked the bootloader of your Nexus 5.
- Download and setup Android SDK on your computer. To do this, download the ADT-SDK bundle zip package and unzip it to the OS drive on your computer. We recommend you to extract the contents of the SDK to C:/Program Files directory. Windows 8 users should extract the zip to the Program Files (x86) folder.
- Make sure that USB Debugging is turned on on your phone (see above if you do not know how to do it).
- Download the latest version of CWM/TWRP from below:
- CWM Recovery: recovery-clockwork-touch-6.0.4.5-hammerhead.img
- TWRP Recovery: openrecovery-twrp-2.6.3.4-hammerhead.img
- Copy the recovery.img file to C:/Program Files/sdk/platform-tools directory.
- Now turn off your Nexus 5 and boot it into Bootloader/Fastboot mode. Press Volume Down and Power keys at the same time for a few seconds.
- Connect the device to the computer and then navigate to the directory where you copied the recovery image file:
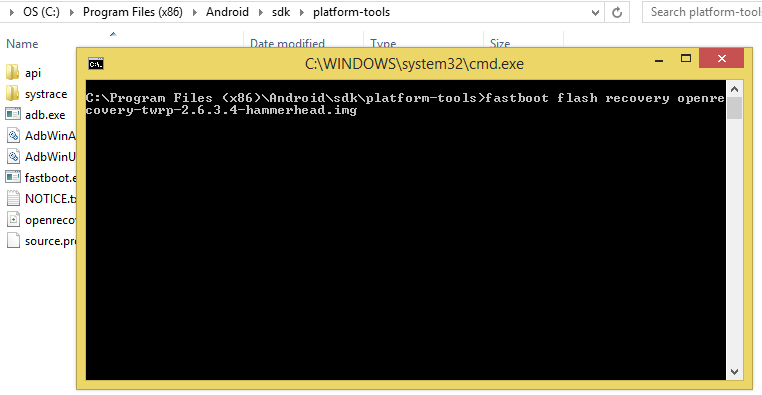
- Move the mouse cursor to an empty space in the directory and then press Shift+Right-click on mouse and select “Open command window here”.
- Then type the following command followed by the name of the recovery file with .img extension:
fastboot flash recovery
- Suppose you downloaded TWRP recovery, the command line will go like this:
fastboot flash recovery openrecovery-twrp-2.6.3.4-hammerhead.img - Then hit the Enter key on the keyboard.
- Your favorite custom recovery will be installed to your Nexus 5.
Now disconnect the device from the computer and reboot your Nexus 5
Booting Nexus 5 into Fastboot/ Recovery Mode
If you ever need to boot your Nexus 5 into TWRP recovery mode, do this:
- Power off the phone.
- Press and hold Volume down + Power buttons at the same time for a few seconds. When you feel a soft vibration, release the Power button.
- You’ll see a green start icon on the screen, indicating that your Nexus 5 has entered Bootloader/ Fastboot mode.
- Use volume keys to navigate the menu and Power button to select options/files.
- Now scroll till “Recovery mode” displays.
- Then press the Power button to select it.
If you have any queries regarding this tutorial, feel free to let’s know. Also, do not forget to share your feedback about how the procedure went for you. Cheers!


Awesome Article
Please Check below article
http://www.gotmint.org/2014/01/How-to-root-Nexus-5-using-CF-auto-root.html
I’m having trouble installing twrp … when pressing enter the comand loads error. can u help me?.
Install the USB drivers correctly. You can find instruction here: https://www.droidviews.com/how-to-restoreunroot-nexus-5-by-flashing-factory-images/
Works on D821 N5?
Yes.
Awesome Article
Please Check below article
http://www.gotmint.org/2014/01/How-to-root-Nexus-5-using-CF-auto-root.html