Although the title might end up sounding more of a click-bait, but trust us, this method truly works. If anyone is left in the dark then there is a slight background check. Google Photos allows you to upload photos and videos over to its cloud. Once the upload is complete, you may free up the device’s storage space by deleting those files. But this comes with a catch. You get Google Photos unlimited storage only if you upload your media files in high quality (a slightly compressed version of your original quality photos).
However. if you instead prefer to upload the photos in all its shine and glory aka Original Quality, then you will only get 15GB of free storage. And considering the fact that this 15GB is shared across Gmail and Drive as well, there is always a dearth of storage space. Before you proceed, you must check out how you can enable dark mode in Google Photos.
But using the trick mentioned in this guide, you could easily upload unlimited numbers of photos/videos and that too in Original Quality. And for that, you don’t have to spend a dime. Moreover, it doesn’t require a rooted device nor any third party app installed either. Just follow the instructions mentioned below to get unlimited photos storage for free. Before beginning with the process, make sure your device is lag-free. Have a look at the tips to speed up lagging Android devices.
Steps to Get Google Photos Unlimited Storage
Before beginning with the process, make sure you have more than one Google account with you. If that isn’t the case, then create a new Google Account. Once done, proceed with the below instructions.
- On your Android device, open the Photos app.
- Tap on the three horizontally stacked lines present at the top left to open the Menu.
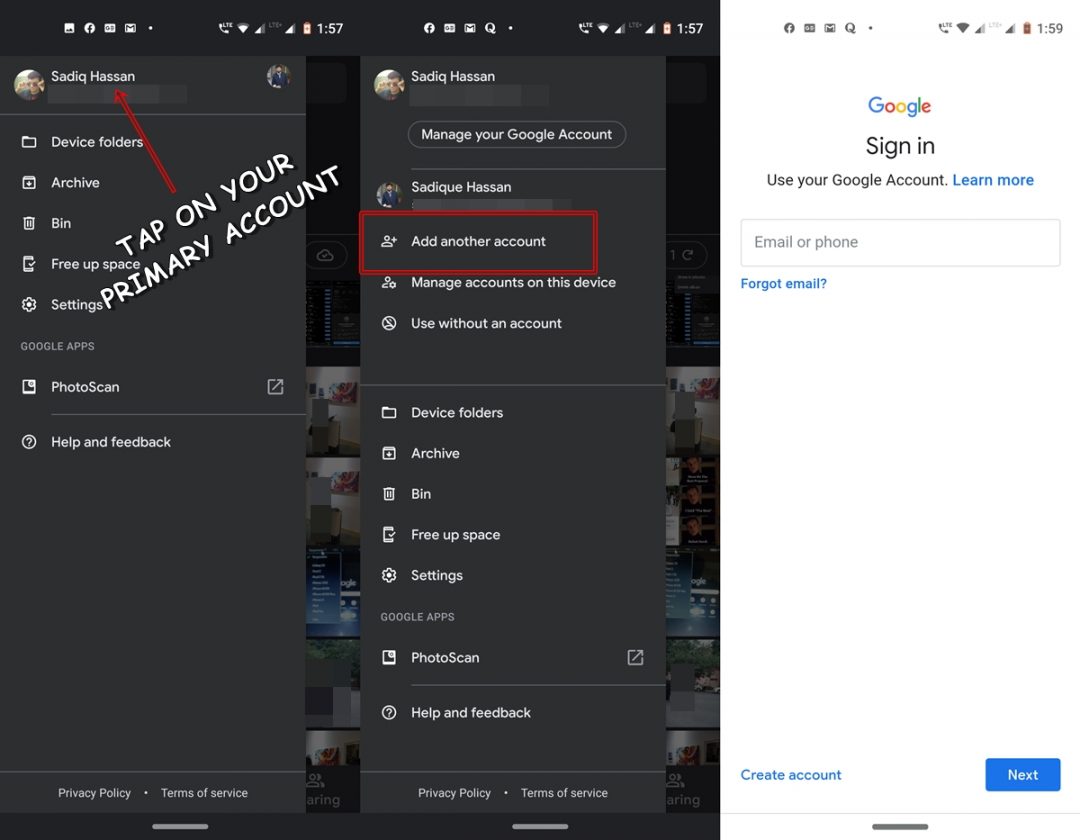
- Now tap on your currently logged in account. A drop-down list will appear. You need to add the Google Account that you have just created in the beginning. This will act as a proxy in getting unlimited Photos storage for free.

- For that, select the Add another account option from the menu.
- At this stage, you will have to authenticate your device using your password or fingerprint. Once done, enter the email and password of the newly created account. Note: If you haven’t yet created a Google Account, you may do so right now as well. Tap on the Create Account option situated at the bottom left and follow the on-screen instructions.
- Once you have successfully created/logged in with the newly created email, open the Photos app. Now go to the menu section and switch your account to the newly created one.
That’s it. You will now have 15GB of free space on your newly created Google account. As and when the entire storage of your primary account gets exhausted, simply switch over to your secondary one. But wait, it’s not over yet. You may just keep on creating new accounts and adding them to your Google Photos app. This way you will keep on earning 15GB of free storage space every time! Quite an easy yet interesting way to get unlimited Photos storage for free, right? Although adding many Google IDs might sometimes create ambiguity and confusion, so add as much as you could easily manage. Using this trick, you can enjoy Google Photos unlimited storage for your pics and images. If you want, you can now merge multiple Google Photos accounts into one to sync all your photos to a single account.
So, if you have more than the required number of Google Accounts, consider it to remove Google account on Android devices.
Check Storage Space of your Google Accounts
Now that we have seen how to get unlimited Photos storage for free, let’s turn our attention to something equally useful. If you have added 4-5 Google Accounts on your device, then you may want to keep a tab on the amount of storage space left in each of them. For that, try the below steps. Make sure to be online otherwise the process won’t work.
- From the Photos app, tap the hamburger menu present at the top left.
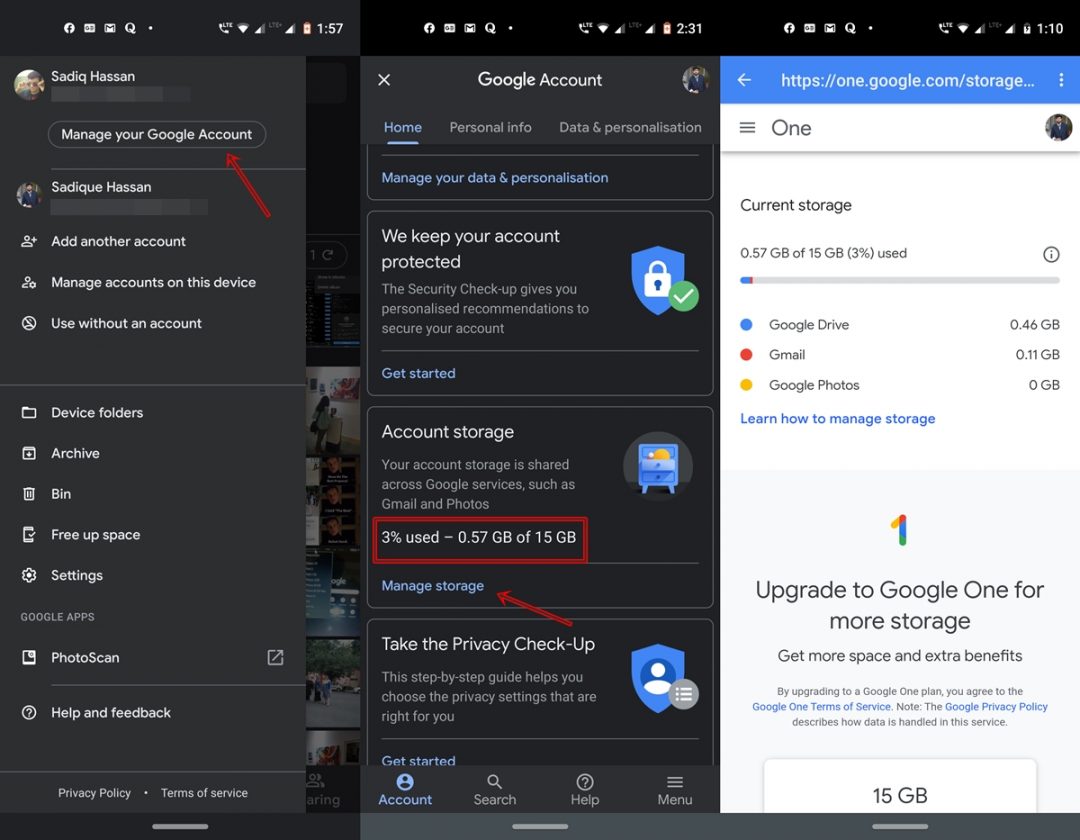
- Switch over to the account for which you want to check the storage space. You may do so by tapping on your primary account. Then from the drop-down list, select the desired account.
- Now, tap on Manage your Google Account.

- Scroll a little down until you reach the Accounts storage section. There you could see the remaining storage space. However, if you want a much detailed break-down of it, tap on Manage storage.
- Select an account dialog box will pop up. Select the desired account and press OK. You will now be taken to the Google One page where you could see how much storage space Gmail, Drive, and Photos are consuming.
- Similarly, if you want to check for any other account, tap on your avatar present at the top right and select the desired account.
With that, we conclude our guide on getting unlimited Google Photos storage for free. Do share your views on the same, down in the comments section below.


Join The Discussion: