The Samsung One UI is a great upgrade over the older Samsung Experience 9.0 and the Galaxy Note 8 has been receiving it too. Follow our tutorial to install the official Galaxy Note 8 Android Pie update with the One UI on the international unlocked variant of the device with model number SM-N950F (Exynos variant). The Android 9.0 Pie firmware for the Note 8 is available with build version N950FXXU5DSB2 and you can download it from below.
The Samsung Galaxy S9 and Note 9 have already received the latest Pie update. The Galaxy Note 8 is starting to receive the official Android Pie update with One UI in certain regions. We can expect more and more users to start receiving the updates soon. The update is live now in Slovakia and Bulgaria as users report. The update also brings Samsung’s new One UI to the Galaxy Note 8 which was only possible via the beta program or custom ROMs based on it earlier.
Samsung One UI
One UI includes new One UI icons, wallpapers and a completely overhauled redesigned of the interface. It makes using huge touchscreen displays easier to use with one hand by bringing all the interactive elements towards the bottom. The upper part of the screen is reserved as the viewing area where you can see information which doesn’t need to be touched. Apart from that, there’s an in-built- dark theme finally so you don’t have to go looking for hacks. You can check out our review of Samsung One UI for more details.
This update comes with a version number N950FXXU5DSB2 and the February 2019 security patch.
Requirements
- A Samsung Galaxy Note 8 [N950F only].
- Your data should be safe but it is still recommended that you perform a complete backup of your personal data, including the storage. We’ve already put up a guide on how you can backup your apps using Titanium Backup if your device is rooted. We also have some other backup guides which aren’t as wholistic but if you’re not looking to root or pay for the full version of Titanium Backup, these might be helpful.
- How to backup your Android Phone
- Backup Apps, Contacts, Logs, Messages and Settings without rooting your Android phone
- Make sure you have the Exynos variant of the Galaxy Note 9.
- The device should be charged up to at least 50%.
- You’ll need Odin to flash the firmware to the device. Odin can be downloaded from the link provided below in the Downloads section.
- Install the latest Samsung USB Drivers on your computer.
Downloads
Before you can install and start enjoying the new One UI, you need to download Odin and the Samsung Galaxy Note 8 Android Pie update firmware from below and follow the flashing instructions.
- Odin3_v3.13.1.zip
- Exynos Galaxy Note 8 Android Pie Update Firmware
Install Galaxy Note 8 Android Pie Update Firmware
- Download the Android Pie based OneUI firmware (N950FXXU5DSB2) for your Galaxy Note 8 from above and extract the downloaded ZIP on your PC. Extract any other zip files that you may find inside as well so that in the end, you have at least four firmware files. Their names should start with AP, BL, CP, CSC or HOME_CSC. All these files should have a ‘.tar‘ or ‘.tar_xxxx_xxxx-.md5‘ format. Rename all the files so that all of them simply have a ‘.tar‘ extension.
- Extract the Odin ZIP to an easily accessible location on the PC.
- Open the extracted ODIN folder and double-click on the Odin exe file.
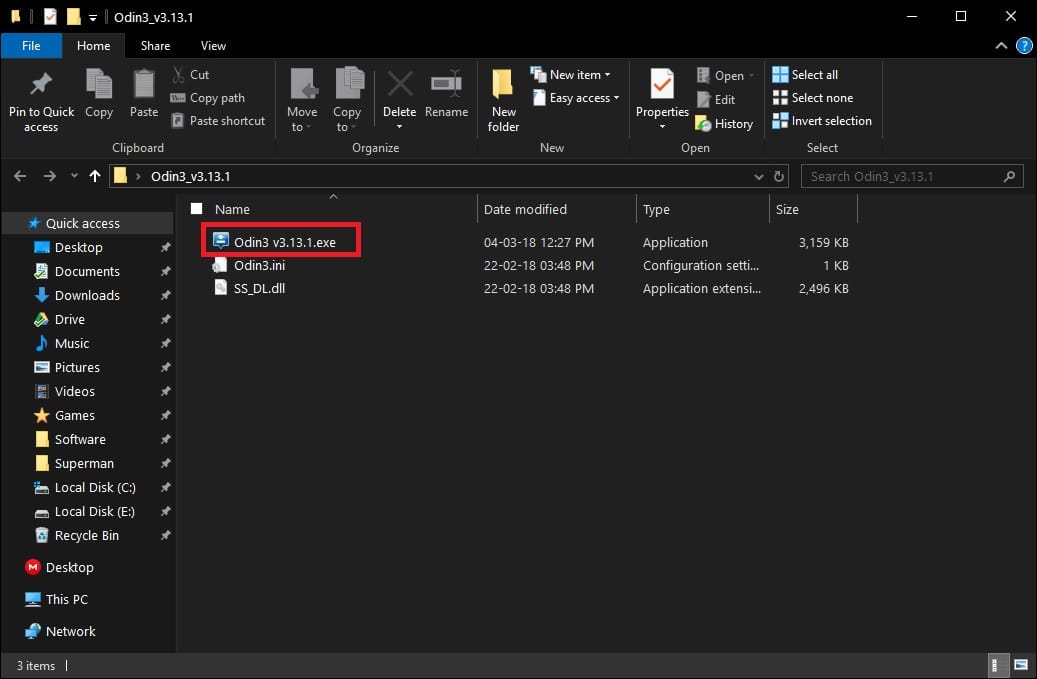
Odin files - Now reboot your Galaxy Note 8 into Download mode:
- Power off your device. Wait for a couple of seconds after the screen goes off.
- Press and hold the Volume down + Power + Bixby buttons together until you see a warning screen.
- Press Volume Up to continue to download mode.
- Connect the phone to the PC using the USB cable and the ID:COM port in ODIN should light. You should see Added!! on the bottom left under Log.
- Click on the BL button and select the extracted firmware file which has a name that starts with BL_.
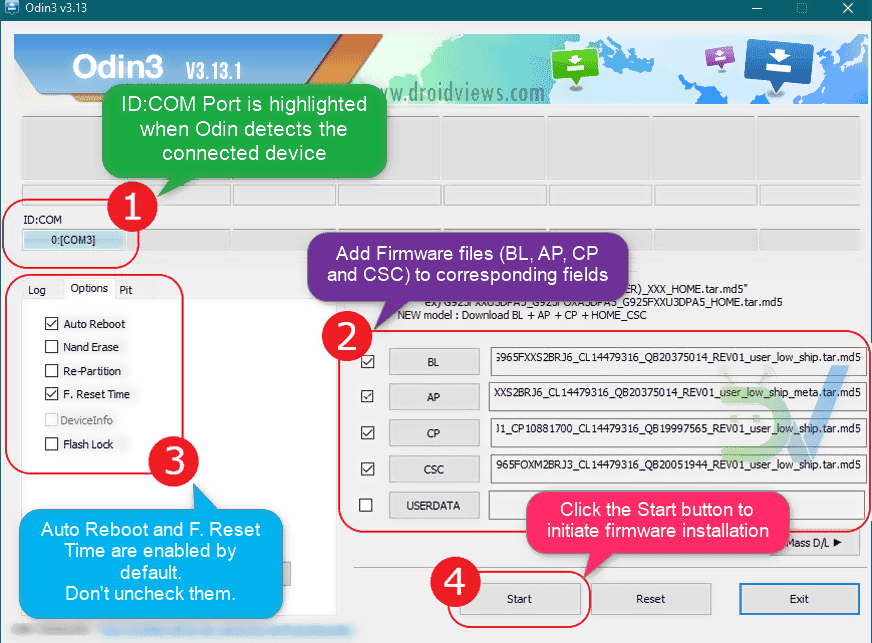
Android 9 Pie firmware installation in using Odin - Similarly, click on the AP, CP and CSC buttons and select the files with initials AP, CP, and CSC respectively. When you’re done, the BL, AP, CP and CSC fields should be populated with the respective files from the extracted firmware.
- Make sure that you choose the ‘HOME_CSC’ file and not the regular CSC file. Using the regular CSC file will wipe your phone completely, including the internal storage.
- On the left-hand side, under the Options tab, make sure only AutoReboot and F.Reset Time are checked.
- When you’re ready, click on the Start button in Odin.
Successful Firmware Installation with “PASS” Message
The process usually takes less than 7 minutes and the device may restart itself twice. In case HOME_CSC gives you an error, you’ll need to use CSC instead. This will reset/wipe the storage so it’s a good thing you took a backup. If Odin shows “PASS“, you’re done. You can now start enjoying Galaxy Note 8 Android Pie update with the all-new Samsung One UI!
Read Next: 10 Best Samsung One UI Features


Join The Discussion: