What is the very first thing you do when you take out your newly bought Android smartphone out-of-the-box? You unpack it slowly and let it boot, excited, that is what you are. But what if a person like me has to answer this question, I would say and mark my words when I say because it’s the truth – I take out my smartphone, reboot it into Recovery Mode and flash a Custom ROM (That is what I’ve always done to my Nexus S, Nexus 4 and Nexus 5). In some decent opinions, some might call flashaholic people like me insane, for not even booting the device once. You see all of this is a rush, excitement to try something new and different. Let’s see how we can install ROMs on Android devices using the CWM and TWRP recovery.
New members are added every day to this group of ours, people who are crazy enough to flash any ROM that causes bling in their eyes. But what if you’re already in, ready with your Custom Recovery installed, but completely unenlightened about the flashing procedure. This situation rises up at least once with everyone.
Now, why is it so important? Yes, we know is a short process, but there is something you should always keep in your head – It is also the one to be highly careful with, or you’ll be suffering from a bootloop (If you do, follow our guide to getting yourself out of trouble). So we make an entrance here. We will help you and instruct you with every minute step and every aspect to be taken care of. The article will further be split into 2 major parts – Flash a Custom ROM on Android using TWRP and how to do the same with CWM Recovery. This guide contains unified instructions for any possible device and any Android version.
Warning!
Rooting or flashing an Android partition may be potentially harmful to your device. DroidViews or any of its community members shall not be held responsible for any mishap. Understand the risk and proceed thereafter.
Important Links
Recover When your Android Device is Caught in a Bootloop
Latest Google Apps (Gapps) for Android (GB/ ICS/ JB/ KK/ Lollipop)
Get Everything Ready
- Backup everything, this includes contacts, messages, calendar, and storage, etc. So, in case you might lose anything during the procedure, you could restore it back.
- Charge your Android Smartphone/Tablet to at least 60% battery life to avoid any shutdowns while the process is carried on.
- Install a Custom Recovery (TWRP/CWM/PhilZ). Make a search at our blog with your device name and you shall find the one for yours. If you don’t, mention your device name in comments and we’ll cover the guide to Install a Custom Recovery, on a priority basis.
- Setup ADB and Fastboot on your device.
- Install USB drivers for your device.
- Enable USB Debugging on your Android device.
Once you have the complete requirements fulfilled, you’re ready to bump to the section below according to the recovery you’re using.
Install ROMS on Android using TWRP
Below are the instructions to install ROMs on Android using the TWRP recovery:
- TWRP is our top recommendation in every term. I personally prefer it over CWM, PhilZ or any other Custom Recovery.
- Download the Custom ROM of your choice. Its corresponding GApps and mods/add-ons (if any).
- Connect your Android device to the PC via USB cable and enable USB storage or MTP mode.
- Transfer the ROM, GApps and the extra files to a suitable and easy location on your device’s storage.
- Its time to reboot your device into recovery mode. Open a new command line window and enter the following command:
adb reboot recovery
- Without the matter of on what device you’re, this command shall work flawlessly.
- Your device will now be in TWRP Recovery.
- The first step is to wipe/format the current partitions.
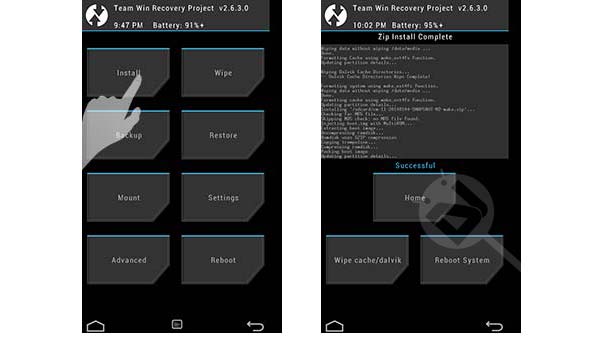
- The ones to be cleared are: data, cache, system and dalvik cache. To do so, tap on Wipe > Advanced Wipe and check the mentioned partitions. Now, swipe the button on the bottom of the screen to start the process. It will take merely a few seconds to complete.

- Return to the main TWRP screen.
- Flash the ROM zip: Tap on Install, browse and select the ROM zip file (e.g. rastapop_rascarlo_mako-ota-2014-11-21.zip). Swipe the button on the bottom of the screen to start the ROM flashing process.

- It will take sufficient time depending upon the size of the ROM you’re flashing. Once done, return back to the main TWRP screen.
- The next thing to flash will be the GApps. In most cases, GApps are not included within the ROM and provided separately for convenience.
- Flash the GApps zip: Tap on Install, browse and select the GApps zip file (e.g. pa_gapps-micro-5.0-ALPHA1-20141117a-signed.zip). Swipe the button on the bottom of the screen to start the GApps flashing process.
- Flash the mods/add-ons zip: After the GApps are installed, the last step is to install any mods or add-ons, if provided by the developer. Tap on Install, browse and select the add-ons zip file and swipe the bottom button to start the process.
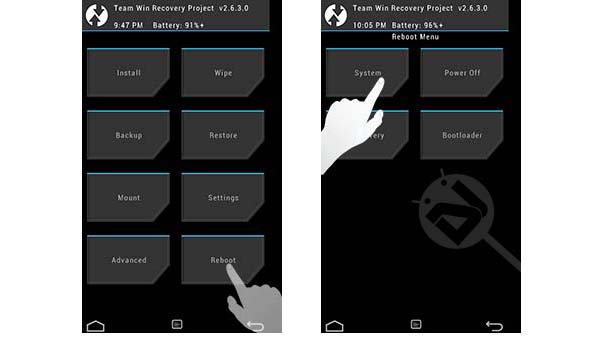
- Finally, when everything is done, return back to the main TWRP screen. Tap on Reboot and then on System.

Install ROMs on Android using CWM
To install ROMs on Android using CWM recovery, follow the steps below:
- Download the Custom ROM of your choice, its corresponding GApps and mods/add-ons (if any).
- Connect your Android device to the PC via USB cable and enable USB storage or MTP mode.
- Transfer the ROM, GApps and the extra files to a suitable and easy location on your device’s storage.
- It is time to reboot your device into recovery mode (Check Important links above or follow this simple command). Open a new command line window and enter the following command:
adb reboot recovery
- Disregard of what device you’re using, this command shall work flawlessly.
- Your device will now be in CWM Recovery.
- The first step is to wipe/format the current partitions.
- The ones to be cleared are: data, cache, system and dalvik cache.
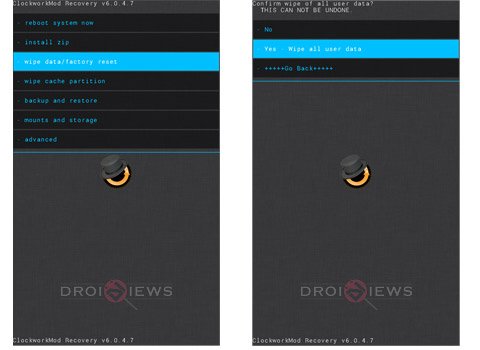
- To format data, cache and dalvik cache partition once, tap on wipe data/factory reset and then Yes – Wipe all user data. It will take merely a few seconds to complete.

- Return to the main CWM screen.
- To format the system partition, go to mounts and storage and tap on format /system and select Yes – Format.

- Flash the ROM zip: Tap on install zip, then choose zip from /sdcard, browse and select the ROM zip file (e.g. rastapop_rascarlo_mako-ota-2014-11-21.zip). Select Yes – Install.

- It will take sufficient time depending upon the size of the ROM you’re flashing. Once done, return back to the main CWM screen.
- The next thing in line is GApps. In most cases, GApps are not included within the ROM and provided separately for convenience (View the Important Links section above to download GApps).
- Flash the GApps zip: Tap on install zip, then choose zip from /sdcard, browse and select the GApps zip file (e.g. pa_gapps-micro-5.0-ALPHA1-20141117a-signed.zip). Select Yes – Install to begin the flashing process.
- Flash the mods/add-ons zip: After the GApps are installed, the last step is to install any mods or add-ons, if provided by the developer. Tap on install zip, then on choose zip from /sdcard, browse and select the add-ons zip file and tap on Yes-Install to start the process.
- Finally, when everything is done, return back to the main CWM screen. Tap on reboot system now.

You have now successfully installed a Custom ROM on your Android smartphone or tablet. Use it efficiently and support the ROM developer by providing some feedback. The procedure is 99% confirmed to work on any Android device, but in case it didn’t work on yours, comment below and tell us.
Support and encourage us by posting some feedback about this guide, we’re waiting to hear.


Hi Dhananjay,
Thank you for the excellent tutorial.
I have a Motorola Verizon XT 912 (DROID RAZR MAXX) It is an unlocked and I am in India. Options for using either GSM or CDMA
Android version 4.1.2
Kernel version 3.0.8-g3617609
Build number 9.8.2o-72_VZW-16-5
System version 98.72.165.XT912.Verizon.en.US
The device is rooted. But this is my first attempt at flashing a custom ROM (The stock Verizon one is tooooooo slow……)
I was unable to find the custom recovery in TWRP or CWM. Will I be able to flash Android Lollipop stock or custom ROM?
Could you please guide me how to proceed further. Also, if I flash a CyanogenMod Lollipop ROM, does it include the kernel. Or does that also need to be flashed? I read something about Safestrap v3.75 and Kexec, but am unsure how to go about that.
Would appreciate your guidance.
Thanks,
Paraag
Hi Dhananjay,
Thank you for the excellent tutorial.
I have a Motorola Verizon XT 912 (DROID RAZR MAXX) It is an unlocked and I am in India. Options for using either GSM or CDMA
Android version 4.1.2
Kernel version 3.0.8-g3617609
Build number 9.8.2o-72_VZW-16-5
System version 98.72.165.XT912.Verizon.en.US
I have rooted it. This is my first attempt at flashing a custom ROM (The stock Verizon one is tooooooo slow……)
I was unable to find the custom recovery in TWRP or CWM. Will I be able to flash Android Lollipop stock or custom ROM?
Could you please guide me how to proceed further. Also, if I flash a CyanogenMod Lollipop ROM, does it include the kernel. Or does that also need to be flashed? I read something about Safestrap v3.75 and Kexec, but am unsure how to go about that.
Would appreciate your guidance.
Thanks,
Paraag
I’ve rooted several phones but the guides are usually more in-depth than that one is. Is there any way you could explain the process a little more clearly for me? I’m dying to get this thing rooted. Also, I sent Huawei an email for the unlock code 2 days ago and again just now, and I still haven’t heard back from them. How long does it usually take? I read it only takes an hour. Thanks in advance.
There needs to be a recovery rom/root for the Huawei y536a1!
I am sorry, but there isn’t a confirmed working method to root your device.