Living among the sea of gadgets, it’s a hectic task to choose between the multitude of options which are just a few clicks away. Especially the Android market is one of the tough areas where your decision seems frail, thanks to quarterly changing smartphone technologies and eye-candy designs from the popular OEM’s. Android is spectacular in its pure vanilla essence but the users leave behind trails of desire for something new everyday. This is where the developers take a leap by following the trail of desire from the users and mold them into spectacular Custom ROMs which will bring a major overhaul on their devices.
So, What’s a Custom ROM?
Playstore hosts a gazillion apps which could potentially change your device’s interface for good but you would able to recognize the theme mismatches between the custom interfaces and the stock areas like settings panel, notification area. However, you can install different apps to get a complete changeover but it increases the load on your device making it slow. But what if the stock Android can be modified from the core and get all the changes on the stock layer itself rather than installing tens of apps? This is what we call a Custom ROM, a standalone package which consists the entire file system of your device along with supported kernels to boot.
A custom ROM doesn’t beef up the device with multiple apps, instead it brings the changes right from the core Android system making an efficient use of the device resources. Apart from that, custom ROMs allow you to use advanced features of Android with the help of root permissions. So apart from the major overhaul in the design, you’d get a boost in the performance as the device is free from any bloatware and can use advanced features like CPU clocking & set wake locks. Custom ROMs can be flashed using the custom recoveries like CWM. TWRP, PhilZ recovery and many more but before that a few prerequisites are to be met.
What are the prerequisites to flash a ROM?
Well, if you’re interested in flashing a custom ROM on your device all you need is a custom ROM compatible with your device. But before flashing there are a few things that should be take care of which we will discuss below:
- Unlocking Bootloader (If any): Few Android devices come with a locked bootloader which will restrict you from any illegal flashing practices, but you can unlock the bootloader to open a back door for our adventurous work. So you should have an unlocked bootloader on your device, which can be found on the Internet with proper search term.
- Rooting: Well, rooting is not a major criteria for installing a custom ROM but since we’re taking a jump over the great abyss, it’s a good idea to have the device rooted. Moreover, rooting your device unleashes the depths of awesomeness on your device. So it’s a good idea to root your device before flashing a custom ROM.
- Custom Recovery: A custom recovery is a modification to the stock Android recovery which brings some advanced features like nandroid backup and restore, flashing ROMs and kernels, advanced wipe options and many more. You can get popular recoveries like CWM, TWRP and PhilZ recoveries from the official websites or from the XDA developer forums.
- Nandroid backups: Taking a nandroid backup is not a mandatory step to install a custom ROM but it’s highly recommended to take backups before you land in the world of uncertainties. If you’re not aware of the process of taking nandroid backups on your device, here’s our quick guide to it: How to Backup and Restore your Android device with Custom Recoveries
- Backup User data: Nandroid backups take a full backup of your Android system and after installing a custom ROM all your user data will be lost (in some cases it won’t). So if you don’t want to lose your game progress and app data, take an app backup using apps like Titanium backup.
How to Flash Custom ROMs on Android Phone
After taking precautionary steps and meeting the pre-requirements, you’re ready to flash a custom ROM on your device. If you’re holding a popular device with well established developer network, you might once again be in trouble as you have to choose between plenty of custom ROMs out there. This is the only area we couldn’t help you as every individual have their own proclivity for features, so choose the ROM that best fits your needs. But our recommendation would be go for a pure ROM with less beefy interfaces making better utilization of resources. So without further ado, let’s jump to the flashing instructions.
- Download the custom ROM of your choice and transfer it to the internal storage of the device.
- Reboot your device into the recovery mode to enter the custom recovery. To do this, you can directly use the fail-proof hardware button combo or use a third party app like Reboot manager to do the job.
[googleplay url=”https://play.google.com/store/apps/details?id=com.jc.rebootmanager”] - Wipe the device clean depending on your situation:
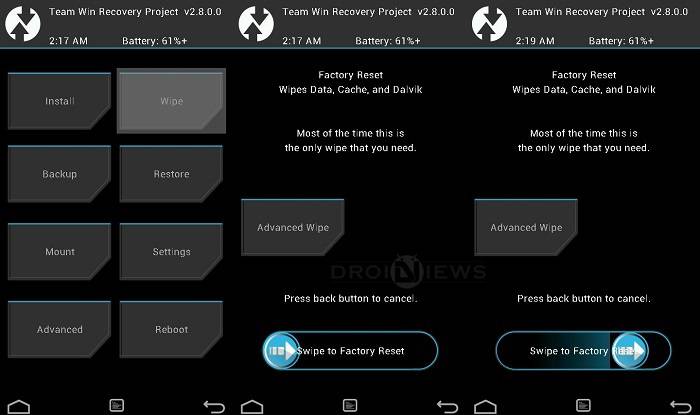
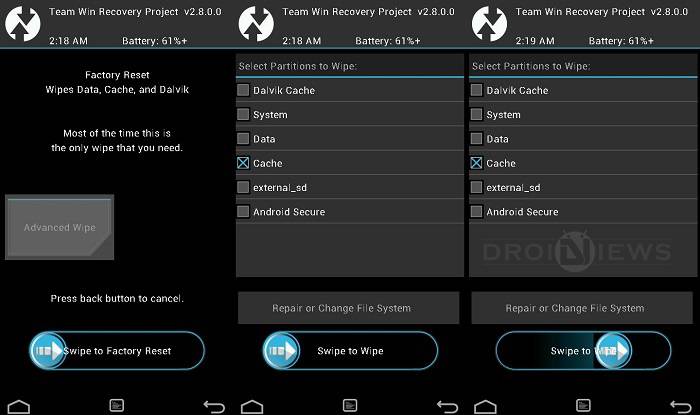
- If you’re flashing a custom ROM for the first time or flashing a new ROM other than the existing one, then you need to make a complete wipe of the device to avoid random force closes on the device. To make a clean wipe, just do a complete factory reset and also wipe the dalvik cache.

- If you’re updating an existing ROM, then you get to keep the user data intact but it’s recommended that you wipe the cache to make sure that the apps doesn’t conflict with the new update. Here you won’t lose the user data as you’re not performing complete factory reset.

- If you’re flashing a custom ROM for the first time or flashing a new ROM other than the existing one, then you need to make a complete wipe of the device to avoid random force closes on the device. To make a clean wipe, just do a complete factory reset and also wipe the dalvik cache.
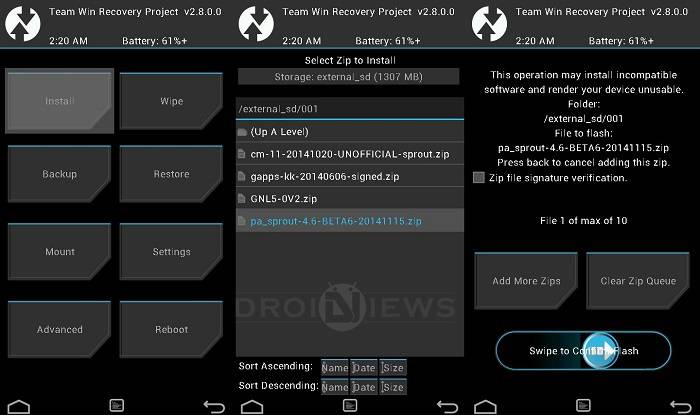
- Now it’s time for the fun part, flashing the custom ROM. Choose the Install or Install from SD card option from the recovery menu and choose the recovery zip from the file manager.

- If your custom ROM doesn’t come with Google apps included, you can flash the compatible Gapps package using the same process but no need of wiping this time.
- Once the flashing process is complete, reboot the device from the main menu.
That’s it, your device now boots to a new custom ROM and takes some time for initial boot. Don’t panic and wait patiently until it boots into the new ROM.
Once in new ROM, you can restore the user data by using the Titanium backup app (If you have taken a backup in the first place)


While on free gee on my lg g pro E988, I am getting secure booting error cause boot certification verify.. I don’t know the reason.. Please help.
dear i have cloudyG3 2.0 installed in my LG G2, touch is not working properly so I want to either restore its original software or upgrade to the latest CloudyG3 2.2… so what should I do? and can I wipe everything first? It does not support external SD card, how should I flash my latest custom rom?
Connect the phone to PC and copy the rom to the phone. Then follow the tutorial to install it.
can you tell how to root the device please
Already replied to the comment on the other post.
Shitt! please help i have done something bad
In advance wipe I checked all boxes… when I reboot it said “seems like u do not have your device rooted, install superSU? I accepted to install then the device turned off.. and its not booting again :((
you saved my life with this handy info about the wiping for the first time!
Thanks!