
There seems to be no end to the WiFi problems on Android devices. You might have noticed that your device might be connected to WiFi, still, you wouldn’t be able to access any of your webpages. It is quite irritating, to say the least. If you face similar issues then, fortunately, we have covered eight different ways to fix WiFi connection problems on your Android phone. Let’s have a look at each of them in-depth. And once your WiFi is up and working, you also see how you can use your Android device as a WiFi Repeater.
1. Basic WiFi Fixes for Android
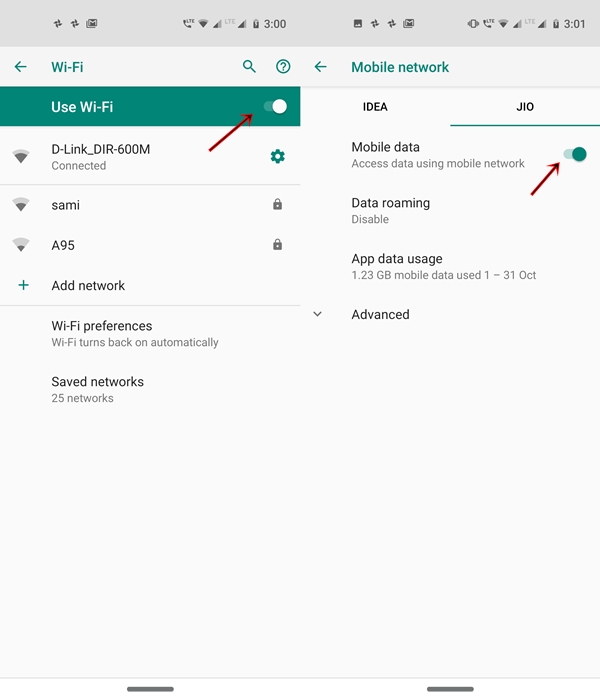
Let’s start with the most basic of methods to fix WiFi connection issues on Android devices. Start by going to the Settings option. Then go to the WiFi section, which may be present under Network & internet. Now turn off the toggle to switch off your WiFi. After a few seconds, turn it on. If you instead use the mobile data, go to the Mobile network settings and do the same as before.
Also, try plugging off the router from the power supply and remove the ethernet cable from the router. Then restart your router after 10-15 seconds. Sometimes, these simple tricks may do wonder and fix the WiFi connection problem on your Android. But if that’s not the case with you, try the below methods.
2. Forget and Reconnect to WiFi network
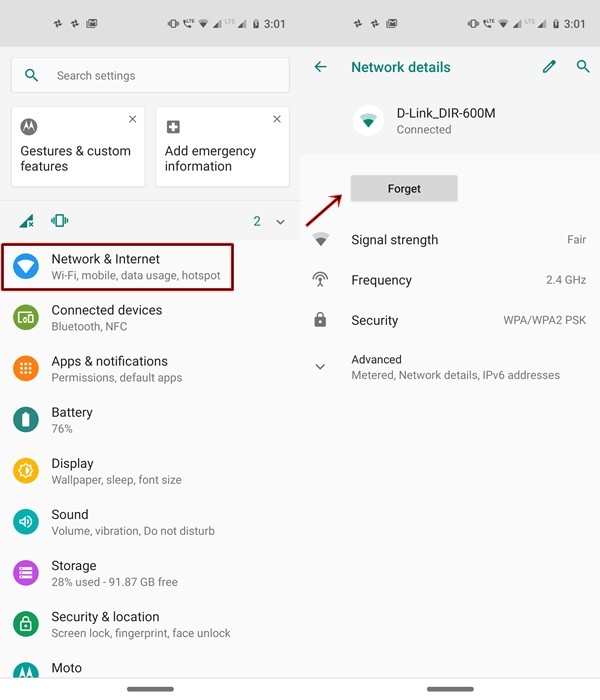
If the other options for fixing WiFi issues on your Android device didn’t work out for you, you may try forgetting and then subsequently reconnecting your WiFi network. This resets your local IP Address and provides you with a new one. To do so, go to the WiFi section, tap on the connected wifi network and click on Forget. Now tap on the same WiFi network again, enter the password and tap on Connect.
Just as a strong password is always recommended for your Wi-Fi safety, in the same manner, Security Patches are an important component for keeping your Android OS safe and secure. Therefore, it is important to get your acquainted with Android Security Patches.
3. Use the Hidden WiFi Testing Menu on Android
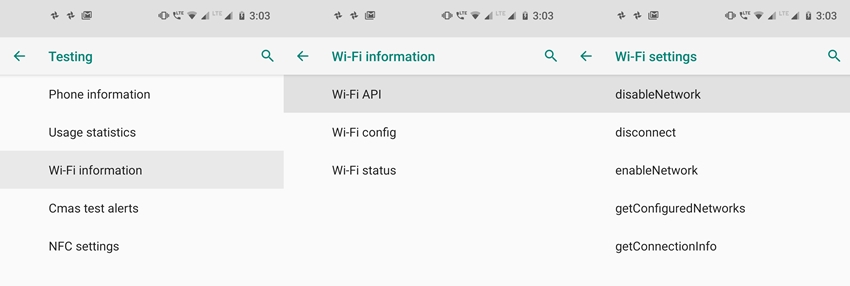
This is one method of Fixing WiFi Connection Issues on Android Devices that many of you might not be knowing about. Most of the Android device comes with a hidden testing menu. This contains settings related to Phone, Usage Statistics, Wi-FI information, Cmas, and NFC (if supported by your device).
To enable it, open your phone pad and dial *#*#4636#*#* (which corresponds to *#*#info#*#*). Then tap on Wi-Fi information and select Wi-Fi API. Now tap on disableNetwork and wait for a few seconds. After a few moments tap on enable network. This should fix your WiFi issue on your Android device. If the problem still persists, try resetting the Wi-Fi network settings as mentioned in the below section.
4. Reset WiFi Network Settings on Android
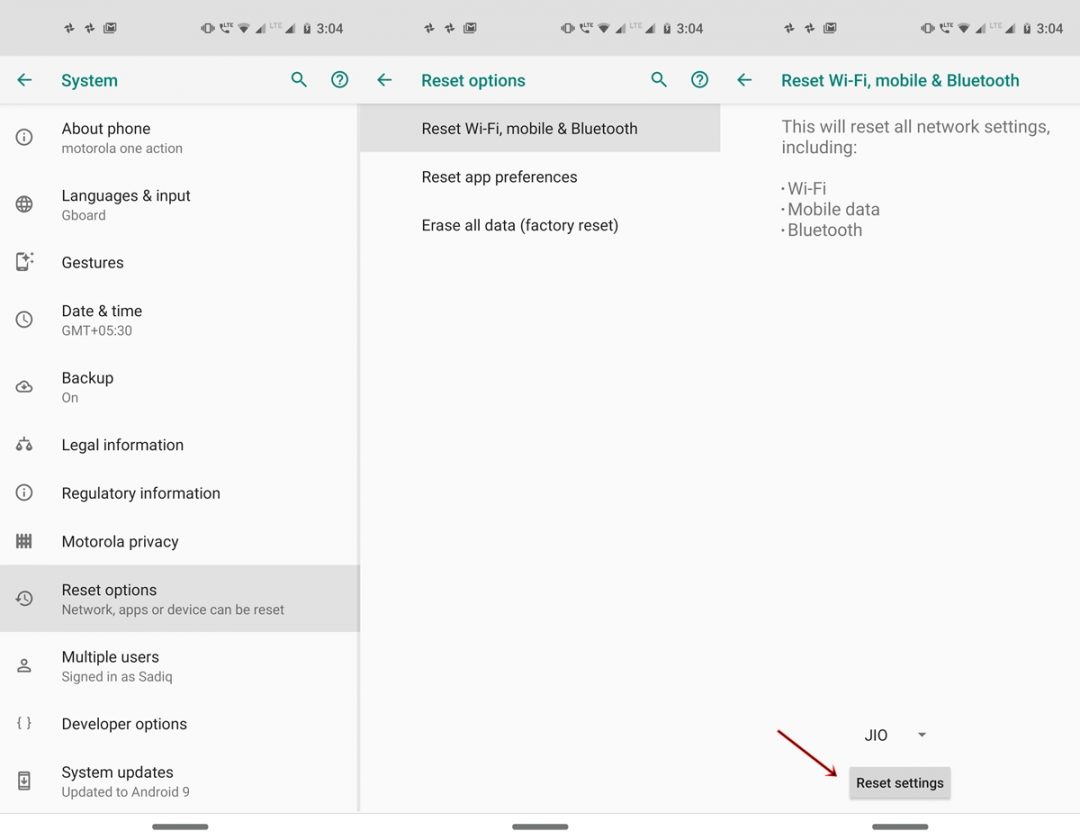
If the above method of fixing WiFi issues on your Android device didn’t help, probably you should try resetting the network setting. This will only reset your wireless settings (Wi-Fi, Bluetooth, etc) and wouldn’t cause any data loss. To proceed, head over to your device’s Settings and navigate to System.
Now tap on Advanced and search for the Reset option. Tap on Reset Wi-Fi, mobile and Bluetooth. Finally, tap on Reset settings. If you have dual sim, you will see an option of selecting your preferred sim, just above the reset button. it is advisable to carry out these steps for both the sims. See if this rectifies your issues, otherwise, try the other methods mentioned below.
Don’t miss: How to Set up and Use WiFi Hotspot on Android Devices
5. Check your Router Settings
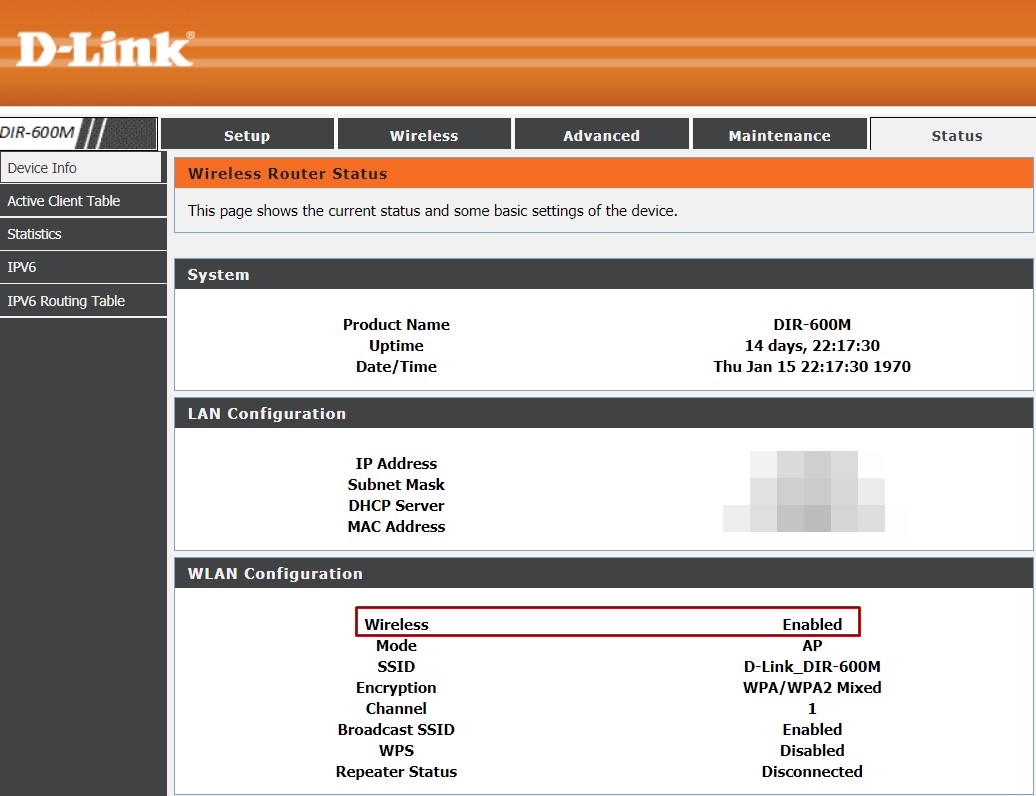
If the above direct methods of fixing WiFi issues on your Android device, didn’t work, then it’s time to try out some of the more technical ones. Head over to your Router’s admin page. For most of the routers, the IP address is 192.168.0.1 or 192.168.1.1 but if none of them works, try searching on Google or contact your ISP. Once you’re in the login page of the router, you’ll have to enter the Username and password, try any of the following options:
- Username: Admin
- Password: <blank>
- Username: <blank>
- Password: <blank>
- Username: Admin
- Password: Admin
Most routers have the first combination. After logging in, head over to the Status section and look for Wireless status under WLAN Configuration. If it shows anything other than Enabled, then something is wrong from the ISP side. You need to contact them to fix this issue. Alternatively, you can try our next tip to fix the WiFi connection problems on your Android phone.
6. Try changing WiFi DNS on Android
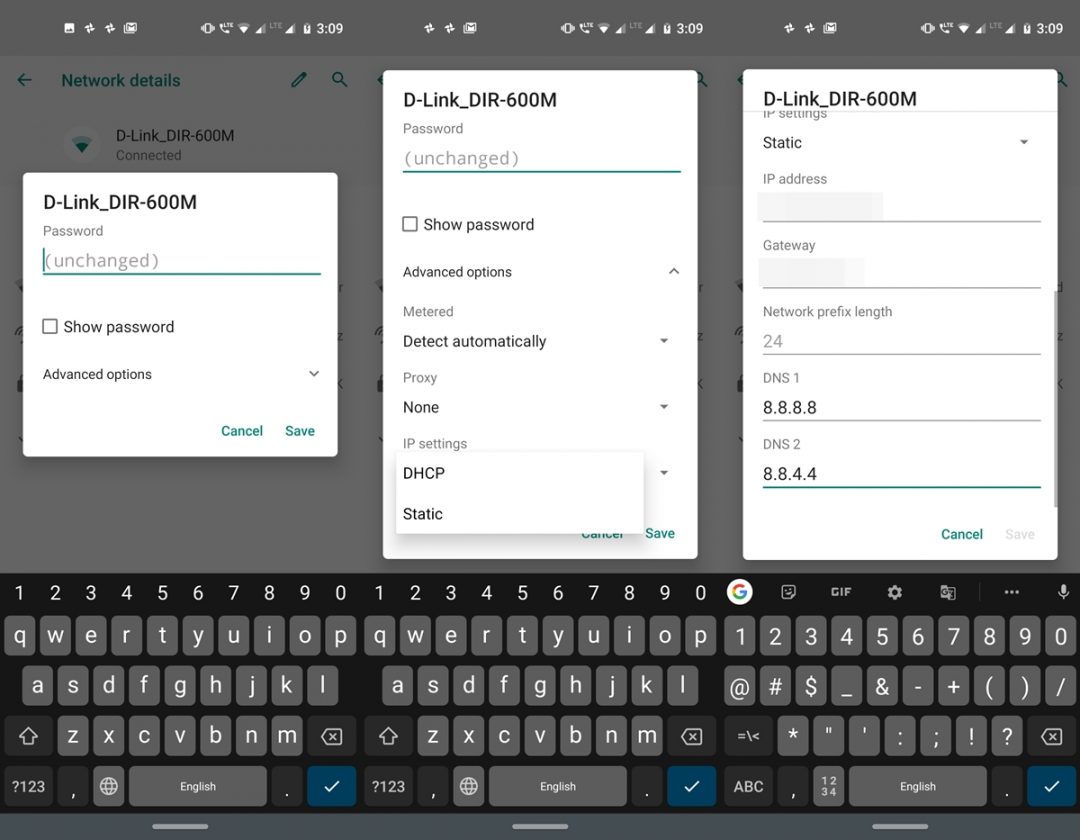
DNS stands for Domain Name System. It is a system that translates any domain name to it’s IP Address. So, to fix Wi-FI Connection issues on your Android device, you may try switching your DNS to that of Google’s. That is, try using the 8.8.8.8 or 8.8.4.4. To do so head over to Settings > Network and Internet and tap on the connected Wi-Fi network. Look for the Modify Network option. if it isn’t present, then there might be a pencil icon. Tap on it to edit your network.
Now head over to Advanced and look for the IP Settings. It will be set to DHCP by default. Tap on it and change to Static. As soon as you do so, you will now see a couple of more options. Enter 8.8.8.8 under DNS1 and 8.8.4.4. in DNS2. Finally, click on the Save button for the changes to take effect.
If your issue gets resolved, check out our guide on using Android devices as a WiFi hotspot or router. Otherwise, head over to the mentioned workarounds to fix the WiFi issue on your Android device.
7. Change Router’s Wireless Mode
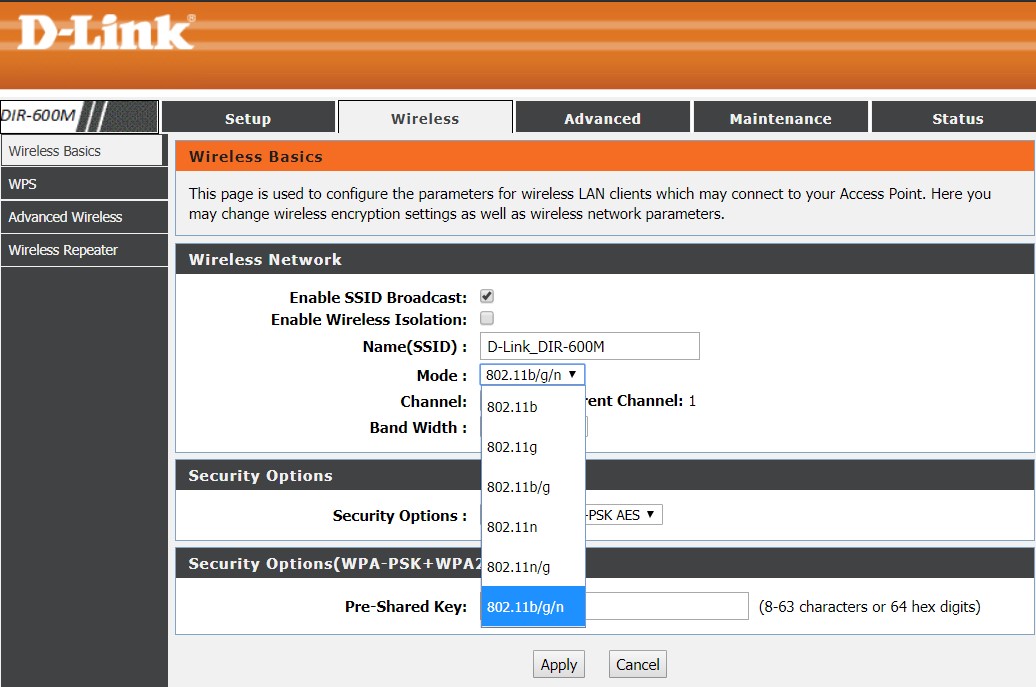
You may try this workaround with your router to fix WiFi issues on your Android device. This problem usually happens with older Android device. So if the internet is up and running on all your other devices, but not so on your own, you may try this method. In this method, we will try changing the Wireless Mode of your router. Let’s first understand it more in-depth. You might have seen 802.11 b or 802.11 b/g or 802.11 b/g/n or something similar in your Wi-FI settings. These are the various wireless modes of your WiFi, with 802.11 b/g/n being the latest and fastest whereas 802.11 b is among the slower ones.
The issue is that by default. the router takes the 802.11 b/g/n mode. But the old Android devices aren’t yet compatible with this latest mode. So you may try changing this mode to some of the older ones. To do so, head over to your router’s dashboard and go to the Wireless section. Now go to Mode and try using any of the earlier ones. See if it fixes the WiFi issue on your Android device.
8. Factory Reset

The last-ditch effort to fix your WiFi connectivity issue on your Android device. When everything else fails, you have no option but to reset your Android device. This will erase all the data stored on your device. So it is advisable to have a backup of them beforehand. To create a backup, go to Settings > System > Backup > Enable the toggle next to Back up to Google Drive and tap on Back up now. Depending on the amount of data and your internet speed, it might take a while to finish the process.
Once done, it’s now time to perform a factory reset. Go to Settings > System > Advanced > Reset option > Reset all data (factory reset) > Reset Phone. After the device has been reset, re-enter the WiFi password and try connecting it to the network.
So these were the various methods through which you could fix WiFi connection problems on your Android device. More often than not, any of the above method should definitely work in favor of you. Do let us know which method was able to rectify your Wi-Fi connectivity issues.


Join The Discussion: