While many OnePlus 6 users patiently await the Android 9.0 Pie update, many are already enjoying it. OnePlus is looking to be on track making the OnePlus 6 only the second non-pixel device after the Essential Phone to get the Android Pie update. OnePlus’ Oxygen OS Open Beta software based on Android Pie is fairly stable and definitely, something users could rely on. There have been a few minor quirks that need ironing out. Meanwhile, XDA junior member sameer1049 has figured out a way to fix Oxygen OS Open Beta on the OnePlus 6.
Oxygen OS Open Beta 1 introduced several improvements over the Android P Developer Preview version for the OnePlus 6 released earlier. However, it also introduced some bugs which also included the failure to pass SafetyNet which saw the Google Pay app stop functioning. Similarly, other apps relying on SafetyNet refused to work as well. Oxygen OS Open Beta 2 solved many of the bugs from the first Open Beta and was a general all-around improvement. Performance, as well as camera quality, was improved. Issues with the SafetyNet persisted though.
The solution sameer1049 has found requires you to root your shiny new Android Pie ROM. Although judging by the fact that you’re running a pre-release software we’ll assume rooting isn’t something new to you. With the Google Pay app fixed and the device passing Google’s SafetyNet certification, Oxygen OS Open Beta 2 is mostly a stable daily driver. You can play Pokemon Go, use Snapchat, banking apps, anything that you couldn’t previously use on the Open Beta.
How to root
Rooting Oxygen OS Open Beta is pretty much the same as rooting the table Oxygen OS based on Oreo. The only difference is you’ll need to flash a different version of TWRP made by the developer eng.stk. We’ve already published a detailed guide on how to install TWRP on OnePlus 6. You can follow the guide step by step but instead of the files linked there, use the twrp image and twrp installer zip linked below.
Once you’ve installed the recovery, reboot to it and flash the latest Magisk zip that you can download from here.
Pass SafetyNet
Passing the SafetyNet will require a little build.prop tinkering which, again, shouldn’t be something brand new for you. In case it is, you should probably check out the link below where we discuss what build.prop is and how you can edit it.
Even if you only care about the SafetyNet you still need root to edit the build.prop file. You can use a file explorer which has root features or you can make use of a simple app called BuildProp editor linked below.
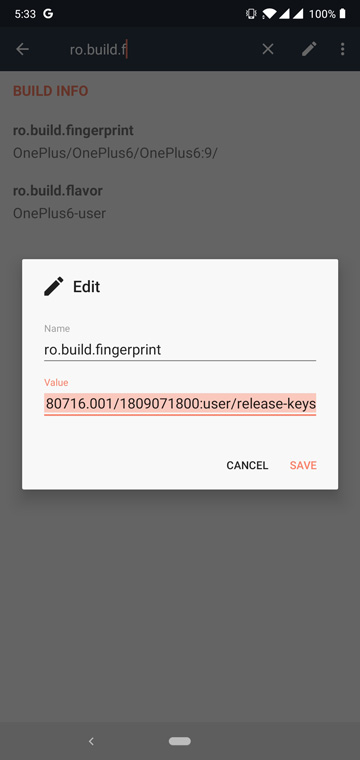
When you have it installed, open the app and let it load up your build.prop file. If you’re using a file explorer, you can find the build.prop file in the /system/ folder. When you have the build.prop file open, navigate to the line that starts with
ro.build.fingerprintand then replace
OnePlus/OnePlus6/OnePlus6:9/PKQ1.180716.001/1808301430:user/release-keyswith
OnePlus/OnePlus6/OnePlus6:8.1.0/OPM1.171019.011/06140300:user/release-keysMake sure you save the changes if you’re using some other app that requires the changes to be saved. Simply exit the app now and reboot your device. When it comes back on, launch Magisk Manager and tap on Tap to start SafetyNet check. It should return the message SafetyNet Passed. Once that’s accomplished you can also try using some apps that require the SafetyNet check such as a banking app or Netflix, Snapchat, etc.
Fix Google Pay & Play Store device certification
Simply having your device pass SafetyNet should fix everything including Google Pay and the Play Store Device certification. You can try hiding root from Google Pay using Magisk Hide from the menu drawer. If all fails, you can try using the Magisk modules linked below.
- TezHider4Magisk-v0.1.2.1(v1500)(3MF).zip
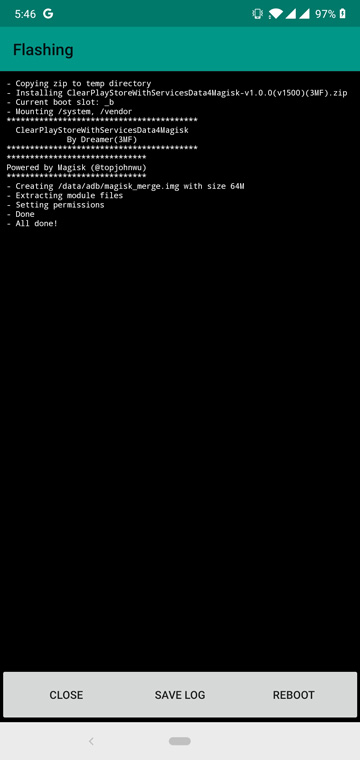
- ClearPlayStoreWithServicesData4Magisk-v1.0.0(v1500)(3MF).zip
When you have the modules downloaded, launch the Magisk Manager app. Go to the Modules section and tap on the floating plus button at the bottom. Select the first module zip and let it install. Choose to CLOSE when the installation is complete and then similarly install the second module. Tap REBOOT this time.
source: xda


![OnePlus 6: AOSP Ambient Display, Lockscreen Weather & More [Root]](https://www.droidviews.com/wp-content/uploads/2018/09/Magisk-OOS-OB-fix-01.jpg)
![OnePlus 6: AOSP Ambient Display, Lockscreen Weather & More [Root]](https://www.droidviews.com/wp-content/uploads/2018/09/Magisk-OOS-OB-fix-02.jpg)


Join The Discussion: