Android Notifications are among the most important component of any device. Now that nearly all your work relies on various apps like Gmail, WhatsApp, etc, missing notifications from them could prove to be disastrous. But more often than not, you might have experienced this issue. For example, you wouldn’t receive any email until and unless you manually open the Gmail app. To avoid such issues in the near future, we have curated eight different types of solutions to fix your Android notifications. Go check them out. Once you are done fixing out your device’s notifications, have a look at 25 hidden Android secret settings to get more out of your phone.
1. Reboot your Device
Surprised with this workaround right at the top of our list in fixing Android notifications? Well, you shouldn’t be. This is because a simple restart may be the perfect solution to such type of problems. Just long-press your Power button once and tap on Reboot. Wait till the device reboots, and if the issue still persists, try out the other methods mentioned below.
2. Check your Notifications Settings
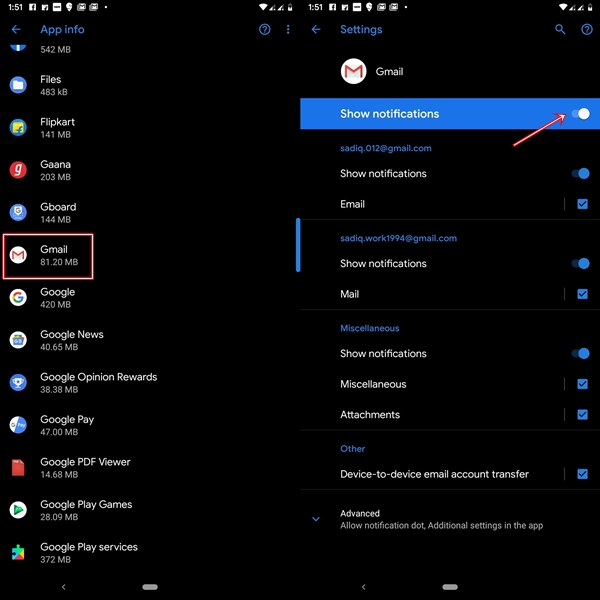
If restarting didn’t work out for you, make sure all the required notification access and permissions are enabled for the said apps. You may check for the same by heading over to Settings > Apps and notifications > See all xx apps > Tap on the applications of your choice. Now tap on Notifications and see that all the nec9essary notifications are enabled for this app.
3. Fix Android Notifications by Turning off Adaptive Battery
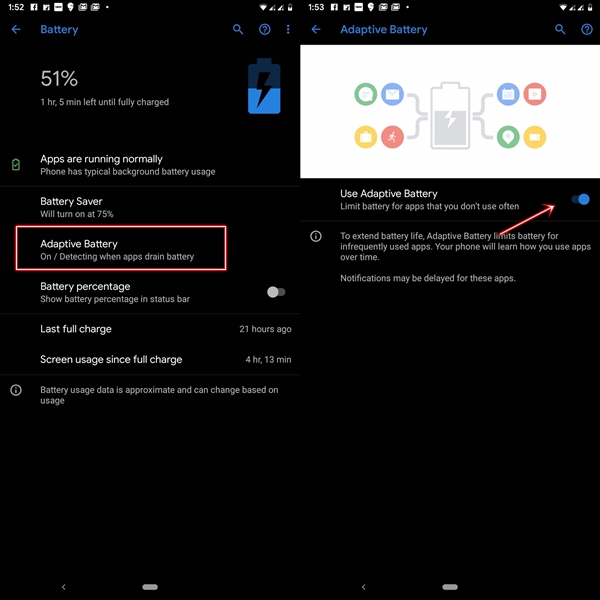
Android has recently adopted the Adaptive Battery to further optimize your device’s battery performance. It basically prevents the apps not used frequently from remaining in the background for pretty long. So restricting background services of an app may take a toll on its notification settings as well. In that case, you may consider turning off the Adaptive Battery feature entirely (not recommended) or do so on a per-app basis.
To entirely turn off the feature, go to Settings > Battery > Adaptive Battery and disable this feature. However, if you wish to disable it for a particular app, navigate to Settings > Apps and notifications > See all xx apps > [Select your App] > Advanced > Battery optimization.
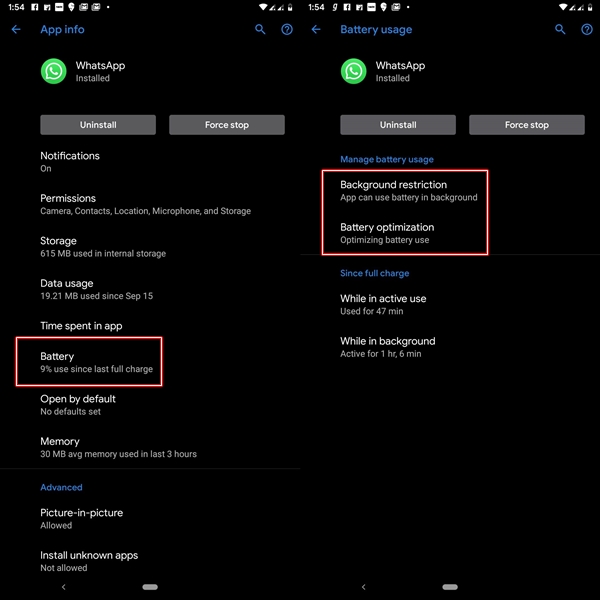
Moreover, also check that the app is not restricted to run in the background. Disable the same from Background restriction feature. It will be present just above battery optimization. If the above steps weren’t able to fix up your Android notifications error, try out the ones mentioned below.
Disabled the Do Not Disturb feature on your phone? Now have a look at the method to disable Chrome notification pop-ups on your Android device.
4. Fix Android Notifications by disabling the Do Not Disturb
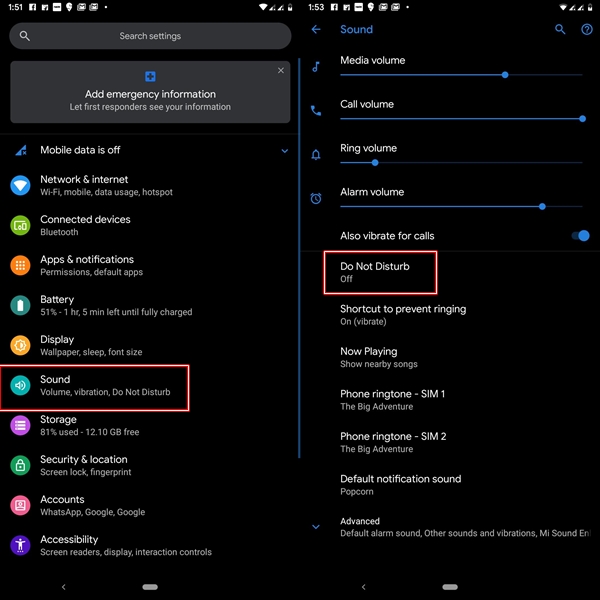
Another important thing to consider while fixing up the Android notifications is regarding the Do Not Disturb mode. As evident from its name, the Do Not Disturb features silence all the notifications from all the apps, unless you whitelist them. So it may be that you have enabled it by mistake- more so after it has made up all the way to the notifications panel. So, to review its settings, go to Settings and look for Do Not Disturb mode under Sounds/Notifications. You may also use the search bar at the top of the Settings page for the same. From there, make sure you turn off this mode for the app of your choice, or entirely if you did it by mistake.
5. Keep the Background Data enabled
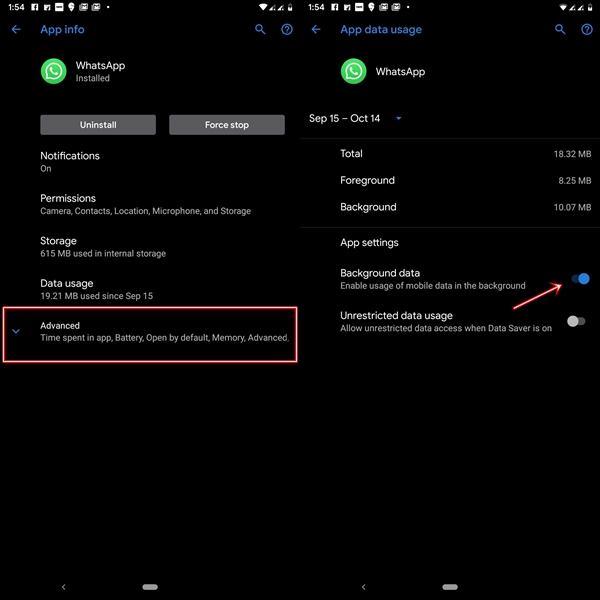
If the background data has been disabled for any particular app, then it is anything but obvious that you wouldn’t be able to get timely notifications. This holds even more true in the case of internet-only apps like Gmail and WhatsApp. To make sure that the background data is indeed enabled, you may have to visit Settings > Apps & Notifications > See all xx apps > [Select your App] > Data Usage > Background Data. From there, make sure that the toggle next to Background data is enabled.
6. Disable Data Saver
The Data Saver feature helps you to restrict the amount of data that an app consumes when you aren’t connected to the Wi-Fi network. Although a pretty useful feature in itself, this also means that you may miss out on pretty important notifications as well. So, unless in extreme circumstances, make sure to have it turned off to fix up the Android notifications. The option to do the same is available under the Settings > Network & internet > Data Usage > Data Saver. Make sure to toggle off the switch from there.
7. Fix Android Notifications via a third-party app
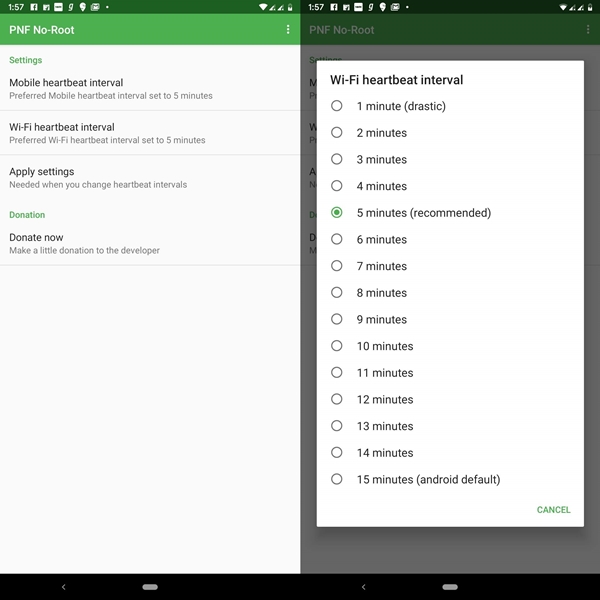
Android has removed the feature of setting up the frequency of sync intervals. By default, it is set to 15 minutes. But you may decrease this time interval to as low as a minute. For this, you may take the help of the Push Notification Fixer to fix various Android notifications. It provides various time intervals, right from 1 minute to all the way upto 30 minutes. Although fewer time intervals will make the sync faster, it will drain your battery much faster (in that case, you can get better battery performance on Android by following our tips). So make the right balance between the two.
8. Wait for a New Update
If all the above methods didn’t work out for you, then it may be a case of some bugs in the app. Wait for a few days until the developer releases a new updated version of the app and try reinstalling it. This may solve your problem.
So, these were the various methods of fixing Android notifications not showing up. Do let us know which method worked for you, in the comments below.
Read next: 9 Best Google Play Store Features You Should Know


Join The Discussion: