MultiROM for Xperia Z2 & Z3 is here finally. We have watched the simple little workaround transform into a cool mod, with its own native app, pre-boot menu and a modified custom recovery. MultiROM has spread its wings to several devices already, including OnePlus One, Xperia Z Ultra, Galaxy S4, HTC One M8, and Galaxy Note 2.
MultiROM has always presented itself as a great asset to Android ROM flashaholics who prefer to test ROMs every now and then. There are times when you just flash away to a new ROM and then follows the regret, but that cannot be undone until you have a Nandroid backup of your previous ROM. But now, you wouldn’t need to cross that bar anymore, you can test your new ROM side-by-side and without even touching the primary one using the amazing MultiROM mod. The mod not just allows you to install a secondary custom ROM, but also customize each and every aspect of them.
We would like to thank XDA member Myself5 for successfully porting this brilliant mod to both the devices. For now, the only issue that would arise is the non-responsive touch input, so you’ll need to use physical volume and power buttons instead. However we do hope for the issue to be fixed very soon. Below we will discuss the features that this mod offers on Xperia Z2 and Z3, and how we can set this up.
Installing MultiROM requires your device to be running a custom kernel compiled with kexec-hardboot patch. On the Z3 you could use AndroPlus Kernel v19+. Or, if you’re using the Xperia Z2, use M5-Kernel-L v2+ or AndroPlus Kernel v19+. In case you want to install MultiROM manually, you could visit the developer’s website. Visit the Xperia Z2 XDA thread and Z3 XDA thread for more information on the mod and join the live discussion.
Note: Installing a secondary custom ROM is a long process to carry, especially when installing it on an external storage like SD card or USB drive. Make sure to use a better class and quality SD card or USB drive, to ease out the process.
Warning!
Using this mod may risk your device’s stability. It is no hard coding, but a huge hack, which may mess your Android system if anything is done wrong. DroidViews or any of its members shall not be held responsible for any damage to your device. Use this mod only on the Xperia Z2 and Z3.
MultiROM on Xperia Z2 & Z3
STEP 1: Download The App
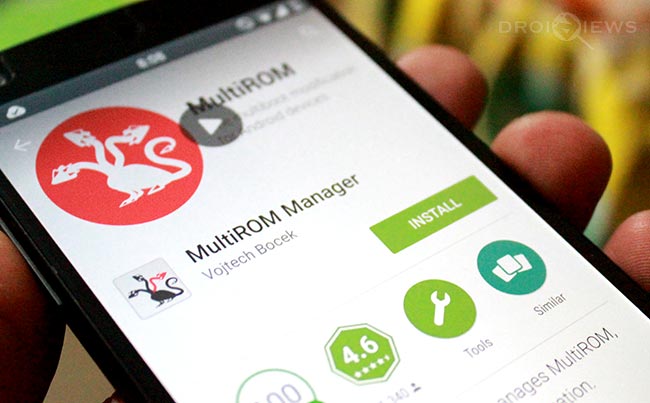
The first step to move along MultiROM is to download the MultiROM Manager app. It can be downloaded directly from the Play Store for free. The app requires your device to be rooted, so make sure you have achieved root on your Xperia Z2 and Z3. Click the app box below to install the app on your Xperia.
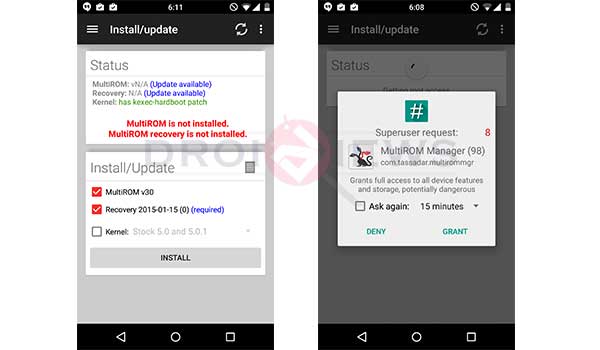
- Once downloaded, open the MultiROM Manager app from the app drawer.
- If you are opening the app for the first time, it will prompt you to grant root access, make sure to agree with the dialog box that pops up.
- The Status card will show the present state of MultiROM on your device, which for now will be “MultiROM is not installed.“
- Select the MultiROM and Recovery check-boxes on the Install/Update card and tap on INSTALL.
- The installation screen will appear and the process will complete soon.
- Once done, tap on REBOOT.
- The device will reboot automatically when the installation completes.
Your recovery and patch are now setup properly for use.
STEP 2: Add Custom ROMs
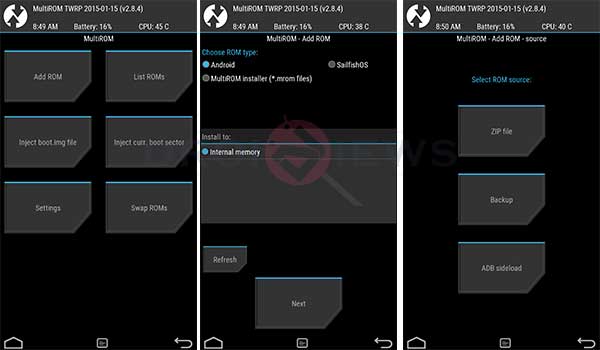
Adding secondary custom ROMs on your Xperia Z2/Z3 has to be done from the recovery, so power off your device and reboot into TWRP recovery mode. Or, you can also use the adb reboot recovery command.
To add a new ROM, go to Advanced > MultiROM > Add ROM. By default MultiROM enables you to install three different ROM types – a regular Android ROM, Sailfish OS or a MultiROM Installer file. These ROMs could either be installed on the internal storage, the external storage like SD card or on a USB drive using an OTG cable. Also, an Android ROM could be installed as a flashable zip, or you could restore a backup as a secondary ROM, another way is to sideload the ROM.
STEP 3: Manage Custom ROM
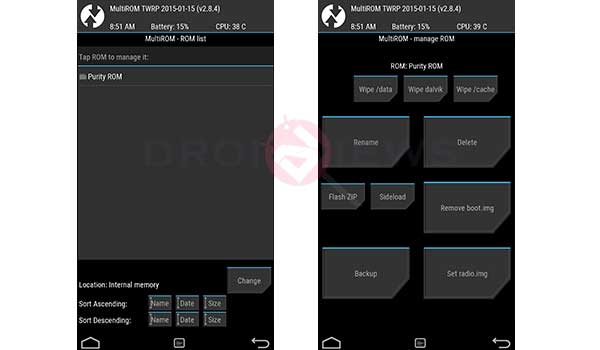
Now that you’ve installed a secondary ROM, you might need to customize it, which again have to be done from within the recovery. So again, boot into TWRP mode. Go to Advanced > MultiROM > List ROMs. The list of installed secondary ROMs will appear, just tap on the ROM you want to modify. You will now see all the available options to customize your current ROM.
All of these options are mentioned below:
- Wipe data/Wipe cache/Wipe Dalvik: If you wish to wipe some partitions like Dalvik, Cache or Data.
- Rename: It lets you rename the selected ROM.
- Flash ZIP: If you want to flash GApps, SuperSU, tweaks, and mods etc.
- Sideload: You can also sideload zips to the secondary ROM.
- Remove boot.img: Use this option to remove the current kernel from the secondary ROM.
- Backup: Use this to backup your secondary ROM to your device’s storage.
STEP 4: Swap ROMs And MultiROM Settings
You have made 90% to your success by installing and managing the secondary ROM, and now is the time to tweak the MultiROM mod settings itself.
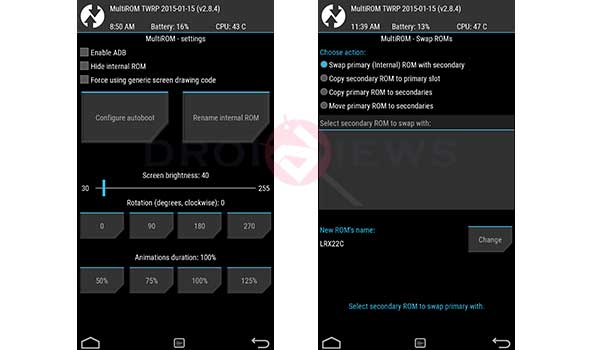
The MultiROM settings could be accessed under Advanced > MultiROM > Settings. Here you could enable ADB, hide internal ROM, configure autoboot, rename internal ROM, set screen brightness, rotation and animations. MultiROM allows another useful feature which may come in really handy, if you have fallen for your secondary ROM and want to use it as primary without losing the present data, also if you want to test an experimental tweak without risking much. You can access this feature under Advanced > MultiROM > Swap ROMs. It enables you to transfer your ROMs from your primary slot to secondary or vice-verse. You can create copies of your primary ROM or permanently move it to the desired location.
Uninstall MultiROM
There is a highly unlikely situation if you would want to uninstall MultiROM, may be just becuase you want to free up space, or your search has ended for your perfect ROM. But it may be required to perform an uninstall and if you want to, just follow the instructions below.
- Run the MultiROM Manager app.
- Tap on the uninstall icon on the Status card.
- Select Uninstall MultiROM.
- A warning message will pop-up asking for your confirmation.
- Tap on CONTINUE to start the uninstall process.
- It will download the corresponding uninstaller zip.
- The uninstall screen will display the progress and finally ask you to reboot.
- Tap on REBOOT.
- The uninstall process will complete and reboot the device.
We have enlightened everything above that would be required to operate MultiROM on Xperia Z2 and Z3. Lets hope you make full out off your MultiROM. And if you got queries, post them below in comments. If you’re good at coding or developing, you could visit the MultiROM Github and the modified TWRP Github.
Provide us with your valuable feedback, it will help us build a better community.


Join The Discussion: