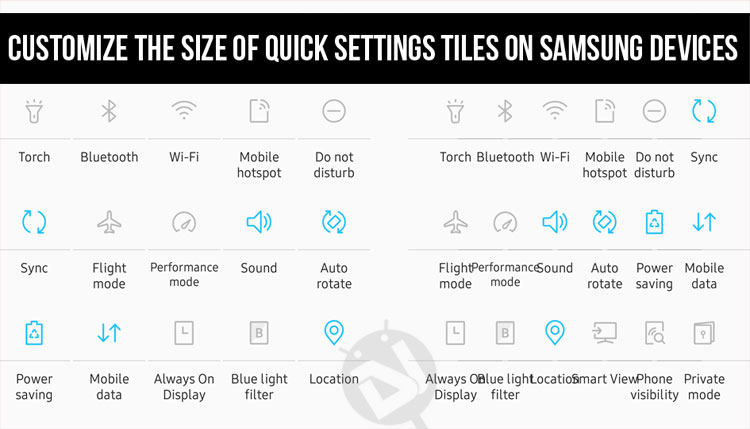
Samsung’s TouchWiz (and more recently, the Experience UI) has been shunned by critics, chiefly due to bloatware and performance lags. Despite its flaws, Samsung did bake in a couple of features that users loved. For example, the quick setting toggles that Google introduced in Lollipop were already present in TouchWiz for ages.
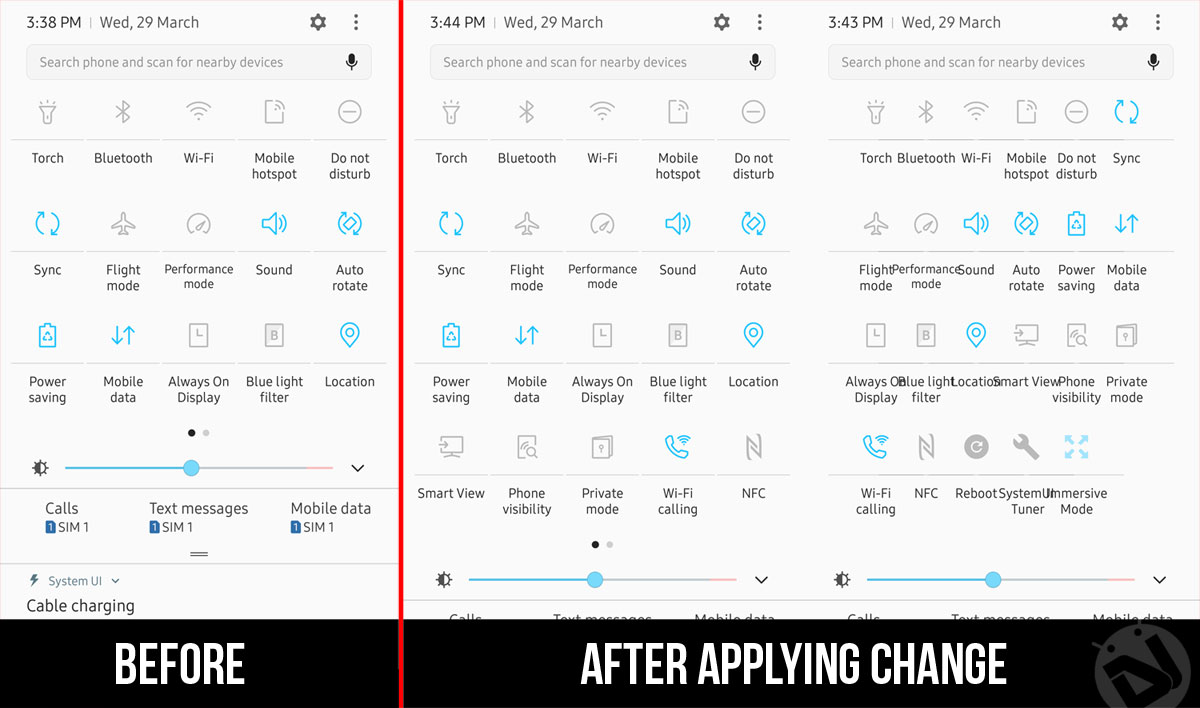
Starting from Nougat, Samsung also lets you customize the quick settings bar of its new Experience UI to some extent. In case you are not satisfied with the default button layout setup and want your quick settings panel to show more rows and columns, there’s a simple workaround to achieve that. Currently, you can choose between 3×3, 4×3 and 5×3 setup by default. Thanks to Mishaal from the XDA portal for discovering this easy trick.
If you want to have more columns and rows of the quick settings tiles on your Samsung Galaxy device, it’s possible without having root privilege on your device. All you need to do is to send a couple of ADB commands to enable the desired number of columns and rows.
Don’t Miss: Enable Quick Reply from Lockscreen on Samsung Devices Running Nougat
I tried this trick on my non-rooted Galaxy S7 Edge running the stock Nougat firmware and here are the results:
Steps to Customize the Size of Quick Settings Tiles on Samsung Galaxy Devices
- Download ADB and fastboot tools for your Windows, Mac, or Linux computer.
- Enable USB debugging on your Samsung Galaxy device. You will find it under Settings> Developer options on your device. In case you don’t see the Developer options, go to Settings> About device> Software info and tap Build number 7 times. The go back to Settings and enable USB debugging.
- Now go to Settings> Display and set the screen timeout duration to 5 minutes so that your phone doesn’t lock while issuing the commands. That’s to say, your phone’s screen must not be off while executing the command mentioned below.
- Unzip the download platform-tools-latest-xxx.zip on your desktop and open the extracted folder.
- Place the mouse pointer at any empty spot inside the folder window and the press Shift + right mouse-click. Select “Open command window here” option.
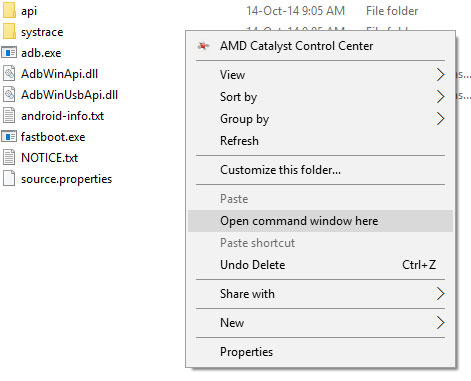
- When the command window is launched, type the following command (and hit the Enter key) to make sure that your device is detected by ADB:
adb devices
- If you see a string of alpha-numeric serial number, it means your device is properly connected.
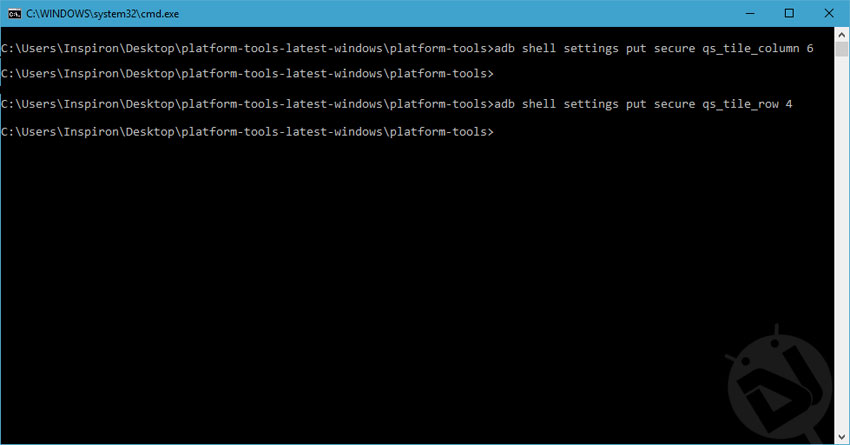
- Now execute the following command to apply the number quick settings tiles columns. You can replace “6” with your desired number if you want more or less number of columns:
 Must read: How to Change Android Device Model Name on Marshmallow and Nougat
adb shell settings put secure qs_tile_column 6
- Please note that the above commands will change the button layout for portrait mode only. In case you want to customize the number of columns for the landscape mode too, execute the following command:
adb shell settings put secure qs_tile_column_landscape 8
- To change the number of rows, issue the following command:
adb shell settings put secure qs_tile_row 4
- New settings will take effect as soon as you hit the Enter key. You don’t need to reboot your phone or do anything else.
Enjoy! Should you have some useful tips for Samsung devices, please let us know!
Editor’s pick for you: Download and Install SamsungOne Font on Your Android
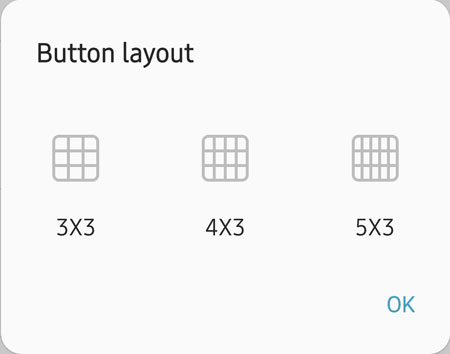


Hi! How would I revert all the codes above (if I just want to see the default 3×3 4×3 and 5×3)? Do I have to flash a back up or there is a code I can enter via adb? TY
Hi! It’s easy to revert to the default 3×3 4×3 and 5×3 button layout. Just tap and hold one of them and select OK. Then reboot your phone.
See the proof below. I have the 4th row enabled and also the option to choose one of the older tile layout.
https://uploads.disquscdn.com/images/229ce6ea8b21801b69bc3b78eea4d53698ea50b4a1f12430572ff81cb95c5dbf.jpg
Thank you so much! This is very helpful. Hope to see more of this things in the future! Cheers!
Thanks for the appreciation, Gerald! Stay tuned and keep following us!