In this tutorial, we’ll see how we can clear cache and browsing data in Chrome for Android. You can find the option to clear browser cache and data in Chrome under browser settings.
The popularity of Google Chrome is not something almost everyone isn’t aware of. It’s by far the most popular web browser on desktops and it leads the pack when it comes to smartphones as well. With the powerful hardware available today across all price points, Chrome has little trouble running well but this wasn’t the case when it first started on mobile. This is why Chrome coming pre-installed on Android played a big role in its current popularity among smartphone users.
Chrome itself has undergone many changes since then, mostly for the better. For instance, if you want to clear cache and browser data, you’ll only be able to find the setting for that deep inside. However, Chrome also lets you access those settings from the history page.
Why Clear Cache and Browsing Data?
As we already said, today’s smartphones have little to no trouble running something like Google Chrome. Even some of the cheapest Android devices can run Chrome quite well. Yet, over time, as you install more apps and use your device, and Chrome more, you tend to fill up the available space. When that happens, you can experience lags and a not-so-smooth performance. This is true for the Google Chrome browser as well as your Android smartphone in general.
Cache data includes images and files from the various websites you frequently browse. The browser stores those in order to deliver those websites to you faster since it doesn’t have to load up the images and some other data all over again. So while clearing cache data can help you free up some memory on your device, it will also result in some websites loading up slower the first time. The cache data will build up again over time so you don’t have much to worry about losing it.
Similarly, clearing browser data can also help you free up some precious memory. Browser data includes cache data as well as other things such as Cookies, and media licenses which allow you to stream DRM protected content from sites like Netflix, Hotstar and Amazon Prime. Like cache data, these will also build up again as you continue to use your browser. However, other browser data like autofill form data, saved passwords, browsing history, etc. are gone for good once you clear them. So before you clear those, make sure you’ll never need them again.
Related article: Android System WebView – All You Need to Know
How to Clear Cache and Browsing Data in Chrome for Android
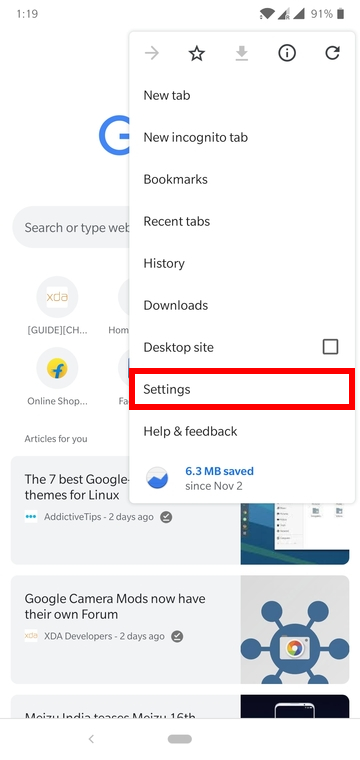
- Launch Google Chrome and tap on the three-dot menu button in the top-right.
- From the overflow menu that appears, select Settings.
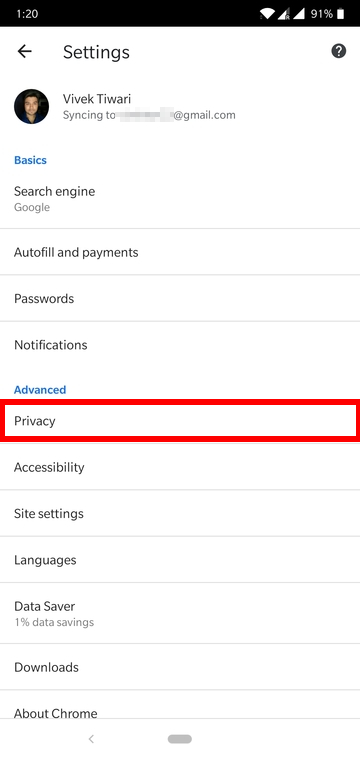
- In Settings, select Privacy under the subheading Advanced.
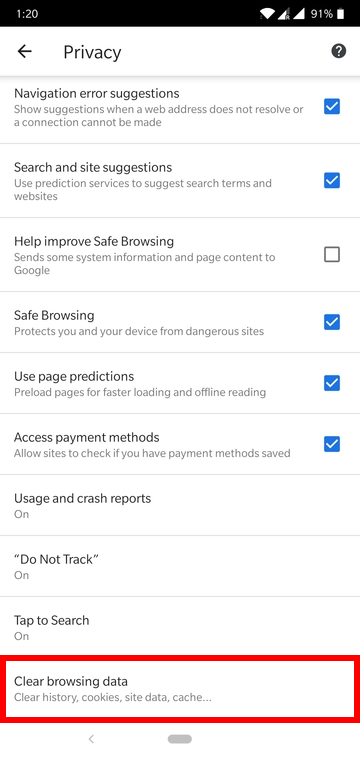
- Depending on the display size of your device, you can either find Clear browsing data at the bottom or you may have to scroll to the bottom to see it. In any case, tap on it.
- There’s an easier, alternative way to get to the Clear browsing data settings but this only works when you have at least one tab open in Google Chrome. From the overflow menu, select History and then select CLEAR BROWSING DATA…
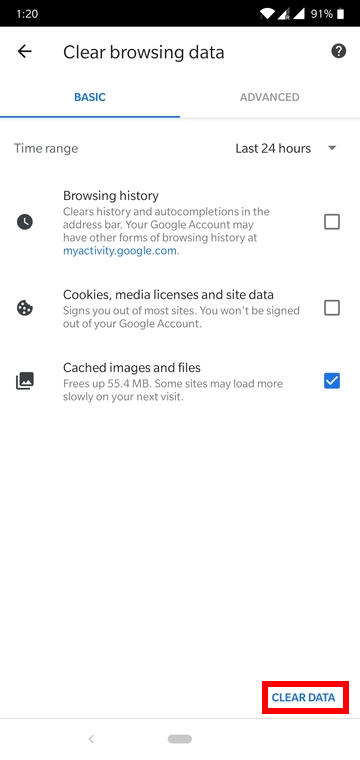
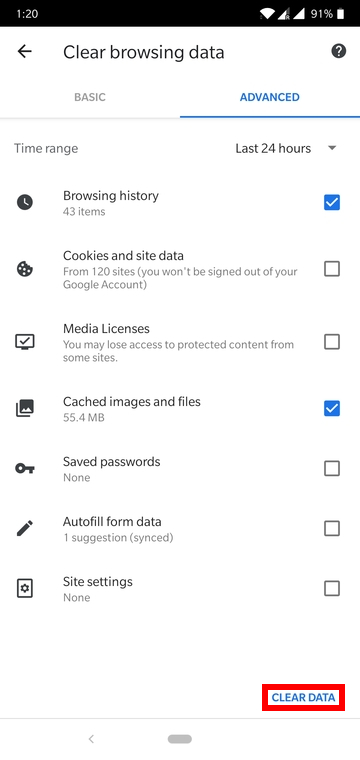
- Regardless of the path you followed, you’ll land on the same page which is divided into two tabs: BASIC and ADVANCED. The Basic tab is easier to use, no surprises there. It lets you clear most of the data that you can clear under the advanced tab. The only difference is that under the advanced tab, you get more control over what exactly you want to delete an what you’d rather not delete. In the basic settings, Cookies, media licenses, site data are all bundled together so you can’t choose to clear one and leave the others. You also get additional choices to clear the Saved passwords and Autofill form data under the advanced tab.
- Select everything that you want to clear, and make sure everything that you don’t want to clear in unselected.

- When you’re ready, tap on CLEAR DATA in the bottom-right. You may now also get to choose the websites for which you want to delete the data. All websites are pre-selected, you can unselect the ones you want and then tap CLEAR.
That’s it! You just cleared cache and browsing data in Chrome for Android successfully.
Read next: Google Chrome Tips and Tricks



Join The Discussion: