Samsung devices have a special partition dedicated to certain rather important information about the device itself. It includes device’s IMEI (MEID or ESN), radio data, MAC address, your phone number, data provisioning parameters, etc. In short, it’s very important for your phone to function normally. That is why we are showing you the way to backup EFS partition on Galaxy Note 4 so that you can restore it later.
EFS is a vital partition found on most Android devices and if is corrupted somehow, the IMEI of your phone might disappear and the outcome will be nightmarish. You won’t be able to use any connectivity features such as making calls or using a data connection. Just imagine a smartphone without network signal!
You might need to restore EFS in case you encounter connectivity issues. The first thing that comes to your mind in case of data connectivity issues should be APN settings. Those are carrier’s parameters stored on your phone, so it knows where to connect (what server) when MMS message arrives or you want to browse the web. If your Access Point Name (APN) settings are correct (Google that one or contact your carrier) and your connections still don’t work, then it might be the problem with EFS partition. In any case, EFS is the last thing I would mess around with, as it is delicate and important. In case you haven’t backed it up and find yourself without it, you are kinda screwed as there is no way of getting it back. So proceed with caution.
EFS partition remains hidden, and in theory, well-protected so flashing custom ROMs and kernels, rooting and other “superuser” staff shouldn’t be harmful. But this is real life and scenarios are countless and sometimes pieces fit up together just perfectly (in a bad sense) and EFS gets erased or its data corrupted.
Since the cases of IMEI loss are reported by Samsung users, we hardly recommend that the owners of Galaxy devices must take a backup of the EFS partition. You can find a plethora of EFS backup and restore tools for Samsung devices at the Google Play store but not all of them work with all Galaxy models.
If you own the all-new Galaxy Note 4, you must backup your device’s EFS as a precaution so that you might restore it later in case it gets corrupted for some reason. Fortunately, the Galaxy Note 4 has got a working root method now and also, there’s a new app available at the Play Store that supports this device. So, it’s high time for securing the EFS of your Note 4 using the EFS Manager app.
List of Galaxy Note 4 System Partitions
There are several apps on the Play Store which lets you backup and restore EFS partition on your Galaxy Note 4. The app can easily backup the following partitions of your Note 4:
- efs.img.ext4
- m9kefs1
- m9kefs2
- m9kefs3
- modemst1
- modemst2
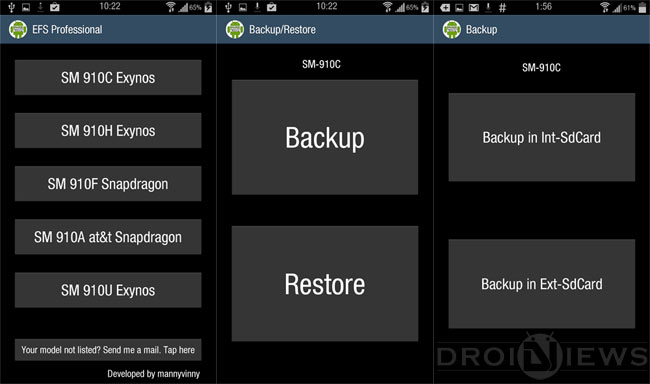
EFS Manager is easy to use the app with a simple interface. All you need to do it is install the app on your rooted Galaxy Note 4, run it, choose your device model and tap the backup button.
Download EFS Manager (Note 4)
Please note to be able to successfully back up and restore EFS on your device you need to have root access and BusyBox app installed on the device.
[googleplay url=”https://play.google.com/store/apps/details?id=com.mannyvinny.n4efsbackup”] [googleplay url=”https://play.google.com/store/apps/details?id=stericson.busybox”]Backup and Restore EFS on Samsung Devices
In case you own any other Samsung Galaxy device and want to backup the EFS partition, you can use the Samsung Tool app: com.sec.ricky310711.samsungtool.apk
If you are worried about backing up your EFS partition means you are no ordinary Android user, so you probably already have root access. The next thing you must do before we go ahead and install this simple application is to get BusyBox installed on your device. It is nothing more than a simple package of extra Linux commands, that get handy when working with root-level operations. You will find the BusyBox link above.
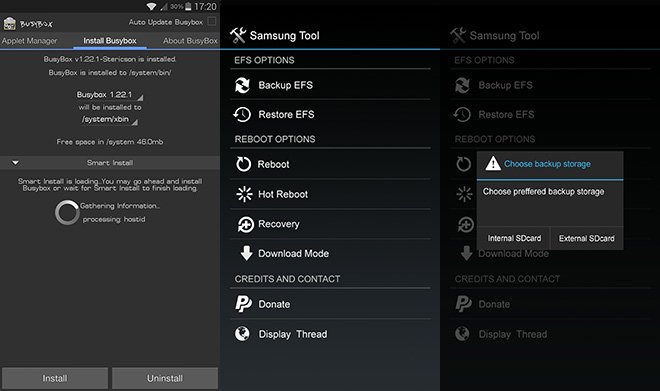
When BusyBox is installed, go ahead and open it. The application should start installing utilities automatically, if that is not the case, just tap “Install”. That’s it. You will never have to worry about it again, unless you do a full wipe, of course.
Anyway, download the copy the Samsung Tool apk file to your device and install it. Then open the app and tap Backup EFS option and you’ll be good to go.
Samsung Tool is a very specific application so options aren’t that numerous. It’s easy to use and straightforward. Simply click Backup EFS to back it up, followed by a destination selection (internal or external SDcard if you have one). Backup is completed within seconds. The application also features a 4-way reboot menu, which is always welcome.
That is it, keep it, safe folks!
Read Next: How to NAND Erase Samsung Devices in Odin


Join The Discussion: