It’s March so it is time for the world to see what Android will be like by the time we reach August. Google has released the first Android Q beta on time and it comes with plenty of changes. We have talked about most of them here. Support for this beta has been extended all the way back to the original Google Pixel and Pixel XL. So Android Q Beta 1 is available on every Pixel phone. While you can install Android Q beta 1 on Pixel, Pixel 2 and Pixel 3 right now, it may not be such a good idea.
Note
This is beta software and we cannot stress this enough. It may have bugs, will have bugs and there’s no guarantee how small or huge the bugs may be. You must understand the risks involved and take full responsibility for your actions. You can proceed with confidence that the method does work. Still, things can go wrong. In which case, you must understand that you were warned, and you still went with it anyway. The good thing is that unlike rooting your phone, installing beta software will not void your warranty.
But you may end up losing your data if things go south. Therefore, make sure you have backed up everything important, including files and folders on your device’s internal storage.
Create backup
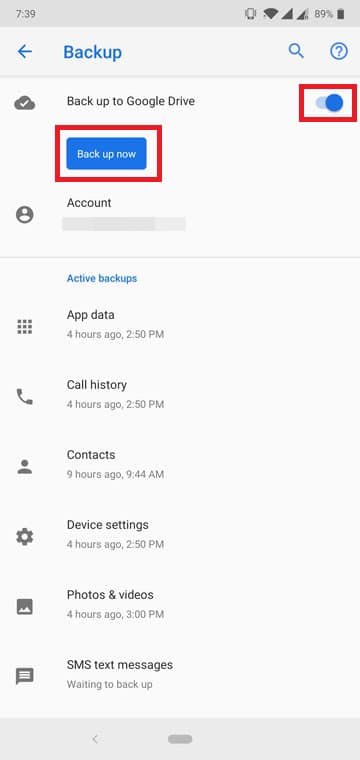
Creating a backup is never a bad idea. On your Pixel smartphone, go to Settings > System > Backup. Here you can see if automatic backup is turned on. If it isn’t, well, turn it on and if it is on, you can also see how recently your data was backed up. You can also see which data was backed up. If you think the backup was done recently enough, that’s good.
If you prefer, you can tap on the Backup now button to start the backup process manually. The process can take some time to complete but if things do go wrong with Android Q and you return to Android Pie, you’d be happy to have all your call logs, contacts, SMS messages, etc.
Install Android Q Beta 1 on Pixel phones (for non-rooted phones)
The simplest, easiest way to install the Android Q Beta 1 on Pixel phones is to enroll in the beta program. Just visit this link, log in with the Google account you’re using on your Pixel and you should find it towards the bottom under the list of eligible devices. Once you enroll, you should soon receive an over-the-air or OTA update on your selected Pixel phone. You may have to manually check the System update if you don’t get a notification. This can be done by going to Settings > System > System updates.
You can opt-out of the beta program anytime you like but there are consequences. Here’s what Google has to say about it.
“You may opt out of the programme at any time to return to the stable, public version of Android. If you opt out when your device is running a beta version of Android, all user data on the device will be wiped. If you choose to stay enrolled until the end of the programme, you will graduate from the programme and receive an update to the stable public release of Q. Your device will not be wiped.”
Install Android Q Beta 1 on Pixel phones (for rooted phones)
If you’ve unlocked the bootloader on your Pixel phone, installed TWRP recovery, rooted it with Magisk, etc. you’ll need to install the factory images. Doing it this way requires a few extra things other than having a Pixel phone and internet.
Requirements
- Unlocked bootloader. Unlocking the bootloader on Google’s phones is pretty easy. We’ve published a guide on how to unlock the bootloader on Google Pixel and Pixel XL. That method still holds true for any Pixel phone.
- A computer with ADB and Fastboot installed. There are a few ways to install ADB and Fastboot on your computer if you haven’t already. You can follow our guides for Windows, Linux, and Mac, depending on the OS you use to install it.
- Enable USB debugging on your phone.
- Android Q Beta 1 factory image for your Pixel phone. You can download the factory images from below.
Downloads
| Device | Factory Image |
|---|---|
| Google Pixel | QPP1.190205 |
| Google Pixel XL | QPP1.190205 |
| Google Pixel 2 | QPP1.190205 |
| Google Pixel 2 XL | QPP1.190205 |
| Google Pixel 3 | QPP1.190205 |
| Google Pixel 3 XL | QPP1.190205 |
How to install
First of all, unzip the downloaded factory image. It would be ideal to unpack all of it inside the platform tools or the adb folder. Launch adb when you’re ready. Then connect your device to the computer using a USB cable and reboot it into fastboot mode with the following command.
adb reboot bootloader
Note: If you choose to extract the contents elsewhere, make sure you enter the full path to the images that you flash using the commands below. This will wipe your entire device, including the internal storage.
- The first file to flash is the updated bootloader, and it can be done with this command.
./fastboot flash bootloader [bootloader file].img
- You can see the progress in the terminal or command prompt window even though you would see nothing on your phone. Once the bootloader is updated, reboot to the bootloader using the following command.
./fastboot reboot-bootloader
- Now flash the updated radios with this command.
./fastboot flash radio [radio file].img
- Reboot again.
./fastboot reboot-bootloader
- And finally, flash the image file.
./fastboot -w update [image file].zip
Once everything is flashed, your device will reboot automatically and boot into Android Q.


Join The Discussion: