Samsung has already rolled out Android Oreo for all of its flagship devices that were shipped with Android Nougat out of the box. The company is now working on an Android Pie update for its latest flagship devices. Although it has been about two months since Android Pie was released, Samsung is still pushing Oreo updates to many of its new devices not even a year old. The Samsung Galaxy J7 2017 is one such device. At least the company hasn’t forgotten about these budget devices. Read on to download and install the stock Android 8.1 Oreo firmware on Galaxy J7 2017. It’s available for multiple US models of the phone from carriers like Verizon, AT&T, T-Mobile, Sprint, US Cellular, and MetroPCS.
The updated firmware brings Samsung Experience 9.5 built on top of Android 8.1 Oreo to the Samsung Galaxy J7 2017.
Prerequisites
- You’ll need to download Odin3 v3.13.1 which is the official tool from Samsung to install updates on Samsung smartphones onto your PC/Laptop. You can find the download link in the Downloads section below.
- Enable USB debugging on your Galaxy J7.
- Make sure to have at least 50% battery or more to proceed with this installation.
- Perform a complete backup of your personal data, including the storage. If you have TWRP installed, you may as well perform a full NANDroid backup from the recovery and/or a Titanium Backup backup if your device is rooted. We’ve already put up guides on using Titanium Backup if you’re interested. We also have some other backup guides which aren’t as wholistic but if you’re not looking to pay for the full version of Titanium Backup, these might be helpful.
- Download Samsung Odin3_v3.13.1.zip
Note
The following tutorial and Android Oreo firmware downloads are only meant for the following variants of the Samsung Galaxy J7: SM-J727P/SM-J727V/SM-J727VPP/SM-J727A/SM-J727R4/SM-J727T/SM-J727T1. So before you begin the installation process, check your device’s model number and make sure you have the appropriate firmware file for your Galaxy J7. If you have any other variant, do not proceed any further as this will not be compatible with your device.
Download Android 8.1 Oreo Firmware for Galaxy J7 2017
Download the appropriate Oreo firmware from below depending on your carrier and phone model.
- AT&T Galaxy J7 2017 (SM-J727A)
- MetroPCS Galaxy J7 2017 (SM-J727T1)
- Sprint Galaxy J7 2017 Perx (SM-J727P)
- T-Mobile Galaxy J7 2017 (SM-J727T)
- US Cellular Galaxy J7 2017 (SM-J727R4)
- Verizon Galaxy J7 2017 (SM-J727V)
- Verizon Galaxy J7 2017 (Prepaid) (SM-J727VPP)
Related post: Download Android 8.1 Oreo Firmware for Galaxy J7 & Galaxy J7 Pro 2017
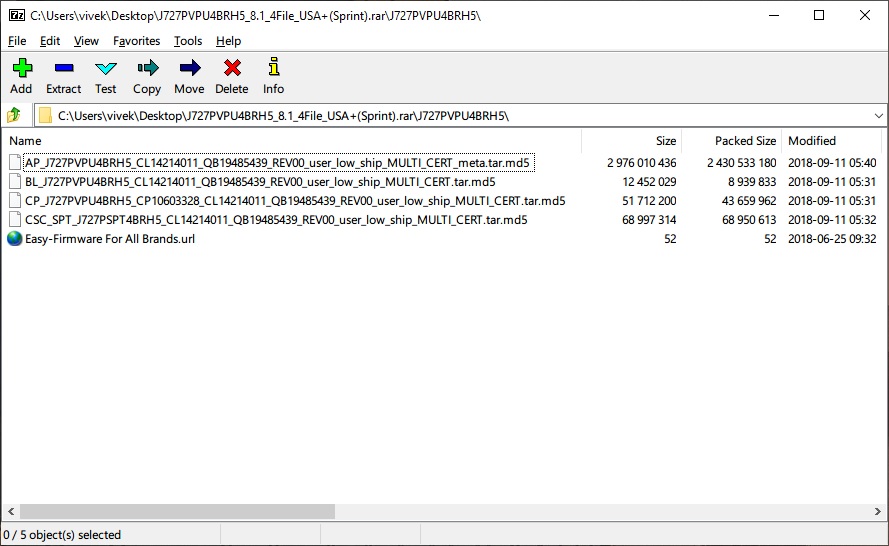
Download the Oreo firmware for your phone and extract the downloaded ZIP on the PC. You should have 4 extracted firmware files in ‘.tar‘ or ‘.tar.md5‘ format.
Connect your Galaxy J7 2017 to ODIN
- Extract the Odin ZIP to an easily accessible location on the PC.
- Open the extracted ODIN folder and double-click on ‘Odin3.exe‘ file.
- Disconnect your device from PC if it is connected.
- Reboot your phone into Download mode:
- Power off your device. Wait for a couple of seconds after screen goes off.
- Press and hold the Volume down + Power + Home buttons together until you see a warning screen.
- Press Volume Up to continue to download mode.
- Once in download mode, connect your phone to PC via USB cable and make sure that the ID:COM port on ODIN turns blue. If it doesn’t, your phone either isn’t properly connected or you don’t have the necessary Samsung USB Drivers.
Install Android 8.1 Oreo Firmware on Galaxy J7 2017
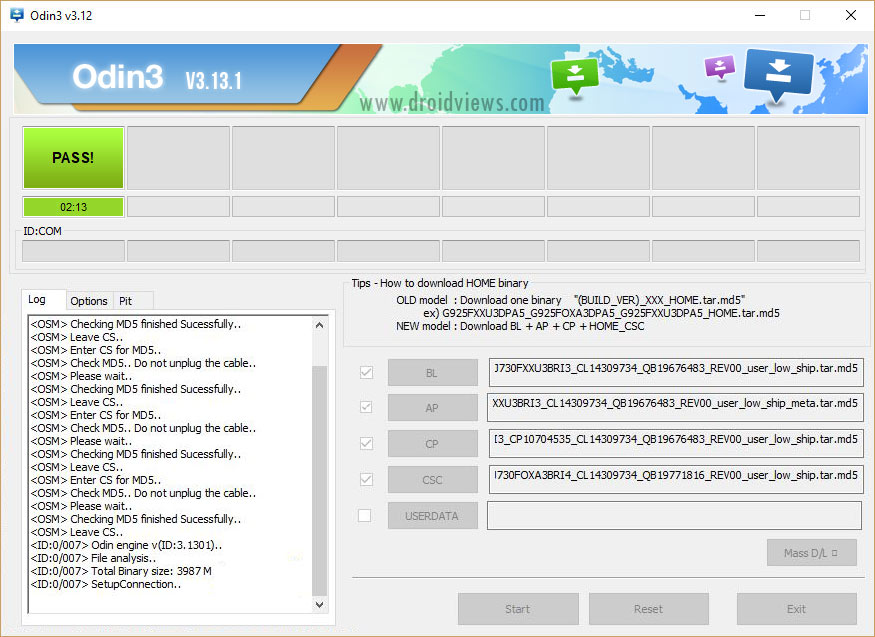
- In ODIN, you will see 4 fields with four buttons – BL, AP, CP, and CSC – as seen from the screenshot attached below.

- Now, click on the 4 buttons one by one in ODIN and select the appropriate files from the extracted folder. For instance, click on the BL button and select the extracted firmware file which has a name that starts with BL_. Similarly, click on the AP, CP and CSC buttons and select the files with initials AP, CP, and CSC respectively.
- Make sure that you choose the ‘HOME_CSC’ file and not the regular CSC file. Using the regular CSC file will wipe your phone completely, including the internal storage.
- On the left-hand side, under the Options tab, make sure only AutoReboot and F.Reset Time are checked.
- When you’re ready, click on the Start button in Odin.
- Wait for ODIN to flash the firmware onto your device. This can take some time.
- Once the process is finished, you should see a PASS! message displayed on ODIN.
Your device will automatically reboot into Android Oreo but the first boot could potentially take longer than usual.
Thanks to deadman96385 from XDA developers forums for uploading the firmware files for us!


Join The Discussion: