If you’ve been buying Samsung flagships lately, and you’re a fan of rooting them as well, you’d know how notoriously difficult it is becoming to root Samsung devices. Especially when it comes to not tripping security flags like Knox. Knox is the security suite on Samsung devices which trips in the event of any modifications done to the device. This disables Samsung Pay and also voids your warranty. The Snapdragon variants especially have been more difficult to root it seems. It has been an established fact now that the Exynos variants receive much more of the developer love. This has been true again for the Galaxy Note 8. The Exynos variant received its TWRP and thus root a while back. Better late than never though, the Snapdragon Galaxy Note 8 has received root as well now. Even better, without tripping Knox.
Luckily for the Note 8 users in the USA, this did not take as long as the Galaxy S8 and S8 Plus Snapdragon variants. The Galaxy Note 8 is rootable via XDA member me2151‘s aptly named SamFAIL utility. There are a few caveats involved though. The team behind it have reworked a stock image to include root and modified the boot image. So it may not trip Samsung’s Knox, but it does break Google’s SafetyNet. And no, you cannot bypass SafetyNet by installing Magisk because you cannot install Magisk. To make things even worse, if you do decide to root your Note 8 via this method, it will limit your Note 8’s charging to 80%. Some people have claimed this is only a visual problem and the battery actually does charge to 100%.
The process won’t SIM unlock your device nor unlock the bootloader but simply root it. Fortunately, you can safely return back to the stock software by simply flashing it via ODIN. This won’t trip Knox either and will restore the SafetyNet to normal. Obviously, of course, flashing the stock software will do away with root access and the 80% charge limit. The method has been tested on N950U but should also work for other Snapdragon variants on the Note 8.
Prerequisites
- Make sure the battery on your Note 8 is charged at least up to 50% so as to avoid any accidental shutdowns.
- Install Samsung USB drivers on your PC.
- Download the CSC file for your particular device. We’ve listed the CSC files for the US Snapdragon variants in the download section below. You MUST use the CSC matching your device or your network will not function correctly.
- Back up all your data, including everything on the internal storage because it will be wiped clean during the process.
- Install Minimal ADB and Fastboot on your PC.
Downloads
Main files
- ODIN
- N8_SamFAIL_SYSTEM
- N8_SamFAIL_FIRMWARE
- fsck.ext4
CSC
How to root Galaxy Note 8 (Snapdragon)
Flash N8_SamFAIL_SYSTEM
- Download the N8_SamFAIL_SYSTEM file from above. This is a pre-rooted system file.
- Extract the system.tar and PIT files from the zip.
- Launch Comsey ODIN on your PC. If you don’t already have the Comsey ODIN you can download it from above.
- Boot your Note 8 into Download mode. To do so, power it off and then press and hold the Bixby and Volume Down buttons together. While holding the two buttons press and hold the power button to switch on the device. Leave the keys once you see a message displayed on the screen and press Volume Up to boot into download mode.
- Now connect it to your PC via a USB cable. Make sure the connection isn’t loose.
- If your Note 8 is detected correctly, you’ll notice the ID:COM port turns blue.
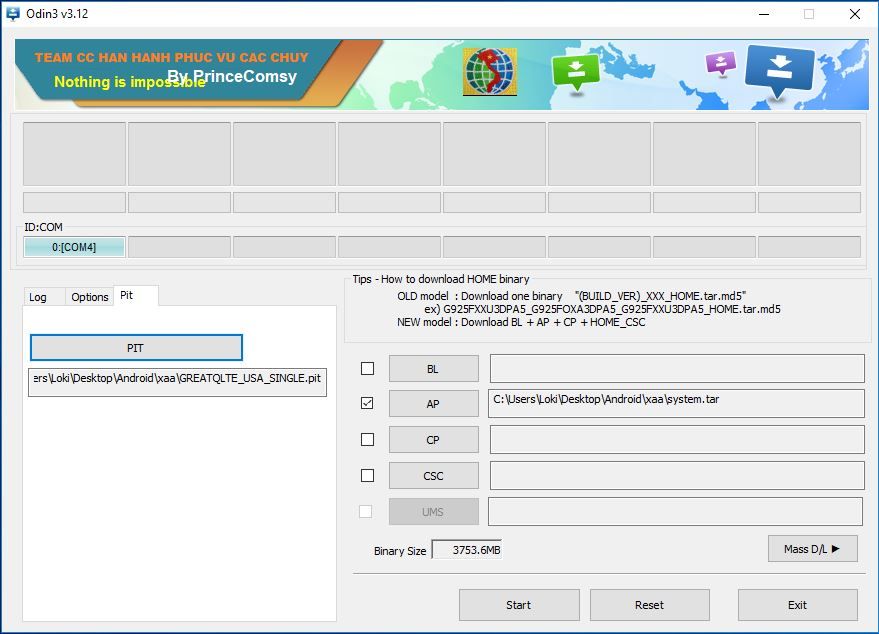
- Click on the AP button and select the extracted system.tar file.

- Go to the Pit tab on the left and click OK or Close on the warning box. Then click on the PIT button and select the extracted PIT file.
- Now go to the Options tab and select the following :
- Auto Reboot
- F. Reset Time
- Nand Erase All
- Re-Partition.
- Make sure nothing else is selected and then click on the Start button.
- At the end of the process, ODIN will show a FAIL! message. This isn’t unexpected however so there’s no need to worry.

- Boot your phone into Download Mode again and don’t fret if it says it is in an emergency mode. This too is expected behavior.
Flash N8_SamFAIL_FIRMWARE
- Download and extract the N8_SamFAIL_FIRMWARE and CSC files onto your PC.
- Click the Reset button on ODIN or close it and launch it again, whichever method suits you.
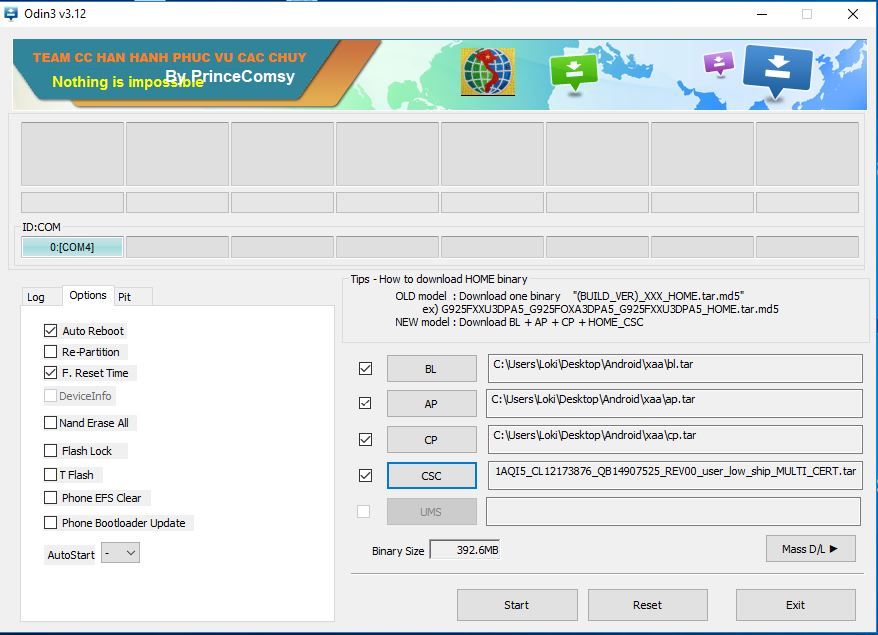
- Now to select the firmware, click on the BL button and select the bl.tar file. Similarly, click on the AP, CP and CSC buttons and select the ap.tar, cp.tar, and the extracted CSC files respectively.

- Before you click Start, head over to the Options tab and select only Auto Reboot and F. Reset Time. Do not select Nand Erase All or you’ll have to repeat the whole process again.
- Start the process now by clicking the Start button.
- You’ll see a PASS! message on ODIN this time and your device will reboot.
When your device comes back up, set it up normally and launch the SuperSU app. Follow the on-screen instructions and update the SU binary.
source: xda


I get booted to a kernel panic screen