Samsung Galaxy Note 8 is the latest and the last addition to Samsung’s flagship lineup for 2017. As is the case with Samsung flagships, there is a Snapdragon variant of the Galaxy Note 8 for the US, China, Japan, and Hong Kong. The rest of the world is sold the Exynos variant. Naturally, the Exynos variant then tends to receive a lot of developer love from developers all around the world. And this stays true with the Exynos variants of the Galaxy Note 8 which can now be equipped with an unofficial TWRP build. All thanks to XDA member geiti94. Consequently, users can also root the Galaxy Note 8.
Requirements
The guide below works for any Galaxy Note 8 device as far as the SoC powering it is an Exynos chip (N950F/FD/X/N). But before you can install TWRP and reap the benefits, you’ll have to make sure your device checks the following boxes.
- Your Galaxy Note 8 should have an unlocked bootloader.
- Make sure the device has at least 50% battery remaining before you begin the process.
- You must already have Samsung’s latest USB Drivers installed on your PC.
- Also, ensure that OEM Unlock and USB debugging have been enabled on your device. You can find both the options in Settings > Developer options. Developer options can be enabled by going to Settings > About phone and tapping on the Build number several times.
- While using Odin3, disable Samsung Kies if you have it installed on your PC.
- It would be wise to back up all your important data just in case.
Note
Okay, so you’re ready to install a custom recovery on your device and possibly root it too. But there are some things that you should consider before you move ahead.
- When you flash a custom recovery like TWRP, KNOX will be tripped. Meaning unless your country forces Samsung to provide warranty regardless of the software status, your warranty is void.
- You will no longer be able to install OTA updates from Samsung and that includes the Android 8.0 Oreo update Samsung has promised.
- The unofficial TWRP is not exactly bug-free. Although it does work well in most cases there is some room for improvement.
Also, make sure that in the rare case that things go south, you own up to the responsibility. DroidViews is not responsible for anything that might or might not happen to your device while following the guide. That said, the method described below has been tested by users and has been found to work.
Downloads
How to install TWRP on Samsung Galaxy Note 8
- Download TWRP for the Galaxy Note 8 from above.
- Download Odin and extract the contents of the zip.
- Now boot your Galaxy Note 8 to download mode. To do so, power it off and then press and hold the Bixby and Volume Down buttons together. While holding the two buttons press and hold the power button to switch on the device. Leave the keys once you see a message displayed on the screen and press Volume Up to boot into download mode.
- Right-click on the Odin3.exe file in and select Run as administrator.

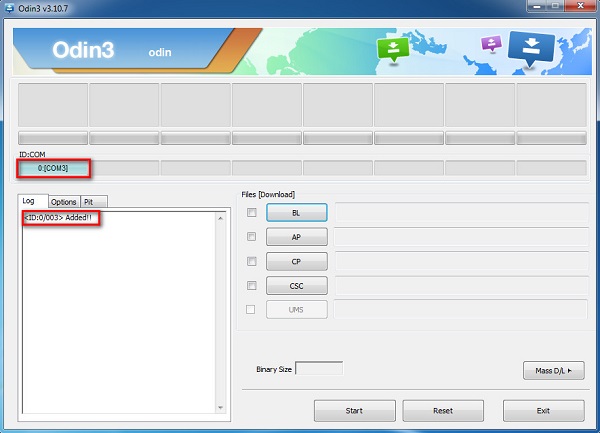
- Connect your phone to the PC with a USB cable and make sure the connection isn’t loose. The ID:COM port on Odin should turn blue if your device is detected and you’d see Added! in the Log box. If not, better check if you have the drivers installed correctly.

- Click on the AP button on Odin and select the file twrp-3.1.1-0-greatlte_V3.tar which you downloaded earlier.
- Make sure that under the Options tab, Auto Reboot and F . Reset Time options are checked and Re-Partition option should be unchecked.
- Click on the Start button in Odin to initiate the installation process of TWRP on Galaxy Note 8.
- A PASS! message will appear once the installation of TWRP on Galaxy Note 8 is successful. The device will reboot automatically.
How to root Samsung Galaxy Note 8
- Now that you have TWRP installed, download no-verity-opt-encrypt-5.1.zip and SuperSU zip from above and transfer them to your device.
- Simply boot your phone into recovery mode. To do this, power it off. Now press and hold the Volume Up and Bixby buttons together. While holding the two buttons press and hold the Power button to power on the device. Leave only the Power button once you see the Samsung logo.
- Your device should now be in TWRP recovery. Here, select Install and then select the no-verity-opt-encrypt-5.1.zip.
- Swipe at the bottom to flash the zip.
- Similarly, now flash the SuperSU zip.
- Once the process is complete, tap on the Reboot system button that appears.
It is also possible to root your device with Magisk instead which provides multiple benefits over Super SU. If you’d like to root via the latest Magisk v14, check out this guide. If you’ve never heard of Magisk, you can know more about it here.
source: xda


Join The Discussion: