Nexus devices are first to get the sweet new treats from Google every year. The top-of-the-line Nexus devices get the updates real quick but it takes considerable time for the older Nexus to enjoy the treat. The Nexus 7 2013 is a pretty old device and it’s unclear if there will be an official Android Nougat on Nexus 7 2013. If you’re still rocking your old Nexus 7 2013 and missing the Nougat, here’s some good news. DevSwift1 from XDA has released an AOSP based Nougat ROM for Nexus 2013. Yay!!!
The AOSP based Nougat ROM for Nexus 2013 seems to be quite stable and most of the bugs have been sorted out in the past couple of weeks. As per the latest build, almost everything works except for the 1080p video recording which is poor. Keeping aside the 1080p recording, all basic functions like audio, video, WiFi, GPS, NFC, MTP, GPU and sensors are working perfectly. Check out the below screenshots to get a sneak peak of the Nougat ROM on Nexus 2013
Screenshots
Also, check out the below video from XDA TV to check how buttery smooth the ROM is.
Like other ROMs, flashing this ROM is fairly simple and anyone with a minimum knowledge of flashing ROMs can do it with ease. All you need is an unlocked bootloader and a custom recovery like TWRP installed on your device. If you’re not sure, follow the below tutorial to flash Android Nougat on Nexus 7 2013.
Downloads
Android Nougat Gapps → Download
Flashing Instructions
Before we begin, make sure that you have taken backup of all the important files on your device. Copy all the files from internal storage to your PC beforehand. You can take a nandroid backup to backup the rest of your device.
- Download the ROM and Gapps package from the downloads section and transfer them to your device’s storage.
- Boot into recovery mode on your Nexus 7 2013. To do this:
- Power off your device and wait until it’s completely turned off.
- Press and hold Power + Volume Up buttons together and release them as soon as you see a menu.
- Scroll to the Reboot into Recovery option and press Volume Down button to enter into recovery mode.
- As you’re in the TWRP recovery, make a complete nandroid backup of your device. You can follow our definitive guide for nandroid backup from here.
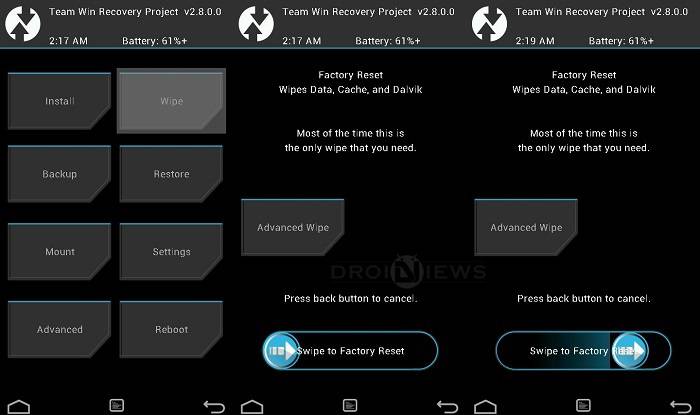
- Now, make a complete wipe of the device as we want a fresh installation. A factory reset will suffice but better make a full wipe. Click on Wipe » Advanced Wipe » Select system, data, cache, and Dalvik cache. Swipe to wipe them all.

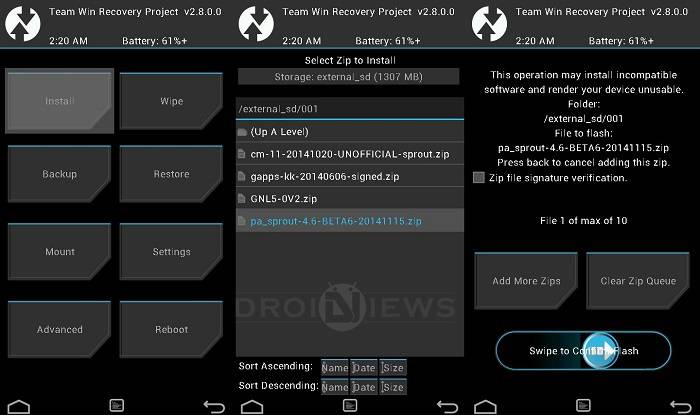
- Flash the custom ROM now. Choose theInstall or Install from SD card option from the recovery menu and choose the ROM zip from the file manager.

- Similarly, flash the Gapps file from recovery.
- Reboot the device once the flashing is complete.
As you have made a fresh OS installation, the first boot will take a bit of time. Once the boot is finished, you’ll be welcomed with the Android Nougat on Nexus 7 2013.
Let us know how the ROM performed on your device in the comments section below.


Join The Discussion: